Il monitoraggio con NetEye / Nagios di stati di un sistema come la lettura dell’utilizzo della CPU, il consumo di RAM disponibile e la banda di una scheda di rete utilizzata sono ormai task quotidiani. Piu’ interessante si presenta invece il monitoraggio del hardware stesso.
Questo articolo introduce le possibilita’ di controllare attivamente le temperature, le velocita’ delle ventole etc. di un sistema, evidenziato alle interfaccie messe a disposizione su motherboard Supermicro. Il sistema operativo utilizzato per questa introduzione e Microsoft Windows(R) XP. Questo non ci limita pero’ di utilizzare anche un altro sistema (per esempio Linux), importante che il manager fornito dal produttore rimanga compatibile.
Preparazione della macchina client
Le informazioni relativamente al sistema vanno letti via SNMP query, il che implicita che ci sia il servizio di “Simple Network Management Protocol” installato. Per installare questo servizio su Windows XP si procede dentro la gestione software nel menu “Aggiungi/rimuovi componenti Windows” e si attiva dentro la sezione “Management and Monitoring Tools” il flag di “Simple Network Management Protocol”.
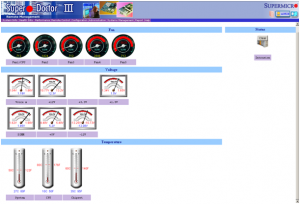
Il secondo step di configurazione comporta l’installazione del Software compatibile con la versione del proprio motherobard Supermicro (scaricabile dal sito del produttore) che e’ nel nostro caso il “Supermicro Doctor III”. Una volta eseguita l’installazione completa e gia’ possibile accedere, tramite webserver integrato, alla pagina di diagnosi e configurazione. Qui si accede gia’ ai valori attualmente rilevati dai sensori (-> vedi immagine sotto).

Integrazione del monitoraggio dentro NetEye
In questo momento e’ gia possibile integrare i valore ottenibili dai motherboard Supermicro assieme le soglie di warning e critical dentro il sistema di monitoraggio NetEye.
Come primo step e possibile scaricare il check specifico check_snmp_supermicro ed installarlo dentro la propria cartella dentro il server NetEye / Nagios. (Su NetEye e’ /usr/lib/nagios/plugins/ )
Definizione del check Command:
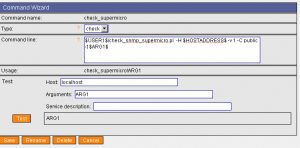
Dentro Monarch sotto il menu “Commands” si crea il commando “check_supermicro” come illustrato da vedeata. ($USER1$ sta per il path default dei plugin in NetEye)
A base di questo command si procede con la definizione dei vari servizi, le definizione dei controlli da eseguire.
La struttura di definizione e’ la seguente: check_supermicro!fan-speeds -w 1000:2500 -c 800:5500, dove “check_supermicro” e’ la chiamata del commando appena creato, >fan-speeds< la chiave del check da eseguire e -w <lowerbound-warning>:<upperbound-warning> e -c <lowerbound-critical>:<upperbound-critical>.
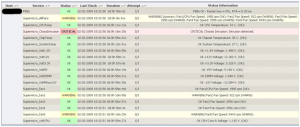
I controlli a disposizione(e le corrispettive chiavi da utilizzare) sono elencati di seguito. La disponibilita’ dei vari valori dipende dall’implementazione dei sensori e varia tra le verioni dei motherbaord supermicro:
– Temperatura sistema: (temp1)
OK System Temperature: 28 C. (OK)
– Temperatura CPU: (temp2)
OK CPU Temperature: 34 C. (OK)
– Temperatura Chip: (temp3)
OK Chipset Temperature: 36 C. (OK)
– Ventola 1 / CPU (fan1)
OK Fan1/CPU Fan Speed: 2033 rpm (OK)
– Ventola 2 (fan2)
WARNING Fan2 Fan Speed: 865 rpm (WARN)
– Ventola 3 (fan3)
OK Fan3 Fan Speed: 2556 rpm (OK)
– Ventola 4 (fan4)
OK Fan4 Fan Speed: 2518 rpm (OK)
– Ventola 5 (fan5)
CRITICAL Fan5 Fan Speed: 5625 rpm (CRIT)
– Check combinato tra tutte le ventole (Prende il valore peggiore come risulato finale) (fan-speeds)
WARNING Summary: Fan1/CPU Fan Speed: 2033 rpm (OK): Fan2 Fan Speed: 865 rpm (WARN): Fan3 Fan Speed: 2596 rpm (OK): Fan4 Fan Speed: 2518 rpm (OK): Fan5 Fan Speed: 5625 rpm (WARN):
– Tensione CPU (volt1)
OK CPU Core Voltage: 1.192 V. (OK)
– Fase + 12 Volt (volt2)
OK +12V Voltage: 11.904 V. (OK)
– Fase + 3,3 Volt (volt3)
OK +3.3V Voltage: 3.28 V. (OK)
– Fase + 1,5 Volt (volt4)
OK +1.5V Voltage: 1.496 V. (OK)
– DIMMs (volt5)
OK DIMM Voltage: 1.536 V. (OK)
– Fase + 5 Volt (volt6)
OK +5V Voltage: 5.152 V. (OK)
– Fase – 12 Volt (volt7)
OK -12V Voltage: -12.472 V. (OK)


Hallo Patrick,
there is a problem with the test_names and the real parameters what you match.
Another problem was the parameter for warning and critical in conjunction with negativ values minus12.
I hope i have fixed both things.
Where do i leave the patch for this?
Hi Ralf,
thank you for using and improving this plugin.
You can just drop me an e-mail and I will manage to update the version in this post and on monitoringexchange.org.
patrick.zambelli@wuerth-phoenix.com
Best regards
Patrick
Hello. It looks like the patch that Ralf was talking about was never added? My test_names and oids also don’t line up. When I do a snmpwalk on my supermicro server, I got 8 fan oid’s, 11 voltage oids and some others, like below:
SNMPv2-SMI::enterprises.10876.2.1.1.1.1.2.1 = STRING: “Fan1 Fan Speed”
SNMPv2-SMI::enterprises.10876.2.1.1.1.1.2.2 = STRING: “Fan2 Fan Speed”
SNMPv2-SMI::enterprises.10876.2.1.1.1.1.2.3 = STRING: “Fan3 Fan Speed”
SNMPv2-SMI::enterprises.10876.2.1.1.1.1.2.4 = STRING: “Fan4 Fan Speed”
SNMPv2-SMI::enterprises.10876.2.1.1.1.1.2.5 = STRING: “Fan5 Fan Speed”
SNMPv2-SMI::enterprises.10876.2.1.1.1.1.2.6 = STRING: “Fan6 Fan Speed”
SNMPv2-SMI::enterprises.10876.2.1.1.1.1.2.7 = STRING: “Fan7 Fan Speed”
SNMPv2-SMI::enterprises.10876.2.1.1.1.1.2.8 = STRING: “Fan8 Fan Speed”
SNMPv2-SMI::enterprises.10876.2.1.1.1.1.2.9 = STRING: “CPU1 Vcore Voltage”
SNMPv2-SMI::enterprises.10876.2.1.1.1.1.2.10 = STRING: “CPU2 Vcore Voltage”
SNMPv2-SMI::enterprises.10876.2.1.1.1.1.2.11 = STRING: “+5V Voltage”
SNMPv2-SMI::enterprises.10876.2.1.1.1.1.2.12 = STRING: “+12V Voltage”
SNMPv2-SMI::enterprises.10876.2.1.1.1.1.2.13 = STRING: “+5VSB Voltage”
SNMPv2-SMI::enterprises.10876.2.1.1.1.1.2.14 = STRING: “+1.5V Voltage”
SNMPv2-SMI::enterprises.10876.2.1.1.1.1.2.15 = STRING: “CPU1 DIMM Voltage”
SNMPv2-SMI::enterprises.10876.2.1.1.1.1.2.16 = STRING: “CPU2 DIMM Voltage”
SNMPv2-SMI::enterprises.10876.2.1.1.1.1.2.17 = STRING: “+3.3V Voltage”
SNMPv2-SMI::enterprises.10876.2.1.1.1.1.2.18 = STRING: “+3.3Vsb Voltage”
SNMPv2-SMI::enterprises.10876.2.1.1.1.1.2.19 = STRING: “VBAT Voltage”
SNMPv2-SMI::enterprises.10876.2.1.1.1.1.2.20 = STRING: “CPU1 Temperature”
SNMPv2-SMI::enterprises.10876.2.1.1.1.1.2.21 = STRING: “CPU2 Temperature”
SNMPv2-SMI::enterprises.10876.2.1.1.1.1.2.22 = STRING: “System Temperature”
SNMPv2-SMI::enterprises.10876.2.1.1.1.1.2.23 = STRING: “Chassis Intrusion”
SNMPv2-SMI::enterprises.10876.2.1.1.1.1.2.24 = STRING: “Power Supply Failure”
SNMPv2-SMI::enterprises.10876.2.1.1.1.1.2.25 = STRING: “DIMM Temperature”
So, the script needs to be modified or one just pulls the info via the standard check_snmp nagios script. I started to modify your script, but in the end as I am only interested in power supply failures I just query 1.3.6.1.4.1.10876.2.1.1.1.1.4.24 and go critical if its not 0. Thanks for sharing anyways, it gave me the right idea, i.e. superodoctor and snmp.
Cheers,
Swen
Hello Patrick Zambelli,
I am looking for SuperMicro server hardware health remote monitoring.
Do you recommend any software?
Hallo Mr. Rahhal,
the plugin I presented here has been written a couple of years ago. It is using the snmp mib base available on Supermicro hardware when installing the supermicro Doctor. This is basically the analog solution as HP asm or insight manager or dell openmanage.
So, basically install the supplier’s management software and then you have lots of hardware information available.
Rgds