


11. 04. 2024
Business Service Monitoring, NetEye, SLM

Icinga Web 2 is a powerful PHP framework for web applications in a clean, minimal design. It’s fast, responsive, accessible and easily extensible with modules. It can be installed quickly and easily from packages found in the official package repositories (see the resource links at the bottom of this blog post).
Besides the global configuration settings, each user has individual configuration options like the interface’s language, the current time zone, and the preferred theme. My aim here is to explain how you can easily create a new customized theme to make your Icinga interface the one you’ve always dreamed of.
Let’s start with some basics. A style is a collection of attributes that specify the look and format for a view or window. A style can specify attributes such as height, padding, font color, font size, background color, and much more. A theme is a style applied to an entire software GUI or app, rather than an individual view. When a style is applied as a theme, every view in the activity or app applies each style attribute that the view supports.
Icinga Web 2 is based on Less. Less is a CSS pre-processor, meaning that it extends the CSS language, adding features that integrate variables, mixins (snippets of reusable code), functions and many other techniques that allow you to make CSS more maintainable, themeable and extendible. Icinga Web 2 will automatically compile your new Less file, which can then be included in the actual CSS file seen by the browser.
The /themes/ folder
All Icinga Web 2 theme files are included in the /public/ directory, separated out among subdirectories for CSS, js, font, and images. In the /public/css/themes/ directory you will find the main theme file which is loaded automatically by the system. Creating a new .less file in the themes folder is probably the simplest way to customize your interface. In this case, you can easily change the colors, font, and logo. To do this you just need to copy and paste color and font variables and set them as you prefer.
@icinga-blue: #4CAF50;
@gray-lighter: #BDBDBD;
@link-color: #388E3C;

#icinga-logo {
    background-image: url('../img/your_theme/your_logo.png');
}
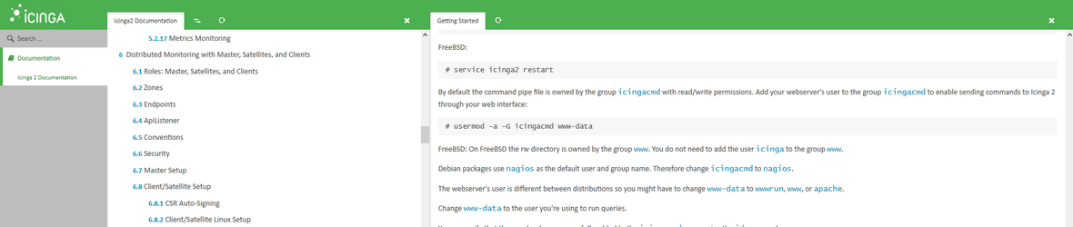
For example, if you create a file named your_theme.less and copy and paste the code above, you will see a new green version of the Icinga interface. Thus starting from this default configuration:

you will get this new view:
The theme file should be used mostly for small changes. But what should you do if instead you want to totally restyle the web interface?!?
Importing various theme-files
In a large CSS project, it is important to keep your code in defined sections. For this reason, I suggest you create a new directory in /public/css/ with the name of your new theme and then save all of your new style sheets there. In this case, the new CSS files won’t be automatically processed by Icinga. Unlike the typical Less structure where you can easily include files, the Icinga Web project has disabled this functionality. Thus you need to “hack” a customized version of the StyleSheet.php file.
This means that you cannot use @import to include your new stylesheet in the your_theme.less file. However, you can “force” this inclusion by customizing the StyleSheet.php. You can find this file in the “/usr/share/php/Icinga/Web/” directory. This file contains a large array listing all the theme files that are loaded.
 /**
 * Array of core LESS files Web 2 sends to the client
 *
 * @var string[]
 */
 protected static $lessFiles = array(
 '../application/fonts/fontello-ifont/css/ifont-embedded.css',
 'css/vendor/normalize.css',
 'css/vendor/tipsy.css',
 'css/icinga/base.less',
 'css/icinga/badges.less',
 'css/icinga/mixins.less',
 'css/icinga/grid.less',
 'css/icinga/nav.less',
 'css/icinga/main.less',
 'css/icinga/animation.less',
 'css/icinga/layout.less',
 'css/icinga/layout-structure.less',
 'css/icinga/menu.less',
 'css/icinga/tabs.less',
 'css/icinga/forms.less',
 'css/icinga/setup.less',
 'css/icinga/widgets.less',
 'css/icinga/login.less',
 'css/icinga/about.less',
 'css/icinga/controls.less',
 'css/icinga/dev.less',
 'css/icinga/spinner.less',
 'css/icinga/compat.less',
 'css/icinga/print.less',
 'css/icinga/responsive.less',
 );
All you need to do is just append your set of new theme files to the bottom of this array.
/**
 * Array of core LESS files Web 2 sends to the client
 *
 * @var string[]
 */
 protected static $lessFiles = array(
 '../application/fonts/fontello-ifont/css/ifont-embedded.css',
 'css/vendor/normalize.css',
 'css/vendor/tipsy.css',
 'css/icinga/base.less',
 'css/icinga/badges.less',
 'css/icinga/mixins.less',
 'css/icinga/grid.less',
 'css/icinga/nav.less',
 'css/icinga/main.less',
 'css/icinga/animation.less',
 'css/icinga/layout.less',
 'css/icinga/layout-structure.less',
 'css/icinga/menu.less',
 'css/icinga/tabs.less',
 'css/icinga/forms.less',
 'css/icinga/setup.less',
 'css/icinga/widgets.less',
 'css/icinga/login.less',
 'css/icinga/about.less',
 'css/icinga/controls.less',
 'css/icinga/dev.less',
 'css/icinga/spinner.less',
 'css/icinga/compat.less',
 'css/icinga/print.less',
 'css/icinga/responsive.less',

 'css/your_theme/mixins.less',
 'css/your_theme/nav.less',
 'css/your_theme/base.less',
 'css/your_theme/menu.less',
 'css/your_theme/layout.less',
 'css/your_theme/tabs.less',
 'css/your_theme/main.less',
 'css/your_theme/forms.less',
 'css/your_theme/login.less',
 'css/your_theme/controls.less',
 );
Custom theme file structure
My suggestion is to keep the same structure as the one Icinga Web uses. This means creating a file with the same name as Icinga’s, containing the style-rules for the related elements.
To do this you should inspect the element you want to customize in order to detect its HTML tag and find its style among the Icinga theme files. In order to easily achieve your goal you should disable the Icinga auto-reload on the page: click on the Icinga search bar, press SHIFT + TAB simultaneously until you see the “Disable auto refresh” message, and then press ENTER. In this way it should be easy for you to detect elements, reset the Icinga style and add your own style rules, keeping your project structure well-ordered and easy to understand.
For example, in the following images you can see the difference between the Icinga default menu structure on the left and the one we created for NetEye on the right.
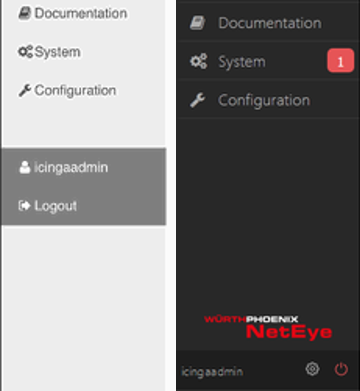
To create my advanced theme I used menu.less to completely restyle some menu elements. In my design mock-up, I put the user setting and logout sections at the bottom of the sidebar – like a fixed footer for the menu – and just above this section you can see the product logo.
Let’s go through the code in order to get an idea of what it means to reset Icinga’s style and refactor the components. An excerpt of the user-section style follows:
// This first level part is used for styling the <ul class="nav nav-level-1"><li class="nav-item user-nav-item"> element
.first-level-item {
    position: fixed;
    bottom: 0;
    height: 3.5em;
    width: 16em;
    padding: 0 .5em;
    display: flex;
    align-items: center;
    justify-content: space-between;

    border-left: none; // remove border for the .active state
    border-right: 1px solid @menu-user-settings-border; // Custom color variables
    border-top: 1px solid @menu-user-settings-border;
    background-color: @menu-user-settings-background;
    &:before { // hide the triangle
        display: none;
    }
    > a {
        .ellipsis(); // used for cutting long username
        display: inline-block;
        padding: 0 .5em 0 0;
        font-size: 12px;
		// hiding icon and other images
        .icon-user {
            display: none;
        }
        &::before {
            display: none;
        }
    }
}

// The second level class attaches the settings and logout sub-menu
// <ul class="nav nav-level-2"><li class="nav-item no-icon">

.second-level {
    // resetting Icinga style
    position: static;
    width: auto;
    padding: 0;
    background-color: transparent;
    color: inherit;
    line-height: initial;

    display: inline-block;
    white-space: nowrap;
    a::before {
        display: none;
    }
}
.second-level-item {
    // resetting Icinga style
    display: inline-block;
    width: auto;
    margin: 0;
    background-color: transparent;
	// account & logout links
    > a {
        width: 27px;
        height: 24px;
        padding: 5px;

        // hiding item label
        text-indent: 200%;
        overflow: hidden;
        background-repeat: no-repeat;
        background-origin: content-box;
        &:before{
            display: none;
        }
    }
    &:nth-child(1) a {
		// setting the cog image (base 64) as background for the settings link
        background-image: url("data:image/svg xml,%3Csvg xmlns='http://www.w3.org/2000/svg' viewBox='0 0 200 160'%3E%3Cpath d='...' fill='%23afafaf'%3E%3C/path%3E%3C/svg%3E");
    }
    &:nth-child(2) a {
		// setting the shutdown button as background for logout button
        background-image: url("data:image/svg xml,%3Csvg xmlns='http://www.w3.org/2000/svg' viewBox='0 0 200 160'%3E%3Cpath d='...' fill='%23e65456'%3E%3C/path%3E%3C/svg%3E");
    }
}

// applying the before define style to Icinga menu elements
body #menu .nav-level-1 > .user-nav-item {
    .first-level-item();
    &.hover, &.active, &:hover {
        .first-level-item();
        .nav-level-2 {
            .second-level();
            .nav-item {
                .second-level-item();
            }
        }
    }
    .nav-level-2 {
        .second-level();
        .nav-item {
            .second-level-item();
        }
    }
}
As you can see from the code above, you can use this advanced theming capability of Icinga to highly customize the environment, making it more closely match your needs but without affecting the PHP files containing the content and functionality that is so difficult to maintain if it must also manage layouts and themes.
Different version of your new custom theme
And if your design mock-up also includes multiple color themes? At this point I suggest you use some custom color variables. As you can see in the following code, I have replaced the Icinga colors with some custom values:
menu.less
#header-logo-container {
 background-color: @customer-logo-background;
 border-bottom: 1px solid @customer-logo-border;
 border-right: 1px solid @customer-logo-border;
}
#header-logo {
 background-image: url( @customer-logo-url );
}
/* Customer logo end */


#menu {
 height: 100%;
 background-color: @menu-background;
 border-right: 1px solid @menu-border;
}
In this way you can add as many color themes as you want in your /public/css/themes/ directory and easily switch your new Icinga web-interface between them. Below you can see an example with both light and dark themes, where the color variables merely have different values. At the same time you can also change the logo image if you need to invert logo colors to make it look more beautiful on different background colors.
light-theme.less
// Customer logo style
@customer-logo-url: "../img/your-theme/logo-light.svg";
@customer-logo-background: @white;
@customer-logo-border: @gray-lighter;

// Menu general style
@menu-background: @white;
@menu-border: @gray-lighter;
dark-theme.less
// Customer logo style
@customer-logo-url: "../img/your-theme/logo-dark.svg";
@customer-logo-background: @icinga-blue;
@customer-logo-border: @icinga-blue;

// Menu general style
@menu-background: @grey-dark;
@menu-border: @grey-dark;
Apply this procedure across your interface
Now you have the basic process down:
- Inspect the content you want to change
- Identify the corresponding tags
- Locate those tags in the Icinga theme .less file
- Create a new file in your theme folder with the same name as the Icinga theme file
- Add this new file into the StyleSheet.php file
- Edit the code to suit your needs
Repeat this process to edit the rest of the content you want to customize.
And You’re Done!
Well done! You’ve just fully customized your first Icinga template. I hope you’re now feeling confident enough to take on more code customization in the future.
The template we worked on might be a relatively simple one, but remember: the process for editing them is always the same, no matter how complicated a template might seem.
Resources
Icinga Web 2 Repository:
https://docs.icinga.com/icinga2/latest/doc/icingaweb/chapter/installation

Valentina Da Rold
Hi, I'm Valentina and I'm a Frontend Developer at Wuerth Phoenix. I started out my career applying my Cryptography skills to coding, but really quickly fell in love with the web. I have been making websites and applications since 2012 and I still can't get enough of it. Along the way I found a passion for front-end development, and I use this passion to create interfaces that solve problems. When I'm not creating beautiful solutions, I enjoy cooking or doing sport, while listening to beautiful music.
Author
Latest posts by Valentina Da Rold
19. 12. 2023
Development, Events, NetEye
We spent a (Vue)day in Verona
Good Job Valentina, tanks
Thx