30. 06. 2026
AI, Kubernetes

17. 11. 2026
Reinhold Trocker
Kubernetes, Log-SIEM
How to Run AutoOps in a Kubernetes Container on NetEye
Elastic AutoOps is a monitoring tool that collects metrics from your local Elasticsearch installation. This data is sent to your user space within Elastic Cloud and can tell you a lot about your installation, the health of the cluster, and how to improve it.
The AutoOps monitoring tool is implemented as an Elastic agent instance. But a NetEye node usually already has an Elastic agent running, and normally you cannot install two Elastic agents in parallel.
One solution is having Elastic AutoOps in a container, which enables independent deployment, makes upgrades predictable, and reduces complexity with other software on the host.
You could run AutoOps in a Docker environment or other similar methods (see deployment options), but I would suggest using Kubernetes, since it’s already part of NetEye: In fact, NetEye 4.49 was the first version to include Kubernetes as part of the product.
In short: Containerizing AutoOps on NetEye with Kubernetes isolates dependencies, simplifies version changes, and aligns the deployment with NetEye native operations.
This blog post also describes very practical settings regarding:
- Proxy settings
- API key creation in a local Elasticsearch installation
- Handling secrets/configs for the container
The main advantage is not only “running AutoOps in Kubernetes,” but doing so in a way that is supportable, versioned, and easy to reproduce on NetEye installations.
What You Need Before You Start
RKE2 Proxy
If your environment requires proxy access, you first need to configure the RKE2/containerd proxy settings on the target node before deploying AutoOps. Without that, the pod may fail to pull the image, or to reach required endpoints.
Add the proxy configuration to /neteye/local/rke2/conf/sysconfig/rke2-user-customization (and fill in “…” with appropriate values).
CONTAINERD_HTTP_PROXY=...
CONTAINERD_HTTPS_PROXY=...
CONTAINERD_NO_PROXY=...
Then restart the service:
systemctl restart rke2-server.serviceHow to Deploy AutoOps in a Container on NetEye
Add the Elastic Helm repository:
helm repo add elastic https://helm.elastic.co
helm repo update
Create the namespace:
kubectl create namespace autoops-agentsCreate the CA secret used by the agent to trust Elasticsearch
kubectl create secret generic npe-elasticsearch-dev-es-http-certs-public --from-file=ca.crt=/root/security/ca/root-ca.crt -n autoops-agentsCreate API key for Elasticsearch (if it doesn’t already exist)
See: Connect your ECE, ECK, or self-managed cluster to AutoOps | Elastic Docs
Create NetEye.Cloud onboarding information
Connect to your self-managed cluster:
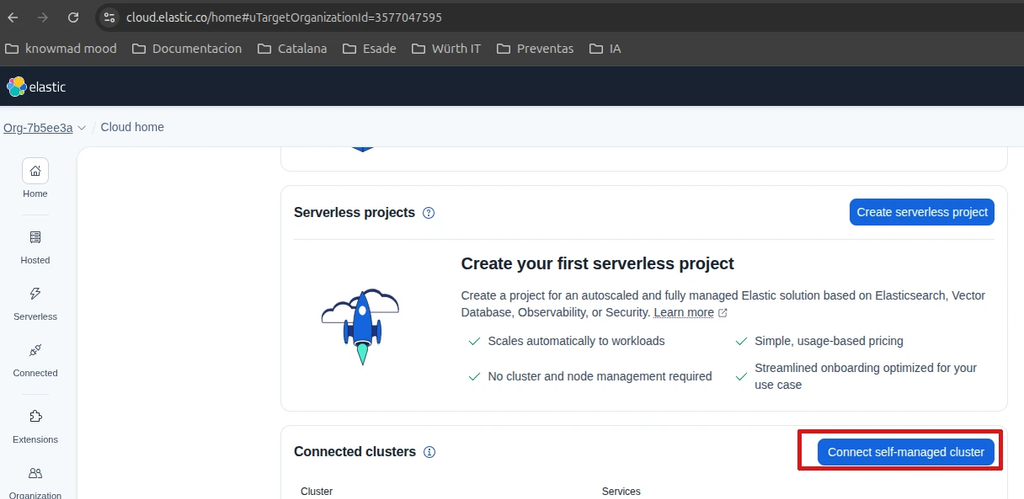
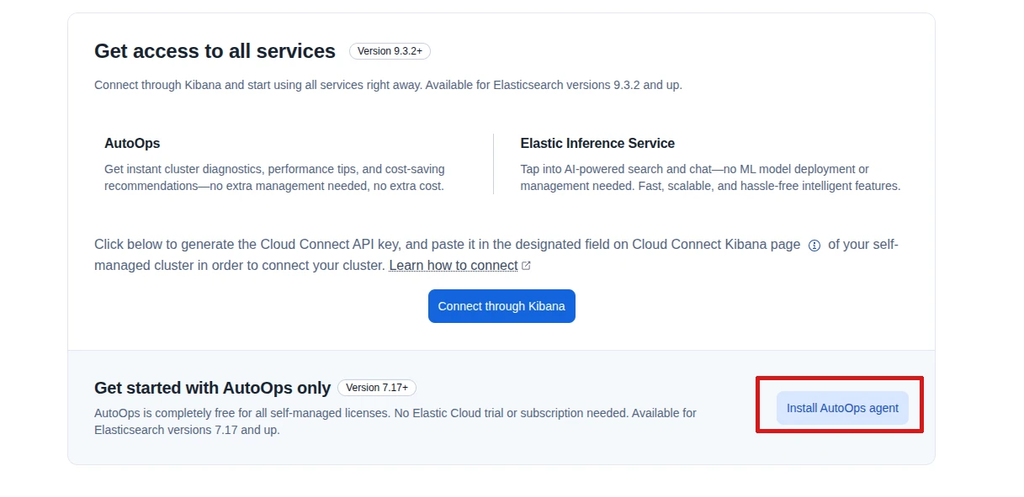
…click on “install AutoOps agent”:
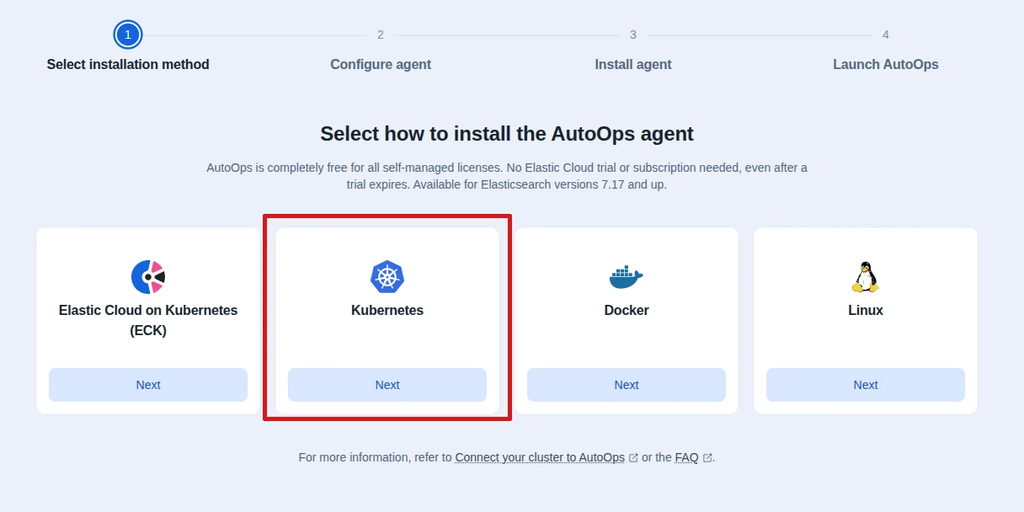
… and choose “Kubernetes”:
Now define the Elasticsearch endpoint URL:
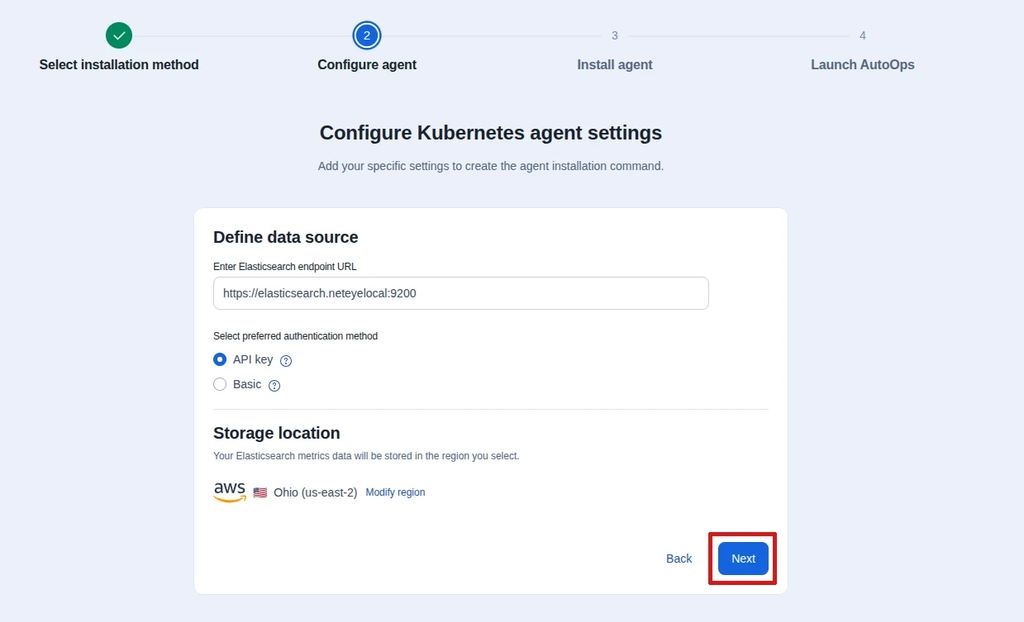
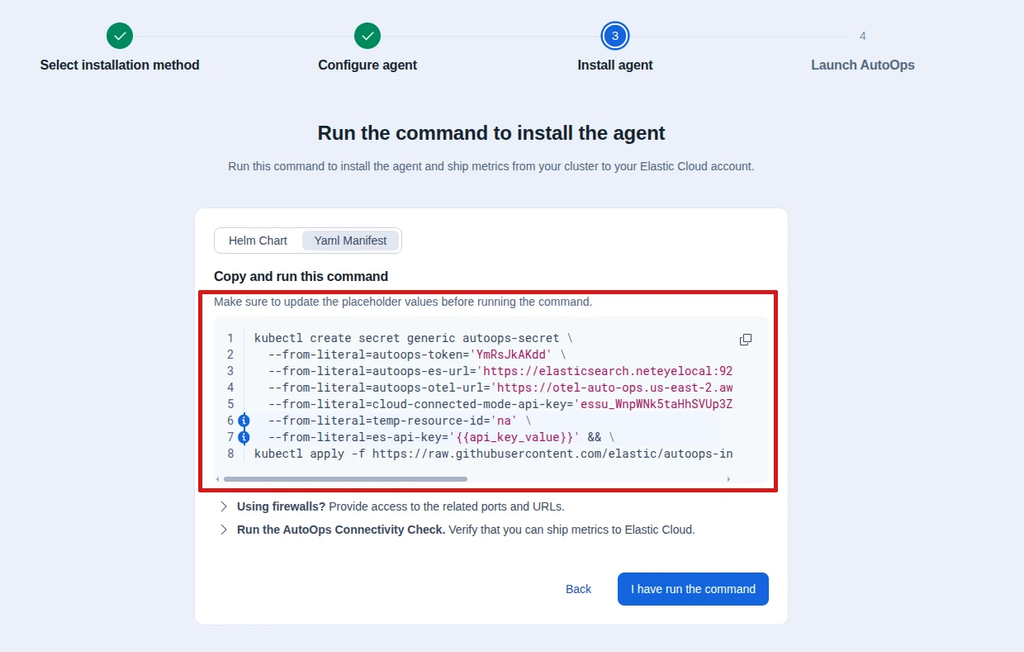
And take the information and overwrite it into the code block below (IMPORTANT: don’t close the browser tab)
Create the main AutoOps secret
Using the values provided by Elastic Cloud AutoOps, fill in “…” with appropriate values:
kubectl create secret generic autoops-secret \
  --from-literal=autoops-token='...' \
  --from-literal=autoops-es-url='https://elasticsearch.neteyelocal:9200' \
  --from-literal=temp-resource-id='...' \
  --from-literal=autoops-otel-url='https://otel-auto-ops.us-east-2.aws.svc.elastic.cloud' \
  --from-literal=cloud-connected-mode-api-key='essu_...' \
  --from-literal=es-api-key='...' \
  -n autoops-agents
Create the proxy secret
… in order to let the Elastic agent communicate with Elastic Cloud (and fill “…” with appropriate values):
kubectl create secret generic autoops-proxy \
  --from-literal=http_proxy='...' \
  --from-literal=https_proxy='...' \
  --from-literal=no_proxy='...' \
  -n autoops-agents
Create this file in the root path (enroll-autoops-kubernetes-via-helm.yaml):
apiVersion: apps/v1
kind: Deployment
metadata:
  name: autoops-elastic-agent
  namespace: autoops-agents
  labels:
    app: autoops-elastic-agent
    app.kubernetes.io/component: autoops
    app.kubernetes.io/name: autoops-elastic-agent
    app.kubernetes.io/version: 9.4.5
spec:
  progressDeadlineSeconds: 600
  replicas: 1
  revisionHistoryLimit: 10
  selector:
    matchLabels:
      app: autoops-elastic-agent
      app.kubernetes.io/instance: autoops-elastic-agent
      app.kubernetes.io/name: autoops-elastic-agent
  strategy:
    rollingUpdate:
      maxSurge: 25%
      maxUnavailable: 25%
    type: RollingUpdate
  template:
    metadata:
      labels:
        app: autoops-elastic-agent
        app.kubernetes.io/component: autoops
        app.kubernetes.io/instance: autoops-elastic-agent
        app.kubernetes.io/name: autoops-elastic-agent
    spec:
      containers:
        - args:
            - "--config"
            - "otel_samples/autoops_es.yml"
            - "--set"
            - 'receivers::metricbeatreceiver::metricbeat::modules=[{module: autoops_es, hosts: "${env:AUTOOPS_ES_URL}", period: 10s, metricsets: [cat_shards, cluster_health, cluster_settings, license, node_stats, tasks_management], ssl: { certificate_authorities: ["${env:AUTOOPS_CA_CERT}"] } }, {module: autoops_es, hosts: "${env:AUTOOPS_ES_URL}", period: 24h, metricsets: [cat_template, component_template, index_template], ssl: { certificate_authorities: ["${env:AUTOOPS_CA_CERT}"] } }]'
          env:
            - name: AUTOOPS_TOKEN
              valueFrom:
                secretKeyRef:
                  name: autoops-secret
                  key: autoops-token
            - name: AUTOOPS_ES_URL
              valueFrom:
                secretKeyRef:
                  name: autoops-secret
                  key: autoops-es-url
            - name: AUTOOPS_TEMP_RESOURCE_ID
              valueFrom:
                secretKeyRef:
                  name: autoops-secret
                  key: temp-resource-id
            - name: AUTOOPS_OTEL_URL
              valueFrom:
                secretKeyRef:
                  name: autoops-secret
                  key: autoops-otel-url
            - name: AUTOOPS_ES_USERNAME
              valueFrom:
                secretKeyRef:
                  name: autoops-secret
                  key: es-username
                  optional: true
            - name: AUTOOPS_ES_PASSWORD
              valueFrom:
                secretKeyRef:
                  name: autoops-secret
                  key: es-password
                  optional: true
            - name: AUTOOPS_ES_API_KEY
              valueFrom:
                secretKeyRef:
                  name: autoops-secret
                  key: es-api-key
                  optional: true
            - name: ELASTIC_CLOUD_CONNECTED_MODE_API_KEY
              valueFrom:
                secretKeyRef:
                  name: autoops-secret
                  key: cloud-connected-mode-api-key
                  optional: true
            - name: ELASTIC_CLOUD_CONNECTED_MODE_API_URL
              valueFrom:
                secretKeyRef:
                  name: autoops-secret
                  key: cloud-connected-mode-api-url
                  optional: true
            - name: http_proxy
              valueFrom:
                secretKeyRef:
                  name: autoops-proxy
                  key: http_proxy
            - name: https_proxy
              valueFrom:
                secretKeyRef:
                  name: autoops-proxy
                  key: https_proxy
            - name: no_proxy
              valueFrom:
                secretKeyRef:
                  name: autoops-proxy
                  key: no_proxy
            - name: AUTOOPS_CA_CERT
              value: /etc/ssl/certs/es-ca/ca.crt
          volumeMounts:
            - name: es-ca-certs
              mountPath: /etc/ssl/certs/es-ca
              readOnly: true
          image: >-
            docker.elastic.co/elastic-agent/elastic-otel-collector-wolfi:9.4.5
          imagePullPolicy: Always
          name: autoops-elastic-agent
          resources: {}
          terminationMessagePath: /dev/termination-log
          terminationMessagePolicy: File
      volumes:
        - name: es-ca-certs
          secret:
            secretName: npe-elasticsearch-dev-es-http-certs-public
            items:
              - key: ca.crt
                path: ca.crt
      dnsPolicy: ClusterFirst
      restartPolicy: Always
      schedulerName: default-scheduler
      securityContext: {}
      terminationGracePeriodSeconds: 30
Finally, deploy the manifest…
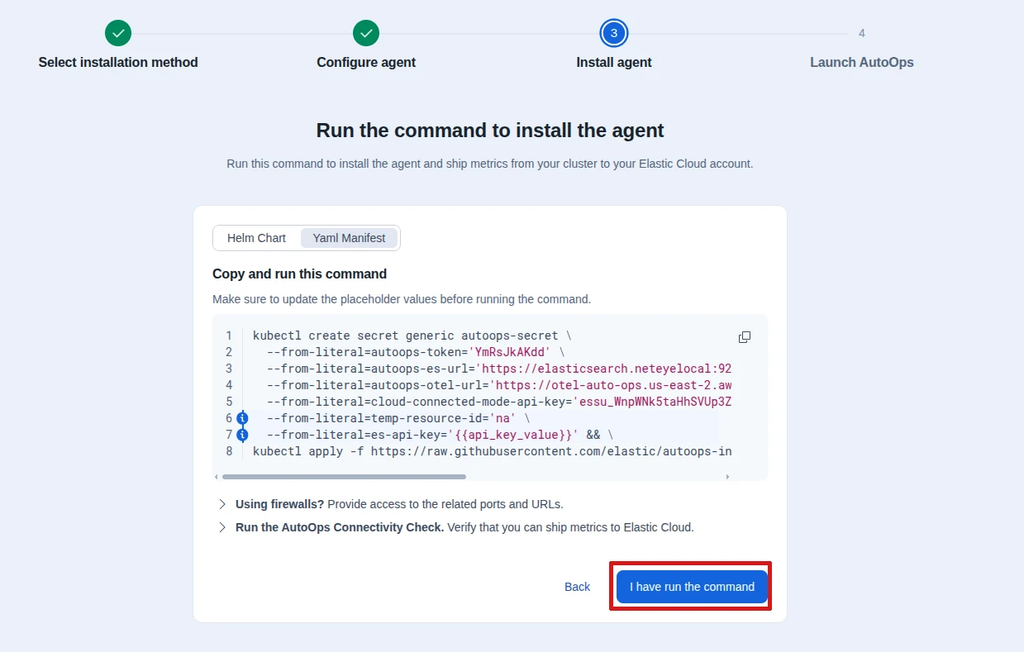
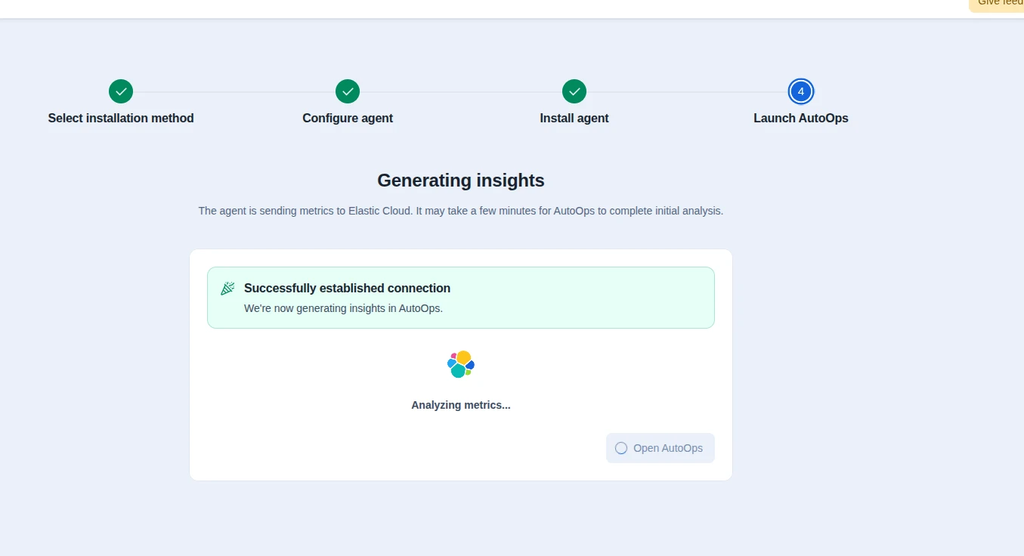
kubectl apply -f enroll-autoops-kubernetes-via-helm.yaml…and within NetEye.Cloud, confirm installation
Upgrades Are Straightforward
Another strong reason to run AutoOps in a container is how simple upgrading becomes. Instead of reworking a host installation, you only replace the deployment version and re-apply it.
Delete the current deployment
kubectl delete -f enroll-autoops-kubernetes-via-helm.yamlUpdate the version values in the manifest
- app.kubernetes.io/version
- The collector image tag, for example: docker.elastic.co/elastic-agent/elastic-otel-collector-wolfi:9.4.5 or :9.5.5
Now apply the deployment again:
kubectl apply -f enroll-autoops-kubernetes-via-helm.yamlThat gives consultants and operations teams a low-friction upgrade path with very little procedural overhead.
Here are some practical tips for consultants:
- Keep secrets externalized, and never hard code sensitive values in the YAML file
- Validate proxy reachability before troubleshooting AutoOps itself
- Use the same manifest structure across customers and only parameterize node, version, URLs, and secrets
For NetEye installations, this approach strikes the right balance between control and maintainability. It respects (1) network constraints such as proxies and (2) product constraints such as internal trust chains and existing container setup, while still giving teams a modern, Kubernetes-native way to operate AutoOps.
These Solutions are Engineered by Humans
Did you find this article interesting? Does it match your skill set? Our customers often present us with problems that need customized solutions. In fact, we’re currently hiring for roles just like this and others here at Würth IT Italy.

Reinhold Trocker
IT professional, IT security, (ISC)2 CISSP, technical consultant
Author

Latest posts by Reinhold Trocker
01. 09. 2026
Log-SIEM
Query Historical Data without Restoring Everything: Using Elasticsearch Searchable Snapshots
15. 12. 2025
Log Management, Log-SIEM
Strange Query Results in Kibana: Understanding the Behavior of event.original and Similar Fields