Introduction
Plugins are used to extend and modify the functions of GLPI. In this tutorial, we will see how to create from scratch a GLPI plugin for cloning Computers . This tutorial presumes that you have basic knowledge of GLPI.
Prerequisites
- GLPI <= 0.85
1. Creating a new plugin
Localize the installation folder of GLPI. In our case /var/lib/neteye/glpi. Inside it, you will find the folder plugins/ in which all GLPI plugins are installed.
Now we create a new folder within plugins/ and call it clonecomputer. Within clonecomputer we create the file setup.php.
<? # /var/lib/neteye/glpi/plugins/clonecomputer/setup.php

/**
 * Get the name and the version of the plugin - Needed
 */
function plugin_version_clonecomputer() {
   return array('name'           => "Clone Computer",
                'version'        => '1.0.0',
                'author'         => 'Davide Bizzarri',
                'license'        => 'GPLv2+',
                'homepage'       => '',
                'minGlpiVersion' => '0.85');
}
We now access the web interface Setup > Plugins and see the plugin we previously created.
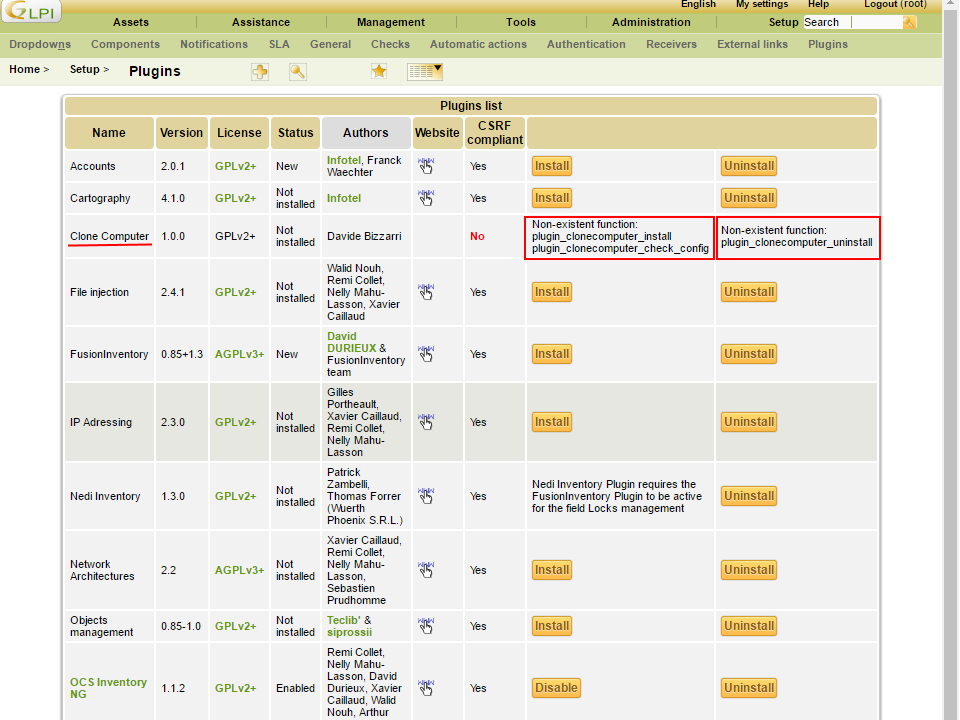
The plugin is not installed and enabled yet. To be able to install and enable it, we have to implement the functions plugin_clonecomputer_install and plugin_clonecomputer_uninstall in hook.php. To do so, we create the file hook.php within clonecomputer .
<? # /var/lib/neteye/glpi/plugins/clonecomputer/hook.php

/**
 * Called when user click on Install - Needed
 */
function plugin_clonecomputer_install() { return true; }

/**
 * Called when user click on Uninstall - Needed
 */
function plugin_clonecomputer_uninstall() { return true; }
In our case, it is not necessary to install or uninstall anything, therefore we keep this functions empty.
Finally, we have to implement the functions plugin_clonecomputer_check_config and plugin_clonecomputer_check_prerequisites in the file setup.php.
<? # /var/lib/neteye/glpi/plugins/clonecomputer/setup.php

...

/**
 *  Check if the config is ok - Needed
 */
function plugin_clonecomputer_check_config() {
    return true;
}

/**
 * Check if the prerequisites of the plugin are satisfied - Needed
 */
function plugin_clonecomputer_check_prerequisites() {

    // Check that the GLPI version is compatible
    if (version_compare(GLPI_VERSION, '0.85', 'lt') || version_compare(GLPI_VERSION, '0.86', 'gt')) {
        echo "This plugin Requires GLPI >= 0.85 and GLPI <0.86";
        return false;
    }

    return true;
}
Since we have no configuration to be controlled, the function plugin_clonecomputer_check_config always returns true.
In function plugin_clonecomputer_check_prerequisites we check that the installed GLPI version is not lower than 0.85 and not higher than 0.86. If this would not be the case, the message This plugin Requires GLPI >= 0.85 and GLPI <0.86 would be shown instead of the Install button.
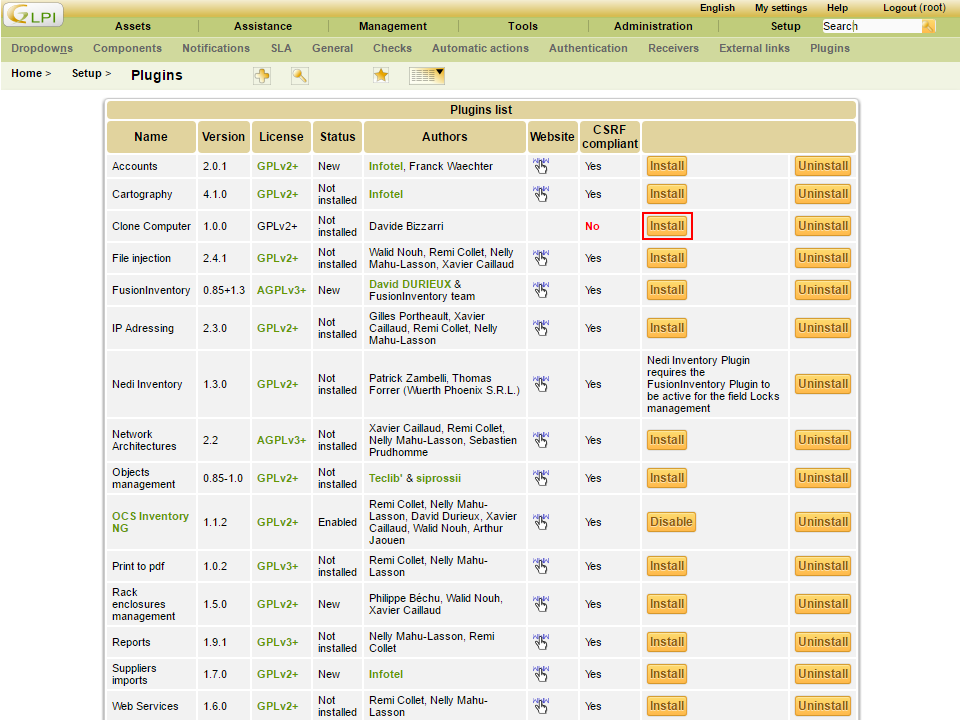
Now we can install and enable the plugin Clone Computer.
2. Adding the tab Clone Computer
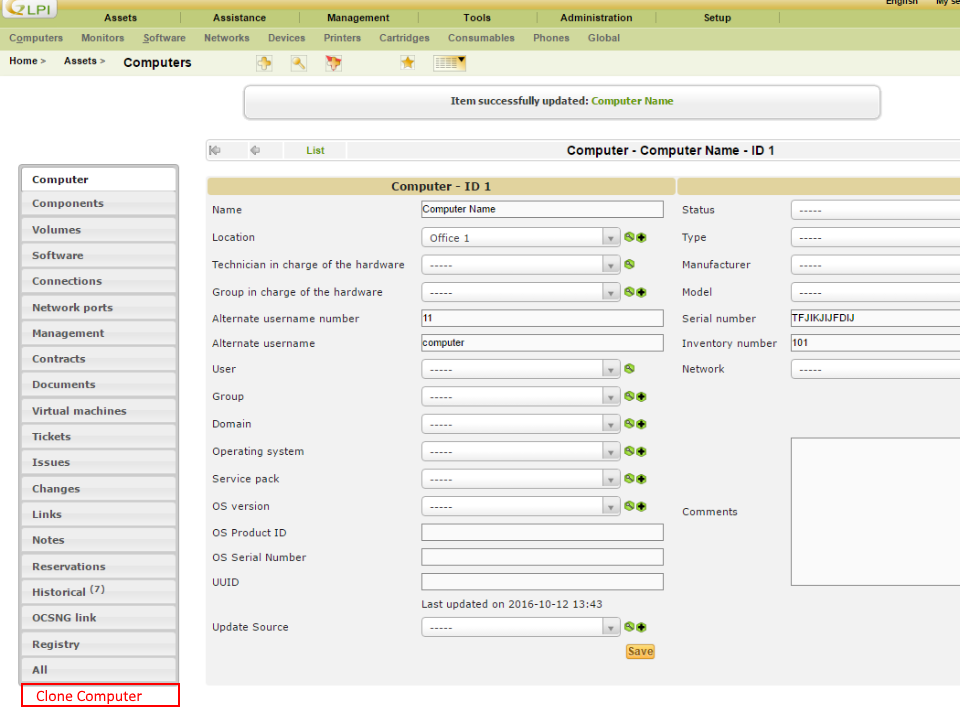
To insert the tab we have to implement the function plugin_init_clonecomputer in setup.php in which we will register the class PluginClonecomputerClone which will be recalled by GLPI to insert the tab and to visualize the content.
<? # /var/lib/neteye/glpi/plugins/clonecomputer/setup.php

...

/**
 * Init the hooks of the plugins -Needed
**/
function plugin_init_clonecomputer()
{
    global $PLUGIN_HOOKS;

    $PLUGIN_HOOKS['csrf_compliant']['clonecomputer'] = true;

    Plugin::registerClass('PluginClonecomputerClone', array('addtabon' => array('Computer')));

}
Now we create the class PluginClonecomputerClone in inc/clone.class.php.
<? # /var/lib/neteye/glpi/plugins/clonecomputer/inc/clone.class.php
class PluginClonecomputerClone extends CommonGLPI
{
/**
* This function is called from GLPI to allow the plugin to insert one or more item
* inside the left menu of a Itemtype.
*/
function getTabNameForItem(CommonGLPI $item, $withtemplate=0)
{
return self::createTabEntry('Clone Computer');
}
/**
* This function is called from GLPI to render the form when the user click
* on the menu item generated from getTabNameForItem()
*/
static function displayTabContentForItem(CommonGLPI $item, $tabnum=1, $withtemplate=0)
{
?>
<form action="../plugins/clonecomputer/front/clone.form.php" method="post">
<? echo Html::hidden('id', array('value' => $item->getID())); ?>
<? echo Html::hidden('_glpi_csrf_token', array('value' => Session::getNewCSRFToken())); ?>
<div class="spaced" id="tabsbody">
<table class="tab_cadre_fixe">
<tr class="tab_bg_1">
<td>
New Computer name:
<input type="text" name="name" size="40" class="ui-autocomplete-input" autocomplete="off">
<input type="submit" class="submit" value="CLONE" name="clone"/>
</td>
</tr>
</table>
</div>
</form>
<?
return true;
}
}
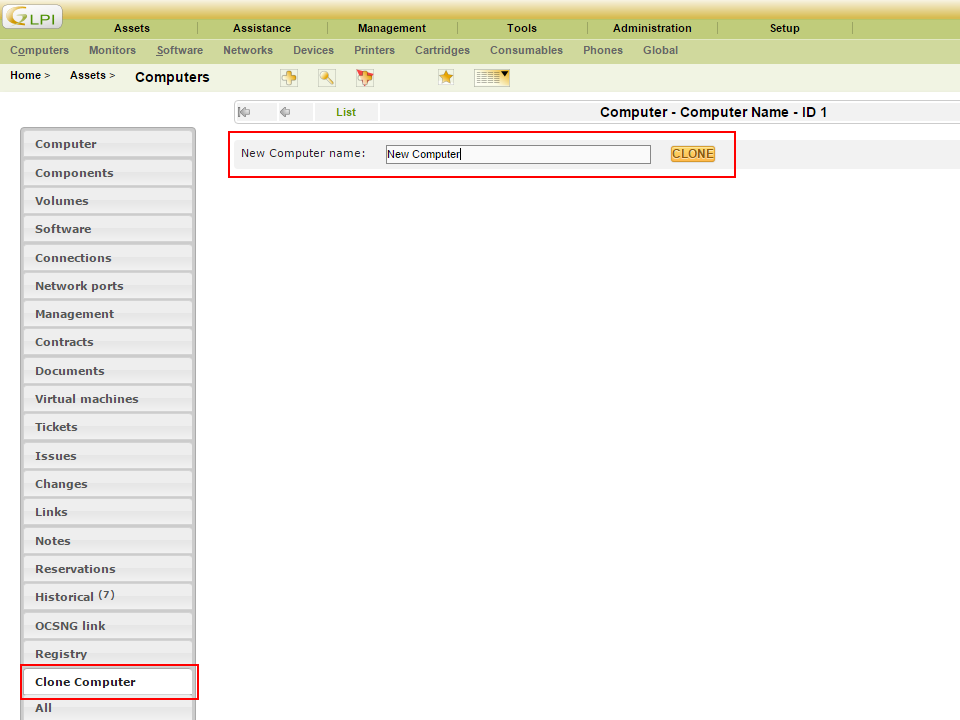
We access the web interface in Assets > Computers and select or create a new computer to visualize the Clone Computer tab. If it is not visualized, check if you have installed and enabeled the plugin (Setup > Plugins).
3. Implementing the action Clone
The form created by displayTabContentForItem() has ../plugins/clonecomputer/front/clone.form.php as action. Therefore, we have to create the file clone.form.php in front/ which manages the request sent by the form.
<? # /var/lib/neteye/glpi/plugins/clonecomputer/front/clone.form.php

// Load GLPI
define('GLPI_ROOT', '../../..');
include(GLPI_ROOT . '/inc/includes.php');

if ($_POST && isset($_POST['clone']) && isset($_POST['id'])) {

    // Check that a name has been passed
    if (!isset($_POST['name']) or empty($_POST['name'])) {
        Html::displayErrorAndDie('Please specified date');
    }

    // Load the Computer to be cloned
    $Computer = new Computer();
    $Computer->getFromDB($_POST['id']);

    // Reset id and change the name
    $Computer->fields['id'] = 'NULL';
    $Computer->fields['name'] = $_POST['name'];

    // Save the new Computer to the DataBase
    $Computer->addToDB();

    // Redirect the user to the new Computer
    $url = explode("?", $_SERVER['HTTP_REFERER']);
    Html::redirect($url[0] . "?id=" . $Computer->getID());

}
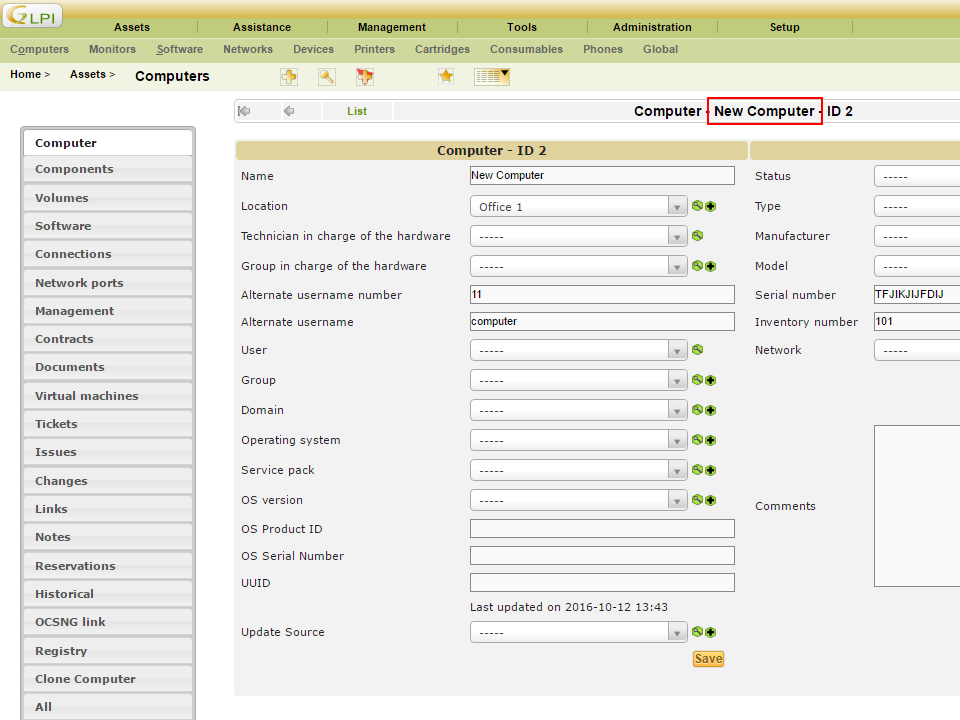
Let’s return to the web interface, insert a new name for the Computer and click on CLONE. The computer will be duplicated and we will be redirected to the new computer.
Conclusions
To know more about GLPI plugins, you can analyze the plugins realized by GLPI, which you can find on GitHub


Hello, tell me, please, did I get to install this plugin on 9.1 …?
Hi, I never tested the tutorial with the version 9.1 of GLPI. But if you need it just give a try and see if it is still working.