15. 06. 2026
NetEye, Unified Monitoring

Einleitung
Plugins werden benötigt um die Funktionen von GLPI auszuweiten oder anzupassen. In diesem Tutorial sehen wir, wie man eine einfaches GLPI Plugin für das Klonen von Computern erstellt. Für die Umsetzung benötigen Sie Grundlagenkenntnisse zu GLPI.
Systemanforderungen
- GLPI >= 0.85
1. Erstellen des neuen Plugins
Greifen Sie auf den Installationsordner von GLPI zu. In unserem Fall /var/lib/neteye/glpi. Hier finden Sie den Ordner plugins/ in welchem alle GLPI Plugins installiert sind.
Nun erstellen wir einen neuen Ordner in plugins/ und nennen ihn clonecomputer. In clonecomputer erstellen wir das File setup.php.
<? # /var/lib/neteye/glpi/plugins/clonecomputer/setup.php

/**
 * Get the name and the version of the plugin - Needed
 */
function plugin_version_clonecomputer() {
   return array('name'           => "Clone Computer",
                'version'        => '1.0.0',
                'author'         => 'Davide Bizzarri',
                'license'        => 'GPLv2+',
                'homepage'       => '',
                'minGlpiVersion' => '0.85');
}
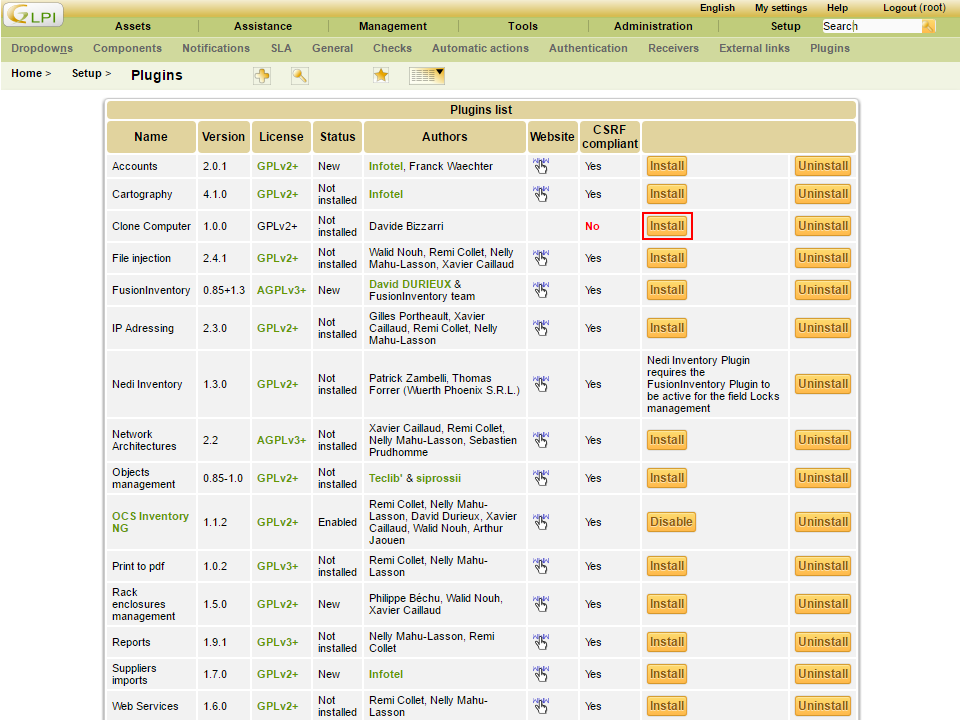
Wenn wir nun über die Weboberfläche einsteigen Setup > Plugins , sehen wir das soeben erstellte Plugin “Clone Computer”.

Aktuell ist das Plugin noch nicht installiert und aktiviert. Dafür müssen wir die Funktionen plugin_clonecomputer_install e plugin_clonecomputer_uninstall in hook.php implementieren. Wir erstellen also in clonecomputer das File hook.php.
<? # /var/lib/neteye/glpi/plugins/clonecomputer/hook.php

/**
 * Called when user click on Install - Needed
 */
function plugin_clonecomputer_install() { return true; }

/**
 * Called when user click on Uninstall - Needed
 */
function plugin_clonecomputer_uninstall() { return true; }
In unserem Fall, müssen wir nichts installieren oder deinstallieren, dementsprechend lassen wir diese Funktionen leer.
Nun müssen wir die Funktionen plugin_clonecomputer_check_config e plugin_clonecomputer_check_prerequisites im setup.php File implelentieren.
<? # /var/lib/neteye/glpi/plugins/clonecomputer/setup.php

...

/**
 *  Check if the config is ok - Needed
 */
function plugin_clonecomputer_check_config() {
    return true;
}

/**
 * Check if the prerequisites of the plugin are satisfied - Needed
 */
function plugin_clonecomputer_check_prerequisites() {

    // Check that the GLPI version is compatible
    if (version_compare(GLPI_VERSION, '0.85', 'lt') || version_compare(GLPI_VERSION, '0.86', 'gt')) {
        echo "This plugin Requires GLPI >= 0.85 and GLPI <0.86";
        return false;
    }

    return true;
}
Da wir keine Konfiguration haben, welche kontrolliert werden muss, gibt die Funktion plugin_clonecomputer_check_config immer den Wert true zurück.
In Funktion plugin_clonecomputer_check_prerequisites kontrollieren wir, dass die GLPI Version nicht niedriger als 0.85 und nicht höher als 0.86 ist. Wenn es so wäre, würde anstelle des Buttons Install folgende Information erscheinen This plugin Requires GLPI >= 0.85 and GLPI <0.86
Nun können wir unser Plugin Clone Computer installieren und aktivieren.
2. Hinzufügen des Clone Computer Tabs
Um den neuen Tab einzufügen, müssen wir die Funktion plugin_init_clonecomputer in setup.php implementieren. Dort registrieren wir die Klasse PluginClonecomputerClone welche von GLPI aufgerufen wird, um den Tab und den Inhalt darzustellen.
<? # /var/lib/neteye/glpi/plugins/clonecomputer/setup.php

...

/**
 * Init the hooks of the plugins -Needed
**/
function plugin_init_clonecomputer()
{
    global $PLUGIN_HOOKS;

    $PLUGIN_HOOKS['csrf_compliant']['clonecomputer'] = true;

    Plugin::registerClass('PluginClonecomputerClone', array('addtabon' => array('Computer')));

}
Nun erstellen wir die Klasse PluginClonecomputerClone in inc/clone.class.php.
<? # /var/lib/neteye/glpi/plugins/clonecomputer/inc/clone.class.php
class PluginClonecomputerClone extends CommonGLPI
{
/**
* This function is called from GLPI to allow the plugin to insert one or more item
* inside the left menu of a Itemtype.
*/
function getTabNameForItem(CommonGLPI $item, $withtemplate=0)
{
return self::createTabEntry('Clone Computer');
}
/**
* This function is called from GLPI to render the form when the user click
* on the menu item generated from getTabNameForItem()
*/
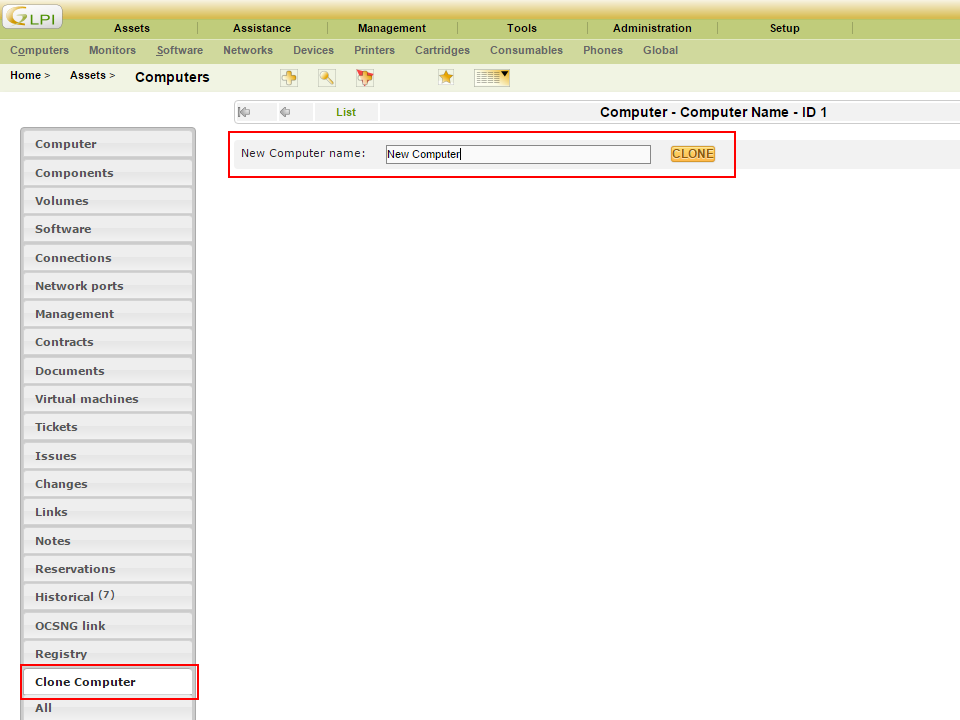
static function displayTabContentForItem(CommonGLPI $item, $tabnum=1, $withtemplate=0)
{
?>
<form action="../plugins/clonecomputer/front/clone.form.php" method="post">
<? echo Html::hidden('id', array('value' => $item->getID())); ?>
<? echo Html::hidden('_glpi_csrf_token', array('value' => Session::getNewCSRFToken())); ?>
<div class="spaced" id="tabsbody">
<table class="tab_cadre_fixe">
<tr class="tab_bg_1">
<td>
New Computer name:
<input type="text" name="name" size="40" class="ui-autocomplete-input" autocomplete="off">
<input type="submit" class="submit" value="CLONE" name="clone"/>
</td>
</tr>
</table>
</div>
</form>
<?
return true;
}
}
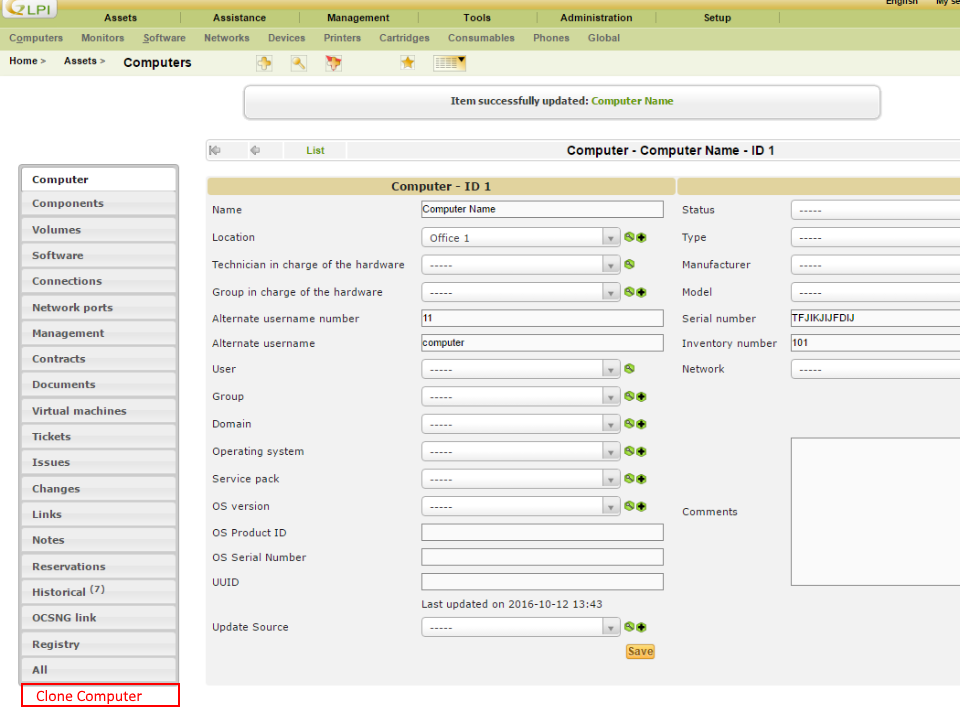
Wenn wir nun über die Weboberfläche einsteigen Assets > Computers können wir einen neuen Computer auswählen oder erstellen, um den Clone Computer Tab anzuzeigen. Wird er nicht angezeigt, vergewissern Sie sich, dass Sie das Plugin installiert und aktiviert haben. (Setup > Plugins).
3. Implementierung der Aktion Clone
Das Formular, welches von displayTabContentForItem() erstellt wurde, hat als Aktion ../plugins/clonecomputer/front/clone.form.php. Wir müssen also das File clone.form.php in front/ erstellen, welches die Anfrage verwaltet.
<? # /var/lib/neteye/glpi/plugins/clonecomputer/front/clone.form.php

// Load GLPI
define('GLPI_ROOT', '../../..');
include(GLPI_ROOT . '/inc/includes.php');

if ($_POST && isset($_POST['clone']) && isset($_POST['id'])) {

    // Check that a name has been passed
    if (!isset($_POST['name']) or empty($_POST['name'])) {
        Html::displayErrorAndDie('Please specified date');
    }

    // Load the Computer to be cloned
    $Computer = new Computer();
    $Computer->getFromDB($_POST['id']);

    // Reset id and change the name
    $Computer->fields['id'] = 'NULL';
    $Computer->fields['name'] = $_POST['name'];

    // Save the new Computer to the DataBase
    $Computer->addToDB();

    // Redirect the user to the new Computer
    $url = explode("?", $_SERVER['HTTP_REFERER']);
    Html::redirect($url[0] . "?id=" . $Computer->getID());

}
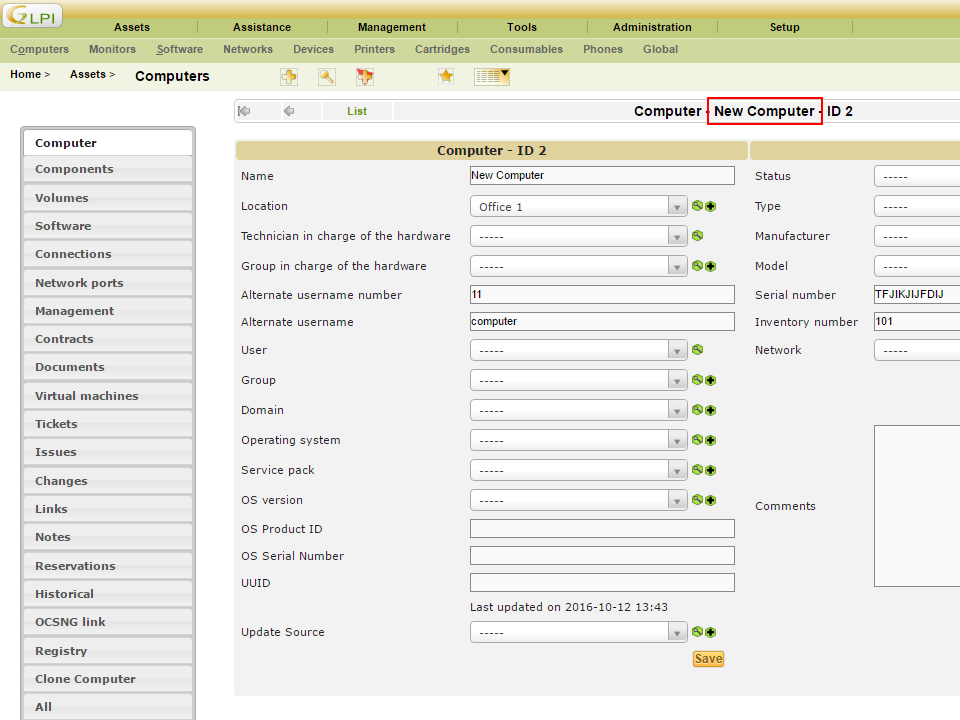
Kehren wir nun zur Weboberfläche zurück und geben wir dort einen neuen Namen für den Computer ein und klicken wir auf CLONE. Der Computer wird nun dupliziert und wir werden zum neuen Computer weitergeleitet.
Für weitere Informaitonen zu GLPI Plugins, können Sie sich auch die von GLPI entwickelten Plugins auf GitHub ansehen.

Davide Bizzarri
R&D Software Engineer at Würth Phoenix
Hi, I'm Davide! I’m a full stack developer at Würth Phoenix. I started to use a PC at the age of ten when my parents bought our first family PC: an old Windows 98. Then, in high school, my professor introduced me to the world of software development by teaching me my first programming language, C. Since then I began to study IT and programming languages alone. After one year, I started to develop my first website that reached over one thousand views per day. Once I finished high school, I changed my job twice, until Würth Phoenix has hired me. Here I have learned many interesting things, one of the most important once is the agile development methodology which we living every day.
Author
Latest posts by Davide Bizzarri
15. 05. 2018
APM, NetEye, Unified Monitoring
How to monitor docker containers using cAdvisor [ Part 2 ]
05. 03. 2018
Downloads / Release Notes
NetEye 3.12 Packages Updates