25. 03. 2026
Atlassian, NetEye, Unified Monitoring

Your web shop is down, a fact that was already reported by your monitoring system. After two minutes the first customer sends in a ticket, asking if you’re aware of the problem. And then another 12 customers after him, resulting in 13 quite useless tickets. Or perhaps you have a planned ERP downtime, and you’ve already informed everyone with a formal email the day before. Still, some seconds after shutting down the service, you will get a ticket from an upset secretary in management who is sure she never got that email. Who doesn’t find such situations familiar?
You can of course reassure your users with a status page on your intranet. But often the first point of contact is directly with the ticketing system.
Here I’ll show you how you can adapt the EriZone QuickTicket functionality and use it together with proper services and categories, to show warning and information messages on the customer interface. With this approach, you will be able to decide if you want to show specific messages to a subset of departments or external companies, too.
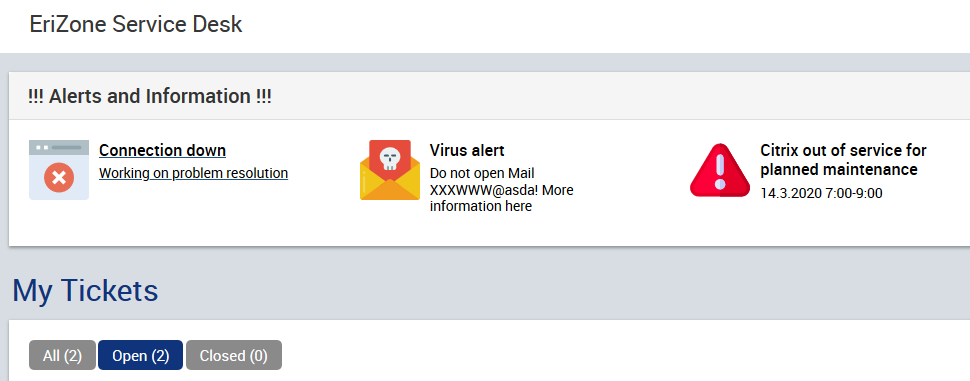
To use Quick-Tickets to display alerts, follow this guide:
- First, you’ll need to create some generic services used to describe the kind of alert, e.g. “
[1] Info::Connection issues”, “[2] Info::Service down”. Group them all by using the same parent service, e.g. “[1] Info”. The only purpose of these services is that described here, they should not be used for tickets. - Create one new category, e.g. “
warning”, and add it to all these services. - Now you can configure and enable the QuickTickets. Since you just linked all services to the category “
warning”, you will find all the QuickTickets by going to “Services <=> Categories” in the admin area, selecting this category, and clicking on “Details Category-Service”. Click on “Edit details”, add an Icon (in Base64 format), the Subject (it will be displayed as the title), the Comment (displayed as a subtitle), and more details in the Body of the rededicated QuickTicket. In this article you can find a detailed description of these steps: https://www.neteye-blog.com/2017/11/quick-ticket-creation-by-image-toolbar-2/ - Link the new services to all the customer companies, to whom the message should be displayed (Module Company <=> Services). The message will only appear to the users of these companies.
- Create an ACL rule that hides the special services in all customer and agent ticket creation interfaces, so that they cannot be used to create tickets.
Now customers can see the quick ticket icons and click on them. However, we don’t want them to create tickets this way. On request we can adapt the QuickTicket screen to show just an info box without the editor toolbar and the “Submit” button:
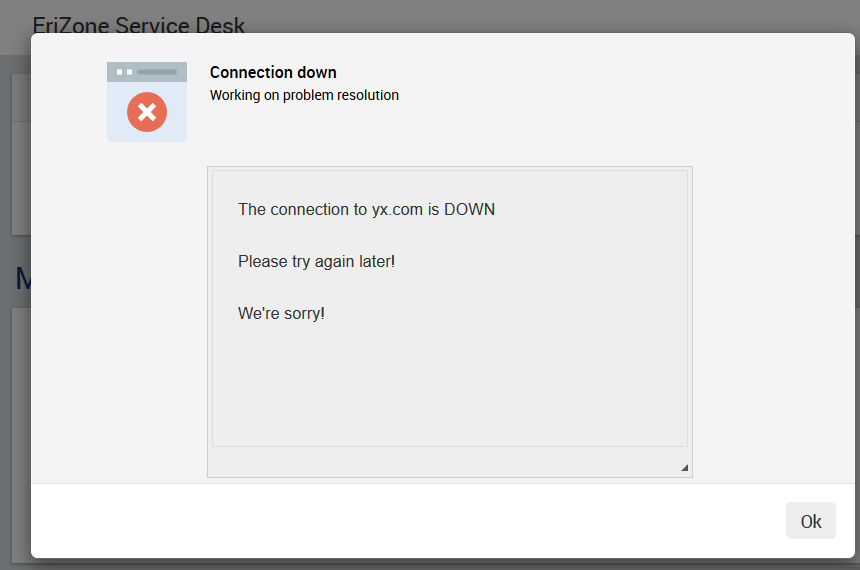
Be aware that with this workaround the QuickTicket icons can no longer be used to create tickets. To use both functionalities in parallel, some further adaptations would be needed, for example by limiting the application of these visual changes to a single icon list.
Mirko Morandini
Mirko Morandini, PhD, is a senior consultant in IT Service Management and Asset Management, with over a decade of experience and numerous successful projects in Germany, Austria and Italy. As the GLPI advocate at Würth IT Italy, Mirko is passionate about open source solutions - and when he’s not optimizing IT processes, he enjoys spending time with his family and playing and conducting wind band music.
Author
Latest posts by Mirko Morandini
31. 03. 2026
Asset Management, GLPI, Service Management
GROUP-based Asset Permissions in GLPI 11: GLPI Rights Management Redefined
29. 09. 2025
Asset Management, GLPI, Knowledge Management, Service Management
Getting the M(u)st out of GLPI
30. 06. 2025
Asset Management, Unified Monitoring
Das neue GLPI 11 – offizielle deutsche Vorstellung [DE]
31. 03. 2025
Asset Management, GLPI, Knowledge Management, NetEye
GLPI: Automated Inventory Without Using GLPI Agents