
When a request is large, it is tempting to turn every step into a sub-task. It makes sense: each activity is visible, assignable, and trackable. However, there is a downside. Projects can quickly become crowded with work items, navigation becomes heavier, and even simple actions require more administration than they deserve.
This was exactly the situation I faced. I had to manage a substantial request that could have resulted in thousands of work items, most of them sub-tasks. Aware of the practical impact that such a large structure can have on a Jira project, I started looking for a lighter alternative. That is how I discovered Checklists for Jira by HeroCoders.
My conclusion after using it is straightforward: it does not replace work items in every case, but it prevents us from creating them when they add little real value.
The problem: when a sub-task is too much
A sub-task is useful when it has its o
wn lifecycle. For example, when it needs a dedicated assignee, an estimate, comments, planning, reporting, or dependency management.
However, many activities do not require that level of administration. Consider a development Story:
- verify the requirements;
- update a configuration;
- run a test;
- collect approval;
- update the documentation.
Creating a sub-task for every item can turn one piece of work into a long chain of tickets to create, classify, and maintain. This does not always provide more control; often, it simply creates more noise.
The key question is: does this activity need to exist as an independent ticket, or is it simply a step required to complete the main work item?
In the second case, a checklist is often the more effective option.
The alternative: a checklist inside the work item
HeroCoders allows teams to manage checklists directly within a Jira work item. Rather than immediately splitting work into multiple sub-tasks, operational steps can remain in the same place where the work is created and managed.
This is more than a list of checkboxes. Each item can include an additional description and, when statuses are enabled, can be tracked as Open, In Progress, Done, or Skipped. This makes it easy to distinguish between activities that have not started, are currently in progress, and are fully completed.
The immediate benefit is clarity: the work item remains clean, while the team retains visibility of every important step.
How to enable Checklists for Jira in a project
After installing the app from the Atlassian Marketplace, the activation process is simple:
- Log in to Jira with the required administrative permissions.
- Go to Jira settings → Apps → Checklist for Jira → Enabled Projects.
- Enable the toggle for the relevant project.
Alternatively, the feature can be enabled for an individual project through Project settings → Summary. This area can also be used to manage access permissions for users and groups.
Once enabled, the Checklist section is available in the work item. If the panel is not visible when the checklist is empty, the app settings can be configured to keep it displayed.
Creating a checklist: the simplest approach
Within a work item, open the Checklist section and add the required steps. This manual method is ideal when the activities are specific to one request.
For example, a release work item could include:
- Confirm that the pull request is approved — Done
- Run regression testing — In Progress
- Update the release notes — Open
- Validate deployment in the test environment — Open
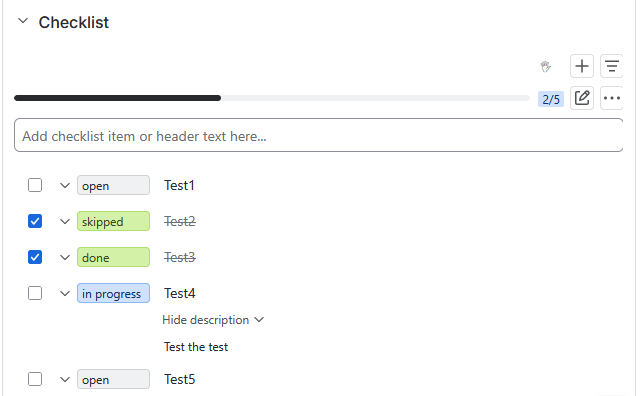
Anyone opening the ticket can immediately understand what is still pending, without searching through multiple sub-tasks. The work item represents the objective; the checklist shows the path to completion.
Templates: the real time-saver
The feature becomes even more valuable through checklist templates.
A template is a predefined set of activities that can be:
- loaded manually into a work item;
- automatically applied when a specific work item type is created;
- added through automation.
To create one, open the More menu in the project and select Checklist Templates. Alternatively, you can save an existing checklist as a template. From there, define the template name and its content.
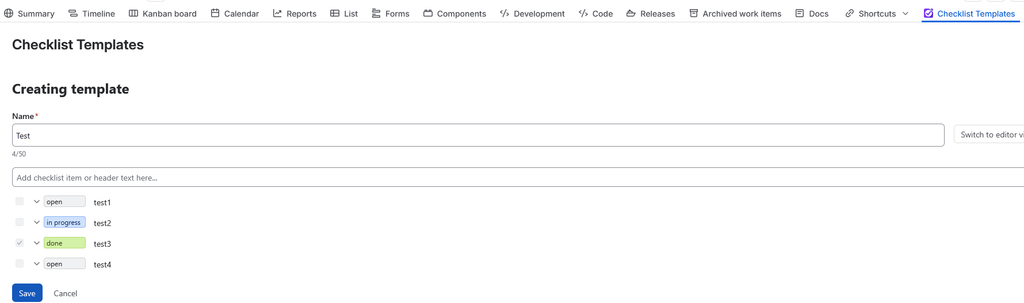
To use it as a default, select the template, choose Set default, and assign it to the relevant work item type. From that point onwards, every new work item of that type in the project will receive the checklist automatically.
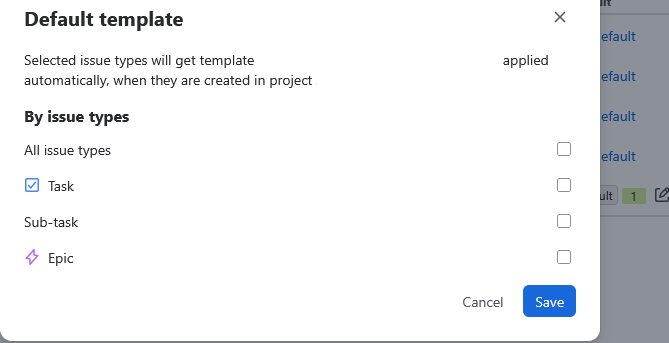
This is especially useful for recurring activities such as:
- a Definition of Done for Stories;
- quality checks before a release;
- onboarding steps for a new request;
- security controls;
- standard documentation or testing checks.
The benefit is not only speed. Templates reduce the risk of missed steps and make processes more consistent across the team.
From checklist item to work item: when a task grows
One of the most useful aspects of this solution is its flexibility. A checklist is not an irreversible decision.
If an activity that initially seemed small becomes more complex—for example, it requires discussion, a dedicated assignee, an estimate, or dependency management—it can be converted into a work item or sub-task using the conversion command available in the checklist item toolbar.
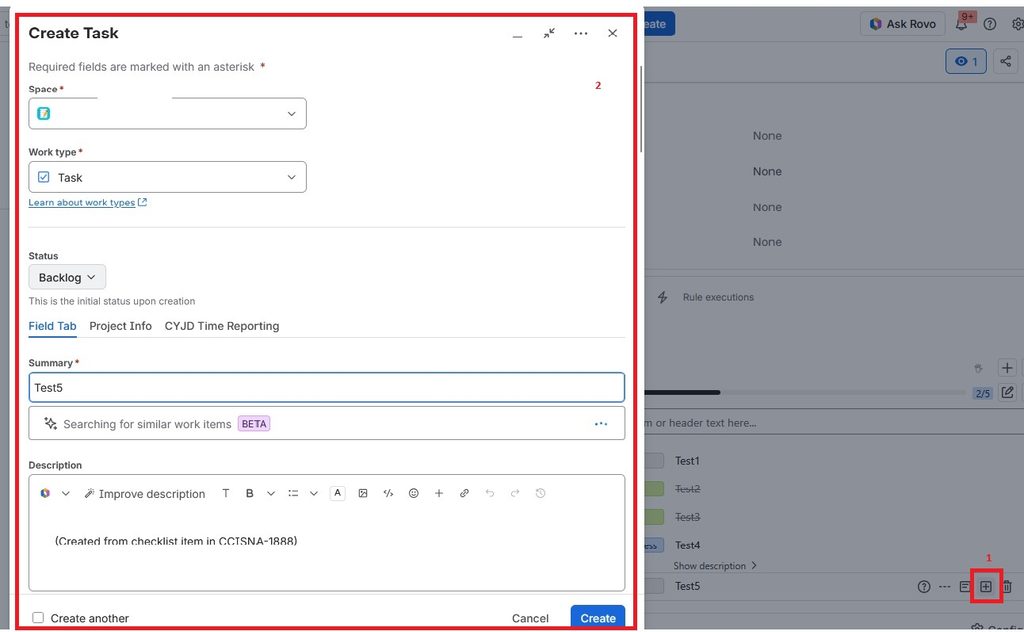
When the new work item is created, the original checklist item is marked as complete. This provides a practical approach: start light, then formalise only the activities that truly need to become tickets.
Free version limits to consider
The Free version is a strong starting point, but its limits should be considered carefully in high-volume projects. At the time of writing, the key limits are:
- Up to 100 visible checklist items per work item, including headers and separators;
- up to 10,000 checklist items per Jira instance; this count also includes items on closed work items;
- up to 6 checklist templates.
When an instance approaches 10,000 items, the app displays a warning. Once the limit is reached, no additional checklist items can be added. For teams with many recurring processes, several projects, or a high volume of tickets, this is an important factor before scaling the approach.
The Pro version removes the limits on the number of checklists, items, and templates. Available capabilities may still differ from the Enterprise edition.
Conclusion: fewer tickets, more focus on the work
HeroCoders Checklist does not remove the need for sub-tasks. Instead, it helps teams use them more intentionally.
In my case, it offered a practical answer to a very large request. Rather than creating thousands of work items to represent every small step, I could keep the necessary detail within the main ticket and create independent tasks only when they were genuinely needed.
The result is a more organised Jira environment, a faster process, and a team that spends less time managing tickets and more time moving the work forward.
Sources and further reading
- HeroCoders — Checklists for Jira documentation
- Enable Checklists for Jira in projects
- Configure project settings
- Create a checklist on a work item
- Manage templates
- Automatically add a checklist when a work item is created
- Convert a checklist item into a work item or sub-task
- Compare Free, Pro, and Enterprise

Sara Ferrari
Author
