01. 07. 2026
AI, Atlassian, Service Management

15. 06. 2026
Guglielmo Fortuni
NetEye, Unified Monitoring
Jira Operations Tips & Tricks for NetEye Users – Part 2
Practical lessons learned from real-world alert routing, automation, and integrations
Introduction
As mentioned at the end of Part 1, let’s continue exploring practical use cases and real‑world solutions for Jira Operations alert handling and enrichment. NetEye, Icinga, and Jira Ops can significantly improve monitoring and incident response workflows – but the overall setup can become tricky to fine‑tune and maintain over time.
In our day‑to‑day scenario, we ran into a few common challenges: understanding why a specific user was notified, experimenting with different ways to enrich alerts, and building filters and routing rules that are precise enough to avoid unexpected behavior.
In this second part, I’ll share the tips and approaches we used to address these issues.
1. Understanding Alert Fatigue in Jira Ops and Personal Notification Timing Configuration
We’ve all asked ourselves at some point: “Why am I receiving notifications?”
In monitoring tools, this often causes confusion. Regarding Jira Ops, you have to remember that once you view an alert, you become subscribed to it.
What “subscribed” means in practice
After you’ve interacted with an alert, Jira Ops may continue to notify you even when you think you’re off duty:
- You may receive notifications outside your schedule
- You may remain part of the escalation/responder chain
- You may still get notified when the alert closes
This behavior is intentional: Jira Ops assumes that if you looked at an alert, you are now involved in its entire incident lifecycle.
That’s why it’s important to explain this clearly to operators – otherwise it can feel like “Jira is ignoring schedules.”
A real-world example
Let’s say an operator, John, has an on‑call schedule from 09:00 to 18:00.
- An alert is triggered at 17:50 (still during John’s schedule)
- At 17:52, John snoozes the alert for 30 minutes and then forgets about it
- At 18:22, the snooze expires and the alert resumes escalation activity
Even though John is now outside his schedule, he may still receive notifications because:
- The alert originally arrived while he was on duty, and
- He interacted with it, so he remains associated with it as a responder/subscriber.
To make things even more confusing, the alert could remain “quiet” for hours and then close later after an OK notification from Icinga (possibly at night) causing John to wonder why he’s still being notified.
Because of the “subscription” behavior described above, it’s important to design schedules and notification timing intentionally.
Personalizing alert notifications (contact methods, events, and delays)
In Jira, go to:
Personal settings → Notification settings → Alert notifications
From there, you can choose:
- Which contact methods you want to use (Jira mobile push, SMS, voice call, email, etc.)
- Which alert events should trigger a notification (e.g., created, acknowledged, closed)
- Optional delays before a specific contact method is used
For example, a sensible configuration for a 24×7 operator could be:
- Immediate: SMS + Jira mobile push notification + Email
- Escalation fallback: a voice call after 30 minutes if the alert remains unacknowledged/unseen
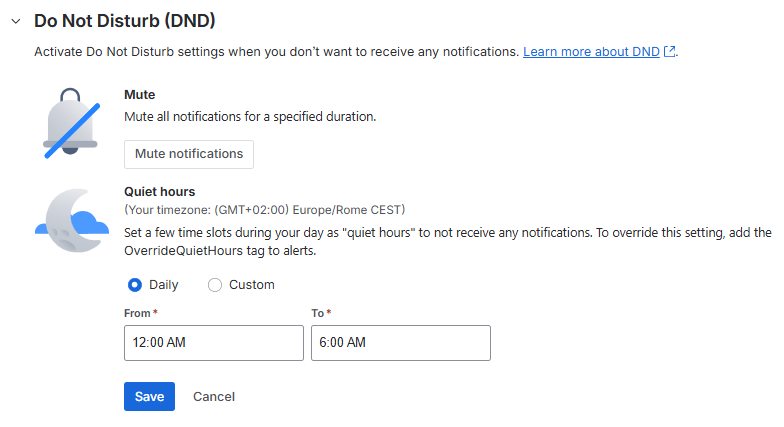
Quiet hours and mute periods (do not disturb)
You can also configure:
- Mute periods (temporarily stop alert notifications)
- Quiet hours / Do Not Disturb windows (a recurring time frame when you shouldn’t be notified)
This is particularly useful for non‑24×7 roles, shift handovers, or when you want to avoid “late” notifications for alerts you are no longer actively handling.
The same settings are also available in the Jira mobile app, so operators can adjust them quickly when needed.
2. Precise Routing Rules Using Tags (Avoiding Broad Matching)
A good routing strategy in Jira Ops is to be as precise as possible.
To achieve this, I rely heavily on the tags (custom var) sent from Icinga. By passing contextual information such as SLA type, customer, service category, or environment, I can build routing rules that are deterministic and easy to reason about. Typical examples include:
- SLA Classification: 24×7 or 8×5
- Customer code
- Service type
- Environment
Instead of writing broad routing rules that may unintentionally capture multiple scenarios, I prefer to create rules that match one exact case only. This reduces ambiguity and makes the routing behavior much more predictable.
Important considerations for Jira Ops routing rules
Jira Ops routing rules are exclusive: once an alert matches a rule, the evaluation stops there. In other words, the alert will not continue through the remaining rules. For this reason, poorly scoped rules can quickly become a source of confusion.
Keep in mind that the rule order is important, because the alert must pass through all the if…else if conditions; consider this carefully.
Example rules
As an example, here is some rules that I used:
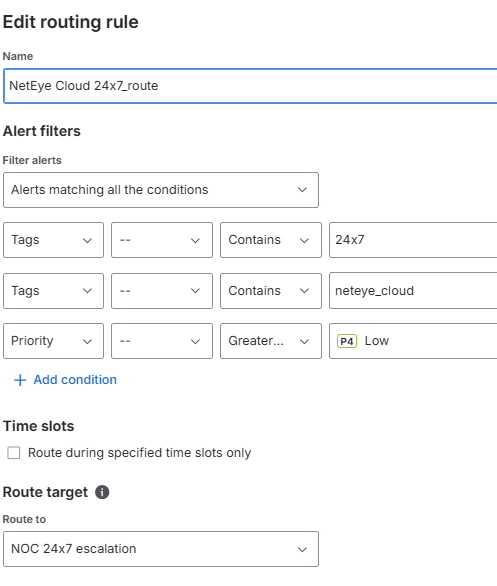
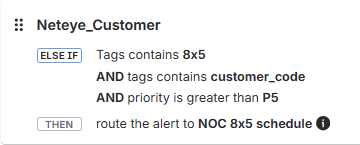
By keeping routing rules strict and tag‑driven, I can ensure:
- Alerts are sent only to the intended team/schedule
- Customer contexts remain clearly separated
- Escalation paths behave consistently
Over time, I realized that having more precise rules works better than building generic ones. It requires more discipline upfront and a longer list of routing rules, but it improves clarity and reliability.
3. Modifying the send2jsm Notification Script to Handle Additional Icinga Custom Variables and Fields
Another effective way to enrich alerts is to extend the send2jsm notification script itself, so it can pass additional Icinga custom variables or other fields directly to Jira Ops.
While working on this integration, I followed the Atlassian documentation and found that this approach is relatively straightforward if you need more flexibility than the default script provides.
1 – The first step is to modify the Go script available here:
https://github.com/atlassian/jsm-integration-scripts/tree/master/icinga2/scripts
Inside the script, you can add a new parameter and map it to a corresponding payload attribute. For example, you may want to introduce a new flag to pass a custom value coming from Icinga.
...
  343   responders := flag.String("responders", "", "Responders")
  344   tags := flag.String("tags", "", "Tags")
  345   // MOD - add new flag
  346   new_attribute := flag.String("new_flag", "", "new_attribute")
  347
  348
...
...
  425   parameters["service_output"] = *serviceOutput
  426   parameters["service_perf_data"] = *servicePerfData
  427   parameters["service_check_command"] = *serviceCheckCommand
  428   // MOD - add new flag
  429   parameters["new_attribute"] = *new_attribute
  430
2 – Once the modification is done, you need to initialize the Go module (if needed), install dependencies, and build the script:# go mod init send2jsm # go build send2jsm.go
3 – After that, you can execute the modified script with your new flag and pass the desired information, for example by using an Icinga custom variable:# send2jsm_mod -apiKey 'xxx' -hn 'h_name' -entityType 'host' -t 'test' -new_flag 'my_new_info'
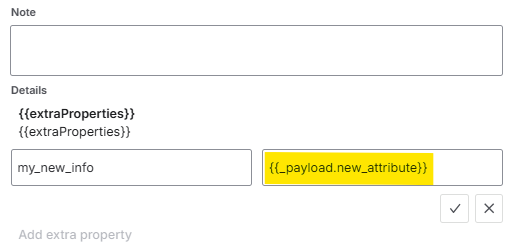
4 – At this point, the new field is included in the payload sent to Jira Ops. However, to actually make use of it, Jira Ops must also be configured to parse and process the new attribute correctly. This is done in the Icinga 2 Integration settings, under the Incoming rules section. There, you can reference the new field using the following syntax: {{_payload.new_attribute}} .
For example, you may choose to include this new value in the alert message, description, or another field:
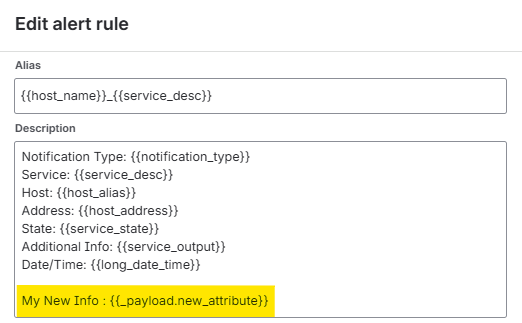
In the same way, you can also add the new attribute to the extra properties of the alert:
This technique is very useful when the default payload is not sufficient and you need to transfer more contextual information from Icinga to Jira Ops.
Of course, the trade‑off is that once you start customizing the notification script, you also need to maintain it over time – especially when upgrading or troubleshooting the integration.
Still, if you need a more flexible and richer alert model, extending the script can be a very powerful solution.
Here are some references from the Atlassian documentation:
Atlassian – Integrate with Icinga
Atlassian Github – send2jsm script
Atlassian Support – Work with alert properties
Conclusion
Jira Ops is a powerful alert management platform, but making it behave exactly as intended requires more than just enabling an integration. In practice, it takes a combination of:
- A solid understanding of alert lifecycle behavior
- Carefully planned notification timing and personal settings
- Precise routing rules based on meaningful metadata
- Effective alert enrichment
- And, when necessary, a bit of customization on the integration side
By applying the tips and tricks shared in this two-part article, I was able to build a cleaner, more predictable, and far less noisy integration between NetEye, Icinga, and Jira Ops. This not only improved the overall reliability of alert handling, but also helped reduce confusion and alert fatigue for operators.
When working on a similar integration, I hope these practical suggestions help you avoid some of the same pitfalls and get the most out of your Jira Ops environment.
If you found these tips useful, stay tuned for a future post where I’ll cover automatic ticket creation based on incoming alerts.
These Solutions are Engineered by Humans
Did you find this article interesting? Does it match your skill set? Our customers often present us with problems that need customized solutions. In fact, we’re currently hiring for roles just like this and others here at Würth IT Italy.
Guglielmo Fortuni
Hello! I'm Guglielmo, a NOC Engineer within the Service & Support / NOC Team at Würth IT Italy. I specialize in customer support and in the management and monitoring of our MSP monitoring platform, NetEye Cloud. My daily work is focused on ensuring service continuity, optimizing alerting workflows, and improving monitoring efficiency for our customers.
Author
Latest posts by Guglielmo Fortuni
25. 03. 2026
Atlassian, NetEye, Unified Monitoring
Jira Operations Tips & Tricks for NetEye Users – Part 1