30. 06. 2026
Azure, Cloud, Microsoft, NetEye, NetEye Extension Packs, Unified Monitoring

29. 08. 2018
Charles Callaway
Documentation, NetEye, Unified Monitoring
Custom User Guide Content in NetEye 4
In my last post, I showed you how to set up your own customized documentation in NetEye 3 so that it won’t be overwritten when you upgrade. Doing the same thing in NetEye 4 is also possible even though there isn’t a dedicated link for external documentation like in NetEye 3’s DokuWiki, and there isn’t a built-in ParseDown editor. It takes just a few moments with IcingaWeb2 for your own notes to show up in the NetEye 4 interface.
Like DokuWiki, the user guide in NetEye 4 consists of a series of markup files organized thematically in directories. But instead of DokuWiki format, NetEye 4 uses Parsedown (https://github.com/erusev/parsedown), which is a very fast PHP version of the well-known Markdown format with a few extensions. You can see the NE4 markup files themselves here, for instance:
- /usr/share/icingaweb2/doc/
- /usr/share/icingaweb2/modules/*/doc/
When adding your own custom content, you wouldn’t really want to change the existing user guide, since on the next update any changes would just get overwritten. But we can take advantage of the structure of IcingaWeb2 to add a menu item that points to your custom guide. Then as long as you use a separate subdirectory, updates will not overwrite your content.
The first step is to create your own directories to put your images and Parsedown files:
% mkdir /usr/share/icingaweb2/modules/custom
% mkdir /usr/share/icingaweb2/modules/custom/doc
% mkdir /usr/share/icingaweb2/modules/custom/img
Now let’s use IcingaWeb2 to create a new menu item called My Guide. Click on the “gear” icon at the bottom left of the screen:
Then click on the Navigation tab and select the action “Create a New Navigation Item”. In the input form that appears, fill in the following fields:
- Name: Enter the title that will appear in the left side menu, for example “My Guide”.
- Type: Select “Menu Entry”.
- Parent: This can create a menu subitem if you’ve already created a main item. Leave it blank for this example.
- Target: The “Window” option will open an entirely new window, while “Single Column” will reuse the existing frame/panel. “Single Column” is probably best for this task.
- Url: Enter doc/module/toc?moduleName=custom, where custom is the directory name we created above.
- Icon: Choose an icon from User Guide > Monitoring View Icons > Icons. For this example I’ve chosen the “attach” icon.

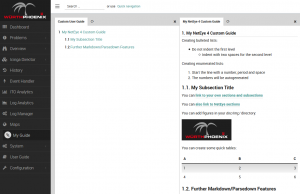
When you click “Save Changes”, our new menu item will appear to the left. If you click on it now, you should see a tab named “Custom User Guide”, with the content “Documentation is empty”. So now let’s put our content into the directory we created.
The user guide in NetEye 4 consists of a series of Parsedown files with associated images or screenshots in a directory at the same level. The table of contents is generated automatically from the section and subsection names in the files, with the alphabetical order of the filenames determining the order of the chapters in the table of contents. Those filenames must have the .md extension or else their content will not appear.
Try the following example. Create a new file named /usr/share/icingaweb2/modules/custom/doc/01-Start.md and cut and paste the text below into it.
<a id="custom-guide-start"></a> My NetEye 4 Custom Guide Creating bulleted lists: * Do not indent the first level * Indent with two spaces for the second level Creating enumerated lists: 1. Start the line with a number, period and space 1. The numbers will be autogenerated ## <a id="custom-guide-subsection"></a> My Subsection Title You can [link to your own sections and subsections](01-Start.md#custom-guide-subsection) You can [also link to NetEye sections](/neteye/doc/icingaweb/chapter/interface-controls) You can add figures in your *doc/img/* directory:  You can create some quick tables: A | B | C :-- |:-: | --: 1 | 2 | 3 4 | 5 | 6 ## <a id="custom-guide-features"></a> Further Markdown/Parsedown Features Make fenced code by putting three tick marks (**\`\`\`**) above and below it: ``` $ cat 01-Start.md ``` Inline markup: * **Bold** * *Italics*
Note: There is currently a bug in the latest version of ParseDown where a file that doesn’t end with a blank line will not have its last paragraph displayed.
Next, add an image called custom/doc/img/sample-image01.png. If you choose a different image, be sure to change the name in the file above.
Congratulations, that’s it, you just created your first customized user guide, just one click away from the main menu!
Next time I’ll explain more about best practices for creating your own Parsedown files, structuring them, and making them pretty.
Charles Callaway
Author
Latest posts by Charles Callaway
30. 06. 2026
Documentation
Teleprompter Tips, Part 2
30. 04. 2026
Documentation
Teleprompter Tips, Part 1
25. 02. 2026
Documentation
Making Your Own Video Tutorials, Part 20: Recording a Good Task-based Screencast
30. 10. 2025
Documentation
Tutorial Video Editing Technical Tips, Part 2: No Country for Boring Men (or Women)