


05. 02. 2025
Knowledge Management, Service Management

24. 01. 2025
Antonio Cerullo
Knowledge Management, Service Management
Dynamics 365 Finance & Operations (On-Premises) Certificate Rotation
Introduction
In this post I’ll describe how to update the certificate used by the Dynamics 365 Finance & Operations on-premises system (which I’ll call D365). This activity is called “certificate rotation” and it was necessary to do on our internal system in December 2024, following the imminent expiration of the company’s wildcard certificate (*.mycompanydomain.com). It’s important to complete everything BEFORE the certificate expires, as doing so later could cause data loss for encrypted fields.
The steps must be performed on one of the Orchestrators. We, out of habit, will perform them on the first of the 3 existing ones.
Certificate Installation on Windows
Our first step is to install the certificate on the chosen Orchestrator operating system via the “Certificates” Snap-in within Microsoft Management Console. It will be placed in the “Personal” certificates of the “Computer account” and it must be exportable.
Replace the Current Certificate with a New One
Check the Thumbprint of the Expiring Certificate:
PowerShell command
ls Cert:\LocalMachine\My | Sort-Object | ft Subject,Thumbprint,not*
Subject                                                      Thumbprint                      NotAfter                NotBefore
-------                                                        ----------                        --------                  ---------
CN=*.mycompanydomain.com, O=Company Srl, L=Bolzano, C=IT  1/1/2025 1:0:0AM  1/1/2020 1:0:0AM
Compare the Thumbprint found by the command with the one in the following file and replace it with the new one:
InfrastructureScripts-x.xx.x\Scripts\ConfigTemplate.xml
<Certificates>
<Certificate type="ServiceFabric" exportable="true" generateSelfSignedCert="false" generateADCSCert="false">
      <!-- Specify the friendly name of the certificate during import operations -->
      <Name>wildcard.mycompanydomain.com</Name>
      <!-- Specify the file name of the pfx that will be used in export and import operations. If not specified, the name property will be used -->
      <FileName>wildcard.mycompanydomain.com</FileName>
      <!-- Specify the dns names for ax, service fabric and the wild card for the dns zone created to host these services -->
      <DNSName>dnsname.mycompanydomain.com</DNSName>
      <Subject>*.mycompanydomain.com</Subject>
      <Provider>Microsoft RSA SChannel Cryptographic Provider</Provider>
      <KeyUsage>DigitalSignature;KeyEncipherment</KeyUsage>
      <EnhancedKeyUsage>Server Authentication;Client Authentication</EnhancedKeyUsage>
      <Thumbprint><CERTIFICATE THUMBPRINT></Thumbprint>
      <!-- Specify list of semi-colon seperated domain users or group (e.g. contoso\adminuser) that will be given permission to access the pfx files without a password -->
      <ProtectTo>xx\xxxxx</ProtectTo>
    </Certificate>
Export Certificate
We’ll use the commands “Export-Certificates.ps1“, used to export digital certificates associated with the D365 environment, and “Export-Scripts.ps1“.
Verify that your domain user (or group) with which you are logged in is present inside the ‘ConfigTemplate.xml‘ file in the line ‘<ProtectTo>domain\user</ProtectTo>‘ under the certificate
PowerShell command
InfrastructureScripts-x.xx.x\Scripts\Export-Certificates.ps1 -ConfigurationFilePath .\ConfigTemplate.xml
InfrastructureScripts-x.xx.x\Scripts\Export-Scripts.ps1 -ConfigurationFilePath .\ConfigTemplate.xml
At this point the new certificate “.PFX” file will be created in the following folders:
InfrastructureScripts-x.xx.x\Scripts\VMs\NAME\
InfrastructureScripts-x.xx.x\Scripts\Certs\
Certified Update on D365 Machines
Run the following commands on each VM to configure the new certificate:
PowerShell command
InfrastructureScripts-x.xx.x\Scripts\VMs\NAME\Configure-PreReqs.ps1
InfrastructureScripts-x.xx.x\Scripts\VMs\NAME\Complete-PreReqs.ps1
InfrastructureScripts-x.xx.x\Scripts\VMs\NAME\Test-D365FOConfiguration.ps1
Update the Service Fabric Cluster configuration file (ClusterConfig.json) with the thumbprints of the new certificate:
PowerShell command
InfrastructureScripts-x.xx.x\Scripts\Update-SFClusterConfig.ps1 -ConfigurationFilePath ConfigTemplate.xml -UpdateThumbprints
Connect-ServiceFabricCluster
Start-ServiceFabricClusterConfigurationUpgrade  -ClusterConfigPath InfrastructureScripts-x.xx.x\Scripts\ClusterConfig.json
Update-ServiceFabricClusterUpgrade -UpgradeReplicaSetCheckTimeoutSec 30
-- Get-ServiceFabricClusterUpgrade -- To check the UPDATE
Updating LocalAgent Certificate
Replace the “serverCertThumbprint” in the “LocalAgent-xxxxxxx\localagent-config.json” file with the new one:
PowerShell command
.\LocalAgentCLI.exe cleanup LocalAgent-xxxxxxx\localagent-config.json
.\LocalAgentCLI.exe install LocalAgent-xxxxxxx\localagent-config.json
Updating the Environment to “Lifecycle Services”
Change the “Server certificate thumbprint” in the connector settings to the new one and perform the ‘Update settings’.
This step results in DOWNTIME for the entire system!!
Update the Service Fabric Cluster configuration file (ClusterConfig.json)
Edit the file “InfrastructureScripts-x.xx.x\Scripts\ClusterConfig.json“
– replacing the values of “ClusterCertificate” and “ServerCertificate” with the thumbprint of the new certificate
– replacing the value of “ClusterConfigurationVersion” with a greater number than the existing one (2.4.0 –> 2.4.1)
PowerShell command
Connect-ServiceFabricCluster
Start-ServiceFabricClusterConfigurationUpgrade  -ClusterConfigPath InfrastructureScripts-x.xx.x\Scripts\ClusterConfig.json
Update-ServiceFabricClusterUpgrade -UpgradeReplicaSetCheckTimeoutSec 30
-- Get-ServiceFabricClusterUpgrade -- To check the UPDATE
Update deployment settings in Lifecycle Services
- In Lifecycle Services, select the “Full Details” link for the environment where you want to change the certificates.
- Select Maintain and then select Update Settings
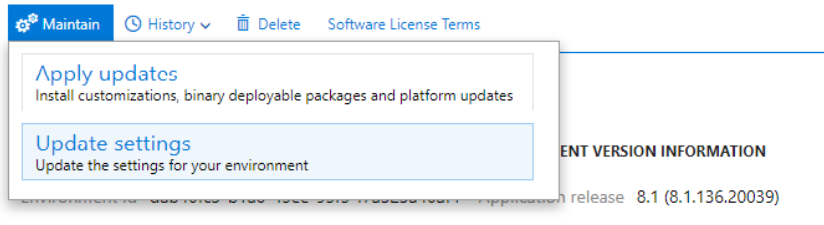
3. Change the thumbprints to the new thumbprints that you previously configured (The thumbprint of your SSL certificate used for WCF/SOAP support)

4. Select Prepare
5. After downloading and preparation is complete, the Update environment button displays
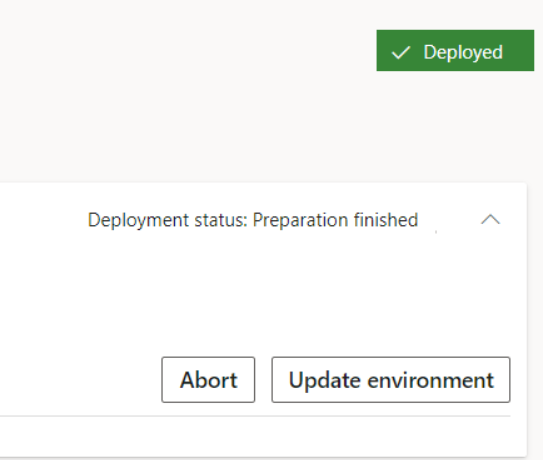
6. Select Update environment to start updating your environment (During the update, th environment is unavailable!!!!!!)
7. Wait for the update to finish
Final Verification of the Activity
To make sure that the certificate update was successful, run the following command:
PowerShell command
Get-ServiceFabricClusterConfigurationIn the output you’ll see the thumbprint of the new certificate:
"Properties": {
    "Security": {
      "$id": "1",
      "CertificateInformation": {
        "$id": "2",
        "ClusterCertificate": {
          "Thumbprint": "<CERTIFICATE THUMBPRINT>",
          "X509StoreName": "My"
        },
        "ServerCertificate": {
          "Thumbprint": "<CERTIFICATE THUMBPRINT>",
          "X509StoreName": "My"
        },
In conclusion, regular SSL certificate rotation on Dynamics 365 is an essential practice to maintain the system’s security. Periodically updating certificates ensures that encryption remains strong and communications are always protected against potential vulnerabilities.
These Solutions are Engineered by Humans
Did you find this article interesting? Are you an “under the hood” kind of person? We’re really big on automation and we’re always looking for people in a similar vein to fill roles like this one as well as other roles here at Würth Phoenix.

Antonio Cerullo
Site Reliability Engineer at Wuerth IT Italy