Microsoft LAPS on Windows Server 2016: From Introduction to Installation
Preface
Cybersecurity is one of the biggest challenges for IT systems engineers. In many companies, local administrator accounts on PCs share the same password during installation.
Imagine a real-world scenario: malware enters the network, steals the local administrator password, and uses it to spread to dozens of machines. Within hours, every last bit of infrastructure is compromised.
To prevent these types of attacks, Microsoft developed LAPS (Local Administrator Password Solution). On Windows Server 2016 (unlike the 2019 version), LAPS is not natively integrated: it must be installed as a separate package. Once configured, it ensures that each machine in the domain has a unique, complex, and automatically rotating local password, stored in Active Directory and accessible only to authorized administrators.
While the Windows Server 2016 environment may be considered dated compared to more recent versions, there are still many companies that use it daily, where upgrading to Windows Server 2019 or 2022, for various reasons, is not always immediately possible. For these situations, this guide can be a reference for implementing LAPS.
How LAPS works
After deploying the LAPS client to the computers to be managed, the following actions are performed each time Group Policy is updated:
- LAPS checks whether the administrator password has expired.
- If the password has expired, a new one is dynamically generated. This password is stored in a specific AD attribute on the computer, transmitted to the computer, and then assigned to the administrative account.
Benefits of LAPS
- Uses a unique password, which is different on each LAPS-managed computer
- Changes the local administrator password regularly
- Stores passwords in a computer attribute in Active Directory
- Configures and control password access
- Securely transmits passwords to managed computers
Requirements
- Domain Controller running Windows Server 2016 (in this case…)
- A functioning Active Directory environment
- Administrative rights to extend the AD schema
- The LAPS.msi package downloaded from Microsoft
Installation Step-by-Step on Domain Controller
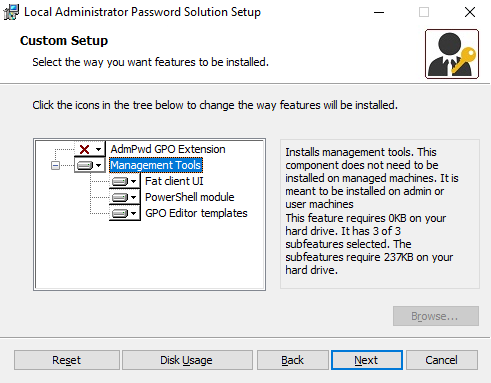
1. Download and Install LAPS
Download the LAPS.msi package from Microsoft and install it on the Domain Controller. Disable the ‘AdmPwd GPO Extension’ and enable all ‘Management Tools’, as shown in this screenshot:
2. Extend AD Schema and Configure permissions
PowerShell commands:
Import-Module admpwd.ps
Update-AdmPwdADSchema
Set-AdmPwdComputerSelfPermission -OrgUnit 'OU=Computers,OU=location,OU=domain,DC=com'
Set-AdmPwdReadPasswordPermission -Identity 'OU=Computers,OU=location,OU=domain,DC=com' -AllowedPrincipals 'domain\Domain Admins'
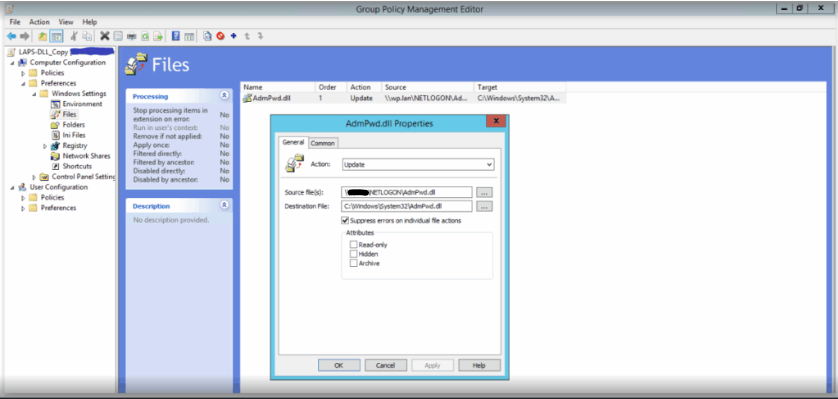
Set-AdmPwdResetPasswordPermission -Identity 'OU=Computers,OU=location,OU=domain,DC=com' -AllowedPrincipals 'domain\Domain Admins'3. Configure GPO to implements LAPS on clients
- AdmPwd.dll file copied to clients:
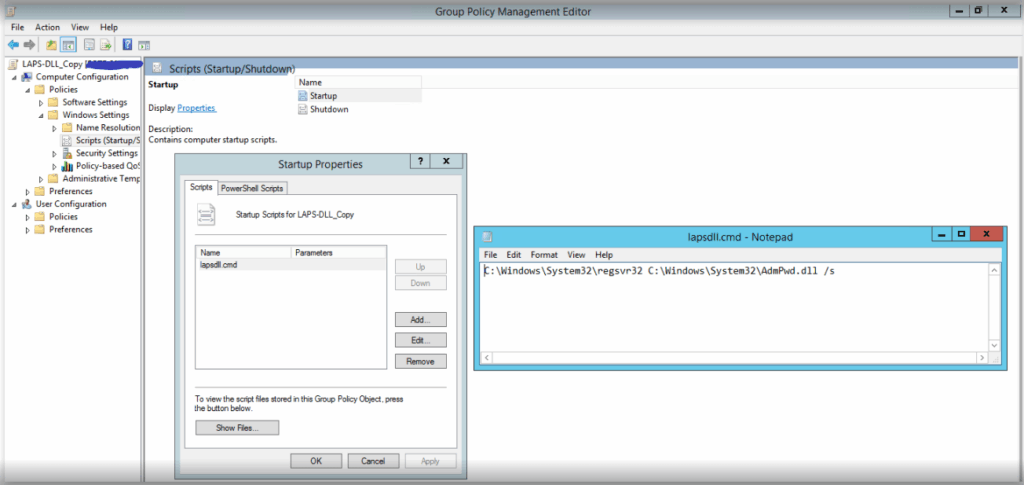
- Startup script with file registration command:
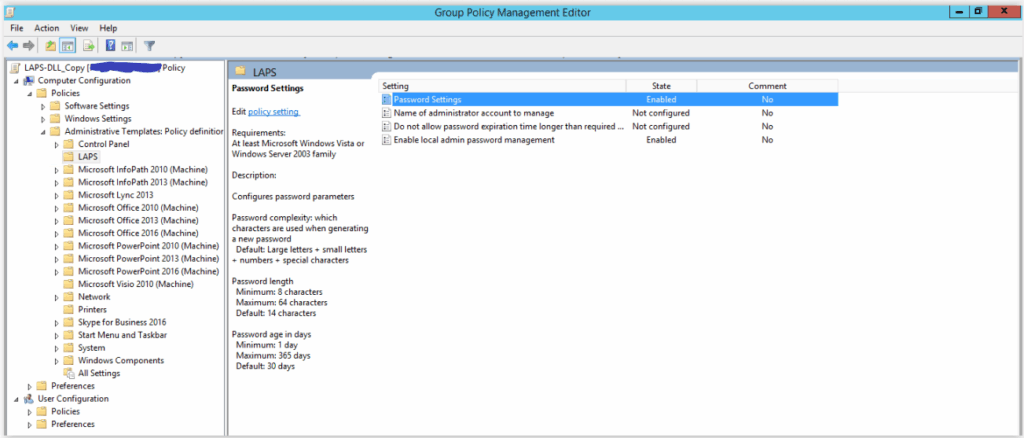
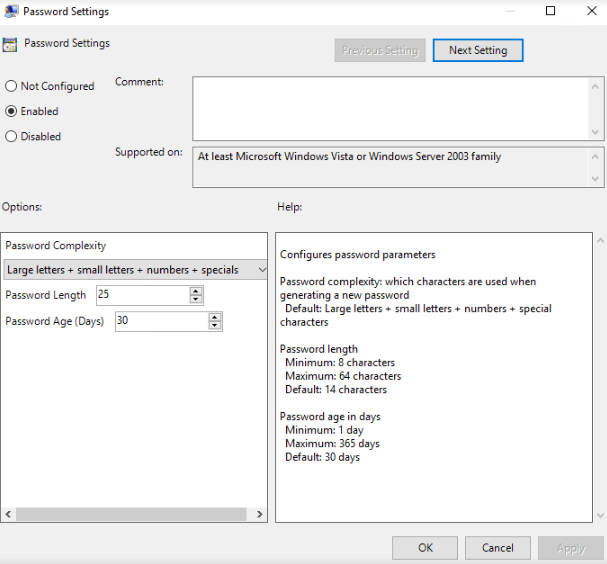
- Password parameter configuration:

- Apply the GPO:
Wait for the GPOs to install on the clients or manually force the update with:
gpupdate /force4. Check LAPS functionality
Open LAPS UI and find the password set by LAPS on the given client:
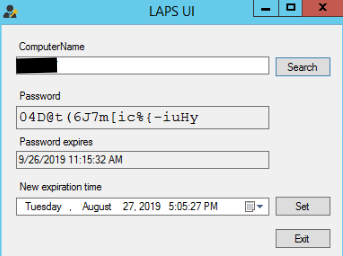
When the password expires (initially set to 30 days), LAPS will change the password, send it to AD and it will then be valid for another 30 days.
You can easily change the expiration date by entering it in the LAPS user interface and clicking “Set”.
These Solutions are Engineered by Humans
Did you find this article interesting? Does it match your skill set? Our customers often present us with problems that need customized solutions. In fact, we’re currently hiring for roles just like this and others here at Würth IT Italy.