30. 09. 2026
Atlassian, Service Management

Data loss happens. Whether it’s accidental deletion, integration issues, or unexpected errors, a robust backup strategy can save the day. This guide walks you through restoring your Jira Cloud instance using a downloaded backup, helping you get back on track quickly.
Before We Begin: Understanding Your Backup
This is a key point because you will need to fix the backup file so that you can use it to restore data.
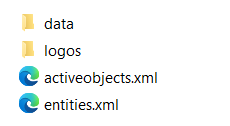
Your downloaded Jira Cloud backup will be a single zip file containing several key components:
- data folder: Holds critical application data.
- logos folder: Stores your custom logos for Jira Cloud.
- activeobjects.xml: Contains configuration information.
- entities.xml: Defines the structure of your Jira data.
Optimizing Your Backup Structure
For a smoother restore process, Jira recommends creating two separate zip files from the main one:
- data.zip: Contains activeobjects.xml and entities.xml files.
- media.zip: Holds the data and logos folders.

Why Separate Files?
Uploading media files (logos and data) separately reduces the risk of timeouts during the import process.
Step 1: Import the Main Backup File
- Log in to your Jira Cloud instance as an administrator.
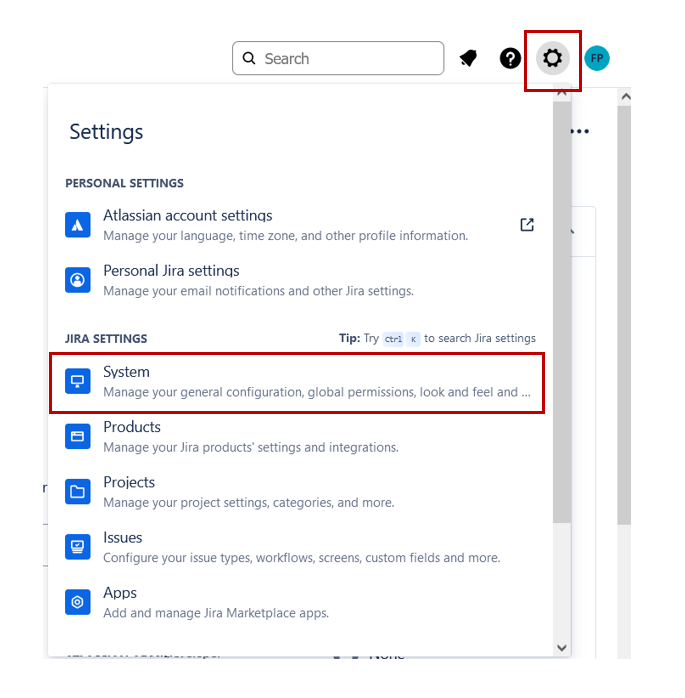
- Click the gear icon (top right corner) and choose System from the Settings menu.
- Under Import and Export, select Import Jira Cloud.
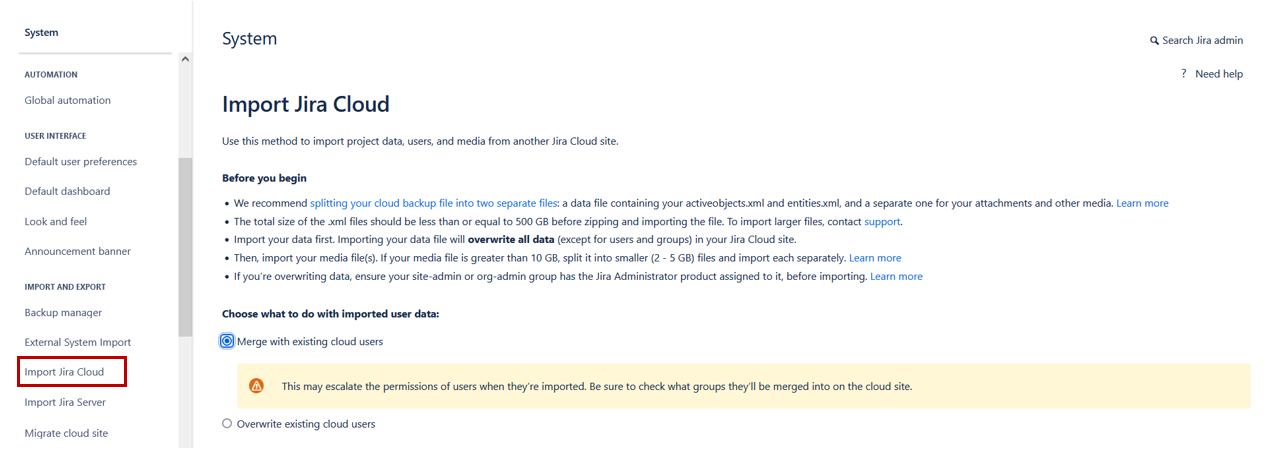
- Choose how to manage existing users: Merge, Overwrite, or Skip (refer to the help text for guidance).
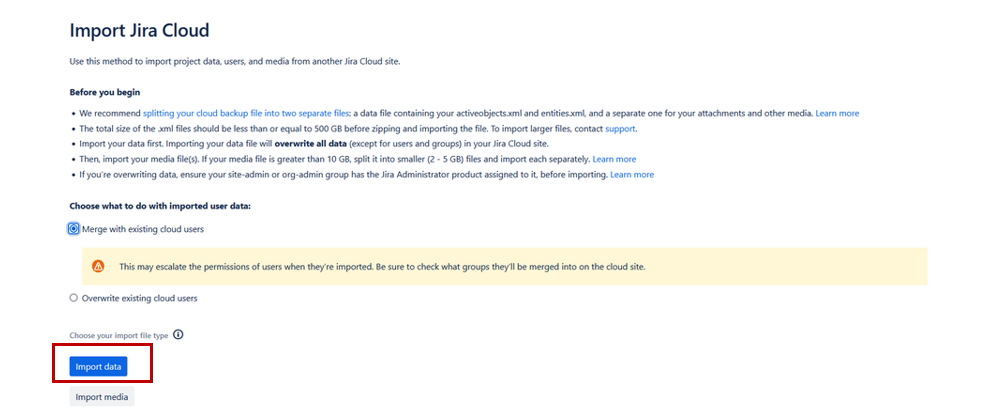
- Select the downloaded main backup zip file and click Import data.
Step 2: Verify and Run the Import
Jira will verify the integrity of the backup. If everything looks good, click Run import.
Step 3: Upload Media and Test
Once the import finishes, you’ll be prompted to upload the media.zip file containing logos and data. Do this now.
Step 4: Post-Import Tasks
Grant Application Access: The import process doesn’t automatically grant access to applications for new users. To enable them to log in, click Grant application access and configure access settings.
Set Permissions: The import handles global permissions like “Browse users and groups.” However, you’ll need to manage application permissions individually within each app. You can also configure the “Administer Jira” permission after import.
Testing and Adjustments:
- Thoroughly test your restored data and media to ensure everything functions as expected.
- Make any necessary adjustments to access controls and permissions.
Congratulations! Your Jira Cloud instance has been successfully restored. With a reliable backup strategy and this guide, you can breathe easier knowing you’re prepared for future data challenges.
Important Notes:
- Ensure the downloaded backup files have the exact names and formats mentioned above.
- Always refer to the official Atlassian documentation for the latest and most accurate instructions.
- Check also what data is backed up and restored: https://support.atlassian.com/organization-administration/docs/what-data-is-backed-up-and-restored/
- Check backup and restore limitations: https://support.atlassian.com/organization-administration/docs/backup-and-restore-limitations/
Conclusion
While Atlassian is committed to providing high standards of security and availability for Jira Cloud, no system is completely immune to unforeseen events. A human error, an unexpected technical issue, or a system update could lead to the loss of valuable data.
Therefore, having a personalized backup and restore strategy is essential. Although Jira Cloud offers some backup features, such as data export and access to previous versions, a complete and regular backup allows you to have greater control over your instance and quickly restore data if necessary.
Remember: Prevention is always the best cure. Perform regular backups, verify the correctness of your restore processes, and keep your documentation up to date. In this way, you will be ready to face any eventuality and protect your investment in Jira Cloud.
Additional tips:
- Automate backups: Use tools or scripts to automate the backup process and reduce the risk of manual errors.
- Store backups in a secure location: Keep your backups in a separate cloud storage or on a physical device in a different location to protect them from any issues with your Jira Cloud environment.
- Regularly test restores: Periodically perform restore tests to verify that your process works correctly and that all data is recoverable.
In conclusion, investing in a solid backup strategy is an indispensable insurance for your business. Don’t rely solely on the backup features integrated into Jira Cloud, but create a personalized plan that allows you to protect your data effectively.
And you, are you ready to build a solid backup-restore strategy?

Alessandra Castiglioni
Author

Latest posts by Alessandra Castiglioni
21. 03. 2026
Atlassian
Atlassian SSO Explained: How Authentication Really Works (Without the Confusion)
23. 06. 2025
Atlassian
Is Your Jira and Confluence World About to Change? Understanding the Shift from Connect to Forge