
Keeping an offline copy of your logs does not only provide better visibility from the system management point of view, but also turns out to be extremely precious in case of a security incident during which your local copies have been affected.
As many of you might know, the Log Management module of NetEye offers a complete solution to manage logs, in line with the obligations intended by the data protection authority. Moreover, it provides a handy way to centrally manage logs from various sources. (see also on our blog: “What to do with all those logs?” and “NetEye Log Management on the official Elastic blog” ).
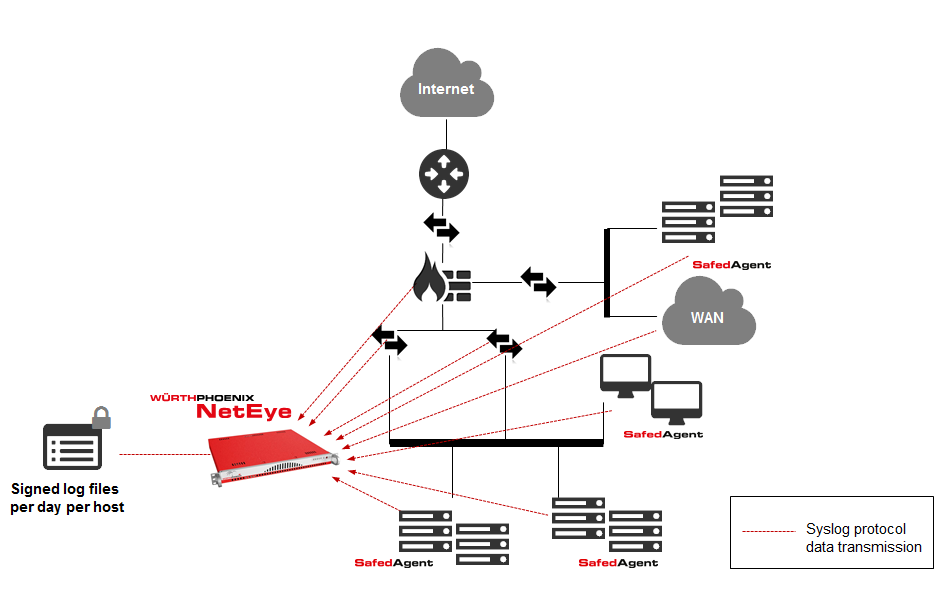
Architecture of the Log Management module:
- Log auditing and data collection system, based on rsyslog
- Agent (Safed) for sending logs over the syslog protocol (RFC 3164 – configured by default to send over TCP on port 514 to guarantee the correct receiving of the sent logs)
It is crucial that the communication between the Safed agents and NetEye on the TCP port 514 is always guaranteed.
During one of my latest customer projects, I was asked to implement a possibility for collecting logs from remote systems in the cloud. The main challenge was that accessing the systems was possible just via SSH.
Now I will show you how I resolved this problem by using a reverse SSH tunnel and a Safed agent on a Linux/Unix machine.
Assumptions and limitation
- The servers in the cloud and NetEye both have individual addresses and are connected via NAT.
- The remote access over SSH to the servers in the cloud is allowed by NetEye through several firewalls
- For implementing the SSH tunnel, dedicated users (without admin permissions) have been created on both, NetEye and the servers in the cloud.
- The centralized configuration of the Log Management module is not applicable for the Safed agents (since it is not possible to reach the agent via HTTP on port 6161).
Implementation
A reverse SSH tunnel allows to connect to a remote server (equipped with a SSH service) forwarding all received TCP connections on a port to another host in the network.
To allow the servers in the cloud, accessing the rsyslog service that is executed on the NetEye server, we can create a reverse tunnel through SSH. To do so, we use this command:
ssh -Nn –f -R *:50514:neteye.mydomain.local:514 rsyslog-remote@mycloud.server
In this way, a SSH connection is created without accessing a shell. In addition, the tunnel that allows forwarding all connections that are incoming on TCP port 50514 of the servers in the cloud in direction to port 514 of the NetEye server, is created.

The communication between the server in the cloud and NetEye is SSH encrypted and therefore secure.
The options used by the SSH command are:
- “-Nn -f”: limits the SSH connection in background to forwarding without opening a shell
- “-R”: specifies the reverse tunneling
- “*:50514:neteye.mydomain.local:514”: specifies how the tunneling has to be applied: all incoming connections to all IP addresses of the NetEye server on TCP port 50514 have to be redirected to neteye.mydomain.local on TCP port 514
- “rsyslog-remote@mycloud.server”: specifies that the connections to the server “mycloud.server” via SSH is executed as user “rsyslog-remote”
Verifying the reverse SSH tunnel
With the commands ncat and netstat, it is possible to verify if the reverse tunnel has been correctly created.
NetEye
We can use a port different to 514 (for example the 515) to not stop the rsyslog service on NetEye and to create the reverse SSH tunnel:
ssh -Nn –f -R *:50514:neteye.mydomain.local:515 rsyslog-remote@remote.server
Further, we can use the command ncat and create a dummy server that listens on port 515 with the options -l -p 515, to test the communication with the server in the cloud:
[rsyslog-remote@neteye ~]$ ncat -l -p 515
Server in the cloud
To verify that the SSH connection from NetEye has been correctly executed, we have to check the existence of a network connection in listening on the IP 127.0.0.1 and TCP port 50514 with the command netstat:
[rsyslog-remote@mycloudserver ~]$ netstat -na | grep 50514
tcp 0 0 127.0.0.1:50514 0.0.0.0:* LISTEN
Now we can test the connection with the NetEye server, using the ncat command:
- The host with which we want to communicate: 127.0.0.1
- The destination port: 50514
- A message: “Hello, this is a test from mycloudserver”
[rsyslog-remote@mycloudserver ~]$ ncat 127.0.0.1 50514
Hello, this is a test from mycloudserver
NetEye
If everything worked fine, we will see appearing the following message on the NetEye server:
[rsyslog-remote@neteye ~]$ ncat -l -p 515
Hello, this is a test from mycloudserver
Configuration of the Safed agent
As mentioned in the “assumptions and limitations”, we have to manually configure the Safed agent. Hence, we cannot utilize the centralized configuration of the Log Management module (because we cannot reach the safed agent via HTTP on port 6161).
It is important to indicate 127.0.0.1 as server IP address in the configuration file /etc/safed/safed.conf and 50514 as destination port.
Example:
[Output]
network=127.0.0.1:50514:tcp
syslog=13
days=30
maxmsgsize=2048
waittime=10000000
After this configuration, we have to restart the safed service and verify that the logs correctly arrive to NetEye.
LogManager module configuration
After concluding the tests and the configuration of the Safed agent, we just have to configure the Log Management module.
We have to set “Determine a hostname from Host configuration” to “no” in Configuration – Main Settings – General Settings

Finally, we have to create a new host using the internal IP of NetEye.
The rest is done by rsyslog.
Conclusion
Our customer is now able to collect logs from remote systems that are reachable just via SSH. No modifications on the NetEye architecture had to be done, this guaranteed that all prior configured Safed agent were not affected by the new implementation. Moreover, thanks to the SSH access from NetEye, it was possible to implement an active monitoring of the servers in the cloud by using the plugin check_by_ssh.