21. 05. 2026
APM, Kubernetes

05. 10. 2022
Alessandro Valentini
DevOps
My OpenShift Journey #3: Active Directory Integration and User Management
In our migration journey from multiple VMs to OpenShift, one mandatory step is the integration with our company’s Active Directory. This is the default IdP for our services like Jenkins, NetEye, etc., and we want to centralize authentication and permissions as much as possible.
Integration with OpenShift is less straightforward than it is with other solutions like NetEye, and furthermore you’ll have to do a minimal RBAC setup to make it usable as a main login solution. In this blog post I’ll cover three main steps:
- Identity Provider setup with Active Directory
- Import groups from Active Directory
- Setup groups and permissions
Identity Provider Setup
From Administration perspective go to Administration → Cluster Settings → Configuration, search for oAuth, and open it. Then in the section Identity providers, click Add, then LDAP.
Once you’ve saved the configuration, you can see the result from the YAML perspective: a new identityProvider like the following will be added at the end:
...
spec:
  identityProviders:
    - ldap:
        attributes:
          email:
            - mail
          id:
            - sAMAccountName
          name:
            - cn
          preferredUsername:
            - sAMAccountName
        bindDN: <your_ldap_username>
        bindPassword:
          name: ldap-bind-password-wh6fh
        ca:
          name: ldap-ca-pwll9
        insecure: false
        url: 'ldaps://mydc.example.com:636/DC=example,DC=com?sAMAccountName?sub'
      mappingMethod: claim
      name: Wuerth Phoenix
      type: LDAP
Once the new IdP is there, you can only edit it via the YAML view.
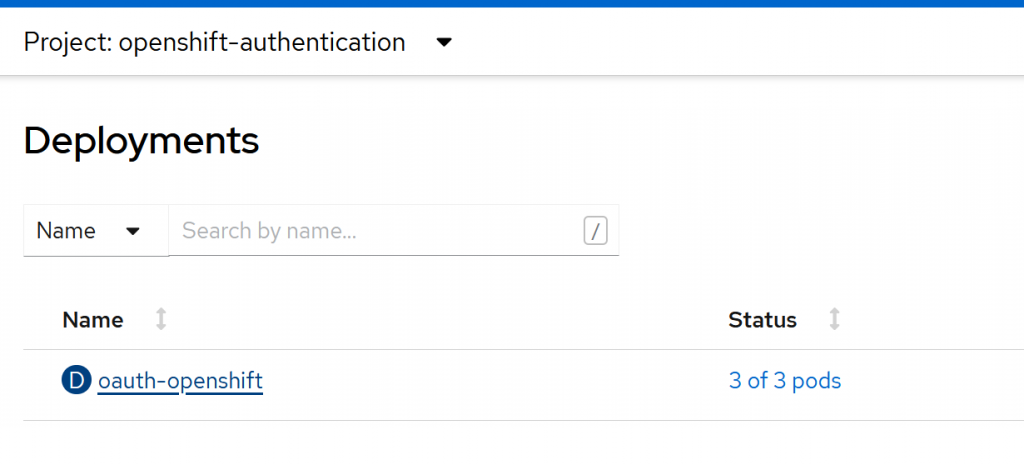
Since everything in OpenShift is pods, deployment requires scaling them down and then up again, and therefore it’s not instantaneous. You can follow the deployment from Workloads → Deployments → oauth-openshift
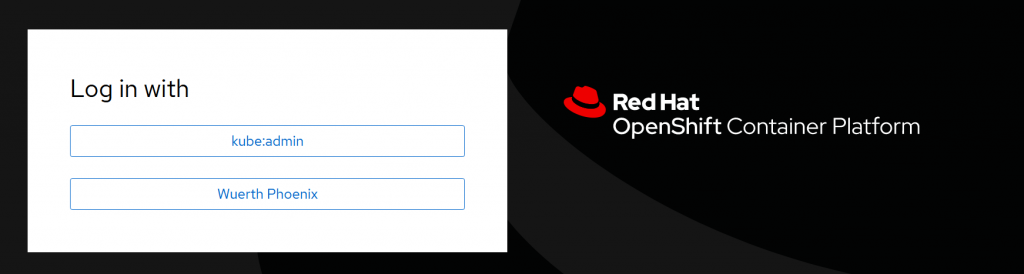
I suggest you change the IdP name while you’re running tests so you can then watch the deployment status on the login page.

To debug authentication or connection issues you can go to the Workloads → Deployments filter for openshift-authentication. Select oauth-openshift, click on one of the containers and then on Logs. Since you have a replica running on each Control Plane you have to look at all three pod logs.
Provided that you know the correct settings, the configuration is quite standard. The main difference with respect to other software, like NetEye for example, is that you have to pay attention to the URL format which is structured as follows: ldap[s]://mydc.example.com:636/?<basedn>?<attribute>?<scope>?<filter>
Furthermore the username must be unique across providers: if you change the IdP name (e.g. from Wuerth Phoenix to Wuerth Phoenix 1 ) and log in with the same sAMAccountName you will get the error Could not create user. In this case delete the existing username via the GUI and try again.
The last pitfall we found is that a user is identified by two different objects: user and identity. When you delete a user, you may incur the generic message An authentication error occurred. In this case you may have to identify and clean up identities using oc get identity and oc delete identity. In general, listing users and identities from the command line and removing test accounts is a good idea.
Identity Provider Setup
OpenShift can organize users into groups, and can handle both manually created groups and groups imported from LDAP at the same time. It’s possible to achieve this with a Config which makes use of augmentedActiveDirectory and a Cronjob.
kind: LDAPSyncConfig
apiVersion: v1
url: ldaps://mydc.example.com:636
bindDN: <your_ldap_username>
bindPassword: '.................................'
insecure: false
ca: /ldap-sync/ca.crt
groupUIDNameMapping:
  "CN=mygroup,OU=Groups,OU=Wuerth-Phoenix,DC=example,DC=com": mygroup
augmentedActiveDirectory:
    groupsQuery:
        derefAliases: never
        pageSize: 0
    groupUIDAttribute: dn
    groupNameAttributes: [ cn ]
    usersQuery:
        baseDN: "DC=example,DC=com"
        scope: sub
        derefAliases: never
        filter: (!(objectClass=computer))
        pageSize: 0
    userNameAttributes: [ sAMAccountName ]
    groupMembershipAttributes: [ "memberOf:1.2.840.113556.1.4.1941:" ]
Parameters are similar to those used in IdP configuration, and you can use groupMembershipAttributes with the value in the example.
You also have to add a whitelist in which you specify which groups you want to import into LDAP:
CN=developers,OU=Groups,OU=Wuerth-Phoenix,DC=example,DC=com
CN=devops,OU=Groups,OU=Wuerth-Phoenix,DC=example,DC=com
CN=ops,OU=Groups,OU=Wuerth-Phoenix,DC=example,DC=com
and add a file container the CA, if you have an internal one. All the information specified will be stored in a secret, which you can create by executing:
oc create secret generic ldap-sync --from-file=ldap-sync.yaml=ldap-sync.yaml --from-file=whitelist.txt=whitelist.txt --from-file=ca.crt=ca.crt
and then inspect or edit it from Workloads → Secrets → ldap-sync
Finally, you can automate group sync by creating a Cronjob: Workloads → CronJobs → Create CronJob
apiVersion: batch/v1beta1
kind: CronJob
metadata:
  name: ldap-group-sync
spec:
  schedule: 15 * * * *
  suspend: false
  jobTemplate:
    spec:
      template:
        spec:
          serviceAccountName: ldap-sync
          restartPolicy: Never
          containers:
            - name: oc-cli
              command:
                - /bin/oc
                - adm
                - groups
                - sync
                - --whitelist=/ldap-sync/whitelist.txt
                - --sync-config=/ldap-sync/ldap-sync.yaml
                - --confirm
              image: registry.redhat.io/openshift4/ose-cli
              imagePullPolicy: Always
              volumeMounts:
              - mountPath: /ldap-sync/
                name: config
                readOnly: true
          volumes:
          - name: config
            secret:
              defaultMode: 420
              secretName: ldap-sync
Setup Groups and Permissions
OpenShift RBAC can be managed from the User Management section. It consists of three objects:
- Subject: a group or a user, in our case we will manage everything via groups
- Roles: a set action which can be done on certain resources
- RoleBindings: the link between a Subject and a Role. We can have a Cluster Role Binding (CRB) and a Namespace Role Binding (RB), in our examples we will handle only CRBs
In our case we manually added an Administrators group with privileges equivalent to a kubeadmin temporary user. To do this you just have to create a new role binding granting cluster-admin privileges from the GUI: Management → Groups → Administrators → RoleBindings → Create binding. Once this group is created you can delete the temporary user kubeadmin.
A second problem we have to address is that OpenShift allows users to create projects and perform other actions by default. We want to remove this capability; to achieve this it’s sufficient to delete the role binding for the self-provisioner role:

Finally, if you want to set up a user with limited capabilities you can create a role binding to grant self-provisioner and view capabilities:

Conclusions
In this article I described the full procedure we used to configure our OpenShift cluster to grant access via Active Directory. The steps presented here are documented in the Red Hat documentation, however I’ve tried to provide a reasonably valid setup from the security perspective as well, and with a particular focus on the pitfalls and details that may simplify and speed up the setup process.
You can find a comprehensive list of the guides I followed in the References section below.
References
Configuring an LDAP identity provider
Set up ActiveDirectory Authentication
How can I configure OpenShift to keep any users from creating projects
These Solutions are Engineered by Humans
Did you find this article interesting? Are you an “under the hood” kind of person? We’re really big on automation and we’re always looking for people in a similar vein to fill roles like this one as well as other roles here at Würth Phoenix.

Alessandro Valentini
DevOps Engineer at Würth IT Italy
Platform Engineer at Würth IT Italy
Author
Latest posts by Alessandro Valentini
05. 08. 2025
DevOps, Kubernetes
Use S3 Storage with OpenShift Data Foundation
04. 03. 2025
Automation, DevOps, Service Management
Group-aware Reboot with Ansible
31. 12. 2024
DevOps
GitOps: Pull-based vs Push-based Approaches