
DRBD 9 Multi-Slave Mesh Network Quickstart Guide
DRBD 9 allows configurations to have multi node replication without stacking. In this post I will briefly describe how to define a multi-node DRBD resource, and highlight the differences for pacemaker cluster integration.
Stacking was a mechanism used with previous DRBD versions, layering two or more DRBD Devices in a way where:
- The lower layer consists of a standard Master-Slave HA setup for failover purposes
- The upper layer again consists of a Master-Slave setup with the master of the lower layer DRBD device being replicated via second DRBD to a separate machine (e.g. for disaster recovery purposes).
With DRBD 9 native multi node support, we can now easily avoid this overhead, which allows us to use DRBD failover in N-Node (N > 1, N <= 16) NetEye 4 Clusters.
Defining a Resource
I picked a simple three node configuration for an influxdb service on NetEye as an example. All the machines had preconfigured, identical lvinfluxdb_drbd volumes in a volume group named vg01.
The /etc/drbd.d/influxdb.res file looks like this:
resource influxdb {
protocol C;

volume 0{
  device /dev/drbd1;
  disk /dev/vg01/lvinfluxdb_drbd;
  meta-disk internal;
}

on neteye01.neteyelocal {
  address 192.168.47.1:7789;
  node-id 1;
}
on neteye02.neteyelocal {
  address 192.168.47.2:7789;
  node-id 2;
}
on neteye03.neteyelocal {
  address 192.168.47.3:7789;
  node-id 3;
}

connection-mesh {
  hosts neteye01.neteyelocal neteye02.neteyelocal neteye03.neteyelocal;
}

}
As you can see, the only thing different from previous DRBD configurations is the assignment of a unique numeric node-id, as well as the specification of the connection-mesh directive enumerating all participating nodes. DRBD will then figure out the necessary node intercommunication on its own, leaving you with a master-slave-slave setup.
Integrating the resource in Pacemaker
Pacemaker clusters already include all the tools necessary to work with N-Node resources. When setting up an N-Node DRBD Device on an N-Node HA Cluster, the only thing that changes from a legacy Master-Slave DRBD setup is a single parameter.
You create the drbd cluster resource as usual by specifying the DRBD device:
pcs resource create influxdb_drbd ocf:linbit:drbd drbd_resource=/dev/drbd1 op monitor interval=60s
Now the only thing left to do is to specify the number of “Clone” resources in your cluster. The desire for simplicity dictates that the number of replicas should be exactly the same as the number of cluster nodes, such that any single cluster node can take over at any point in time.
pcs resource master influxdb_drbd_clone influxdb_drbd master-max=1 master-nod-max=1 clone-max=3 clone-node-max=1 notify=true
With clone-max being the number of clone-nodes we want to have (N) and clone-node-max being 1 replication per clone-node.
Obviously you still have to mount the device into the filesystem, which should be trivial from this point on.
These few really straightforward configurations lead to a very resilient, but very understandable architecture for our NetEye product.
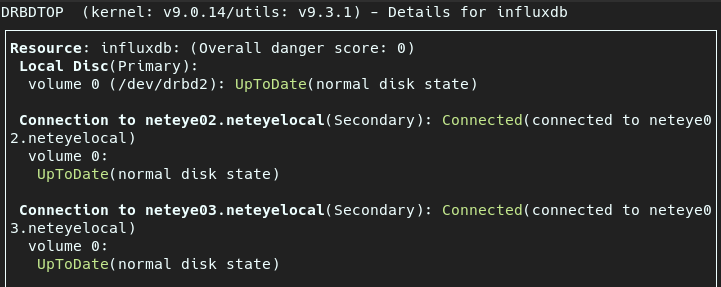
drbdtop
As a final remark, I can’t recommend highly enough the use of drbdtop.
It’s a wonderful little tool that gives a remarkably comprehensive overview of the state of a DRBD cluster, while also providing the right tools for status exploration and maintenance tasks.
(Intro to drbdtop) It was extraordinarily helpful for me when I was getting my feet wet with this technology. I was able to immediately grasp and eventually fix emerging problems on the fly using just this tool alone.
For more information and specific configurations you can reference to the extensive DRBD user guide.

Hi, thanks for this article. I might have found a couple of typos:
In the 1st command, shouldn’t it be “drbd_resource=influxdb”? BTW, I find it helpful to add –disabled here and enable the resource after the 2nd command.
In the 2nd command, it looks like “master-nod-max” is a typo; maybe it “master-node-max” was intended?