
17. 12. 2020
Mirko Morandini
Cloud, Unified Monitoring
EriZone/OTRS: Single Sign On with (Multiple) AzureAD Using Shibboleth
More and more enterprises rely on Microsoft Azure Active Directory as a company-wide identity provider for Office365, Teams, Sharepoint and other Microsoft and various non-Microsoft services. It provides Single Sign-On (SSO), so when opening any of these applications, if an authorization is needed, you will always be redirected to the same, trusted, company-wide login page.
Once you are authorized on the company domain, you can access the application without any further login. Users will no longer be requested to type their account password into a variety of different login pages, and company-wide multi-factor authentication can be easily implemented.
In this blog post I will show you a simple way to implement authentication using SAML2-tokens on Linux-based web applications (in this case the EriZone/OTRS service desk solutions), with the aid of Shibboleth. I’ll use AzureAD as the IdentityProvider (IdP), but any other IdP that supports SAML2 tokens (e.g., ADFS) should work, possibly with minimal adaptations to the configuration.
Moreover, the configuration presented here allows for easy integration with multiple Azure or ADFS tenants – this can be of high value e.g. for a multi-company service desk.
Architecture
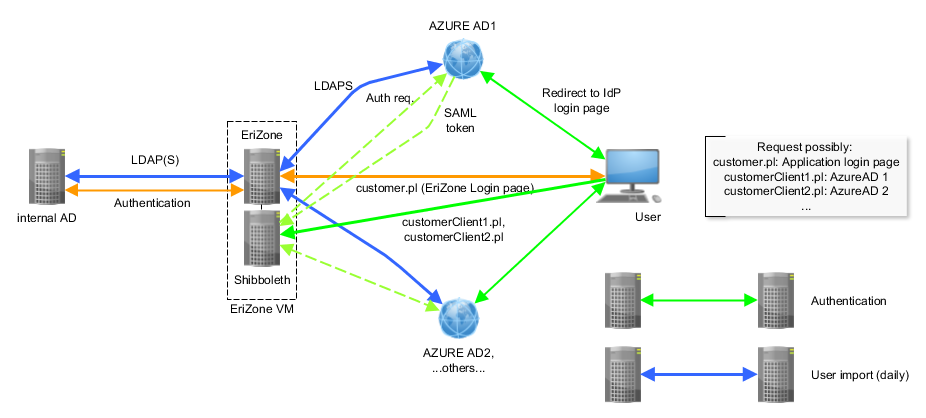
The following image shows the request flow with EriZone/OTRS, using Shibboleth as ServiceProvicer (SP) and one or more AzureAD tenants as IdentityProvider (IdP).
- Orange: the classic application login page, where password verification can be either performed locally or through LDAP to an internal or cloud AD.
- Green: SAML-based SSO.
- Apache hands the user request over to the Shibboleth service (SP). To implement multiple IdP’s, you can either provide custom URLs (as shown here) or a selection menu.
- Shibboleth responds to the user with a redirect request to the registered IdP (displayed with a dashed line, without the redirect, for clarity reasons).
- The IdP (AzureAD) prompts the user for login, displaying the company-wide login page.
- Once authorized, the IdP sends the SAML token to the user, redirecting it back to the SP.
- The SP verifies the authenticity of the SAML token and finally redirects the user to the application.
- Blue: customer information import and synchronization must still be carried out through some directory service or DB connection. In the case of AzureAD, a direct connection with LDAPS is possible.
Preparation (EriZone/OTRS Service Provider Side)
The EriZone instance needs a fixed FQDN so that it is reachable from outside through HTTPS. SAML authentication is achieved using Shibboleth (package shibboleth.x86_64), which can be installed by configuring one of the available repos.
Now you can generate the XML metafile to share with the IdP by simply creating a self-generated certificate, or using the one generated during installation in /etc/shibboleth. The certificate used should be different from your SSL certificate! However, after the latest updates of AzureAD, it is easier to skip this step and do a manual setup in AzureAD.
/etc/shibboleth/metagen.sh -c sp-cert.pem -h servicedesk.xy.com -o "XY" -u "www.xy.com" -a "noreply@xy.com" -s "noreply@xy.com" > sp-metadata.xml
Azure AD Side (IdP)
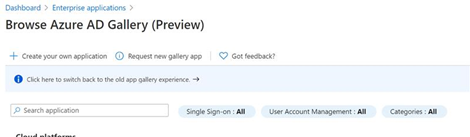
Log in to myapplications.microsoft.com and go to “Enterprise applications”. Here, add an “application not listed in the app gallery” (the exact names are constantly changing in AzureAD) and press “Set up single sign on”.
Here just insert the EriZone FQDN, and keep all of the default settings. The standard user attributes should already contain the user name for the EriZone login (usually the UPN, email or samaccountname). It can usually be found in one of the standard attributes (name, email or UserUniqueIdentifier) and is configurable. Optionally you could try to upload the metafile previously generated. See also e.g., https://docs.microsoft.com/en-us/azure/active-directory/manage-apps/non-gallery-apps.
Now download the generated XML file and share it with the SP. It can be found as “Federation Metadata XML” in the section “SAML Signing Certificate”. This file includes the entityID parameter that is needed by the SP. The XML is specific to the single Azure Tenant:
entityID=https://sts.windows.net/[Azure Tenant ID]/
Configuration of Shibboleth and HTTPD on the EriZone/OTRS VM (SP)
Copy the metadata XML file(s) obtained from the IdP(s) to /etc/shibboleth/Metadata/. It already contains the IdP certificate, nothing else needs to be done on this side.
Configure Shibboleth (V3):
Start with your shibboleth2.xml configuration by using the example-shibboleth2.xml provided in /etc/shibboleth/ (just overwrite the original shibboleth2.xml) and apply the following changes:
Edit the EriZone hostname:
    <RequestMapper type="Native">
          <RequestMap>
             <Host name="erizonetest.wuerth-xy.com">
                 <Path name="secure" authType="shibboleth" requireSession="true"/>
             </Host>
         </RequestMap>
     </RequestMapper>
Edit the hostname, then adapt the user loginname attribute (usually you can use the standard parameter “name” in the AzureAD SAML2 token). You can see the token passed from Azure using the browser’s web developer tools, in “Network”.
<ApplicationDefaults entityID="https://erizone.wuerth-xy.com/shibboleth"
         REMOTE_USER="name persistent-id targeted-id"
         signing="true"
         metadataAttributePrefix="Meta-"
         sessionHook="/Shibboleth.sso/AttrChecker"
In <SessionInitiator>, add the entityID (it can be found in the XML, https://sts.windows.net/[TenantID]). This should be done if you have a single tenant. Multiple tenants can be defined in the HTTP configuration (see below).
<Sessions …>
<SessionInitiator type="Chaining" Location="/Login" isDefault="true" id="Login"
       relayState="cookie">
      <!-- only for single tenant, comment for multiple tenants -->
      entityID="https://sts.windows.net/1ac5e.../" relayState="cookie">
      <SessionInitiator type="SAML2" template="bindingTemplate.html"/>
      <SessionInitiator type="Shib1"/>
</SessionInitiator>
…
      <!-- eppn to name -->
      <Handler type="AttributeChecker" Location="/AttrChecker" template="attrChecker.html"        attributes="name" flushSession="true"/>
</Sessions>
In the following section, register the XML metadata files for each IdP:
<MetadataProvider type="XML" validate="false"
      file="/etc/shibboleth/Metadata/IdP1Metadata.xml"/>
<MetadataProvider type="XML" validate="false"
      file="/etc/shibboleth/Metadata/IdP2Metadata.xml"/>
In the <CredentialResolver> section, register the certificate files (it’s fine to keep the ones that are predefined in the file and were generated at installation; alternatively you can use self-signed ones, but avoid using the SSL ones).
Configure Apache HTTPD
In /etc/httpd/conf.d/shib.conf, add one <Location> for each page (customer or index) to be protected by Shibboleth:
For a single IdP, the entityID can be defined in Shibboleth2.xml, so here you can keep the standard settings:
<Location /erizone/customer.pl>
    AuthType shibboleth
    ShibRequireSession On
    require valid-user
</Location>
With multiple IdP’s you register the entityID‘s here (they can be found in the IdP’s metadata xml)
<Location /erizone/customer-name1.pl>
    AuthType shibboleth
    ShibRequireSession On
      ShibRequestSetting entityId https://sts.windows.net/1ac...3/
    require valid-user
</Location>
<Location /erizone/customer-name2.pl>
    AuthType shibboleth
    ShibRequireSession On
      ShibRequestSetting entityId https://sts.windows.net/e1...d/
    require valid-user
</Location>
/etc/shibboleth/attribute-map.xml
Moreover, it might be necessary to add the attribute “name” in attribute-map.xml. It is used in shibboleth2.xml in place of “eppn”:
<Attribute name="http://schemas.xmlsoap.org/ws/2005/05/identity/claims/name" id="name"/>
EriZone/OTRS Configuration
In Config.pm, add the customer and/or agent authentication modules ShibbolethCustomerAuth and ShibbolethAuth‘. Pay attention to the backend numbers!
$Self->{'Customer::AuthModule'} = 'Kernel::System::CustomerAuth::ShibbolethCustomerAuth'; # ShibbolethAuth for Agents
$Self->{'Customer::AuthModule::IdentityIdentifier'} = 'name';
$Self->{LogoutURL} = 'https://erizone.xy.com/Shibboleth.sso/Logout';
For multiple IdP’s, or if some of the users need to be able to bypass SSO and use the application’s login page, you need to create the files that you previously defined in shib.conf in EriZone, by cloning index.pl and/or customer.pl in /opt/otrs/bin/cgi-bin (use /opt/erizone/src-dev/bin/… to be update-safe in EriZone).
Conclusion
Finally, restart the affected services with: systemctl restart httpd && systemctl restart shibd.
For debugging, take a look at the error logs: /var/log/shibboleth/shibd.log, and the otrs/erizone log to find out if the wrong parameters were passed from the SAML token to the application.
I’ve tried to distill this quite complex subject into a single blog article, hoping that it might help you implement SSO for your Linux applications. Unfortunately the world out there is full of pitfalls and exceptions, so getting this to run is often not as easy as it seems. Nevertheless, give it a try, and if you need some help, feel free to contact me!
Mirko Morandini
Mirko Morandini, PhD, is a senior consultant in IT Service Management and Asset Management, with over a decade of experience and numerous successful projects in Germany, Austria and Italy. As the GLPI advocate at Würth IT Italy, Mirko is passionate about open source solutions - and when he’s not optimizing IT processes, he enjoys spending time with his family and playing and conducting wind band music.
Author
Latest posts by Mirko Morandini
31. 03. 2026
Asset Management, GLPI, Service Management
GROUP-based Asset Permissions in GLPI 11: GLPI Rights Management Redefined
29. 09. 2025
Asset Management, GLPI, Knowledge Management, Service Management
Getting the M(u)st out of GLPI
30. 06. 2025
Asset Management, Unified Monitoring
Das neue GLPI 11 – offizielle deutsche Vorstellung [DE]
31. 03. 2025
Asset Management, GLPI, Knowledge Management, NetEye
GLPI: Automated Inventory Without Using GLPI Agents