30. 12. 2025
Automation, Development, Log Management, Log-SIEM, NetEye


Suggested reader skill level: Proficient in software development
Reading time: 10 min
What you will learn:
“Blockchain is hard.” Even if everyone has heard this sentence at least once, the truth is that it’s not. It’s just a database, with a bit of cool stuff added on top.
This article will teach you how to write blockchain-based software in a simple and comprehensible way. Some of the concepts might be a bit oversimplified, but it will be helpful to get a quick start.
Due to the widespread use of blockchain technologies, people have begun thinking that it might now be possible to have a secure, unbiased and decentralized way to express their vote.
After all, hundreds of thousands of financial transactions flow every day through the major blockchains, and they have yet to be shown to be insecure. Are we so sure that a voting system using blockchain is not achievable?
Here I’ll show you how to implement a simple but realistic voting system based on Hedera. What is Hedera? Save that for later and have fun with it.
A Minimal Voting System
First of all, we’ll have to imagine the structure of a future ballot. Let’s consider these as must have features:
- We must ensure that the number of existing votes is finite.
- Every person must be able to delegate their vote to any other person eligible to vote
- The delegation must be “liquid” (the person who received the delegation should be able to vote differently how he/she has been told to vote)
- It should be possible to host multiple ballots in parallel
On top of that, the more flexible the structure will be with possible customizations, the better the system will be.
To get a little bit of context for this example, let’s assume the voting system is owned by the United Nations, which will try to make everything as fair as possible.
Let’s Plan!
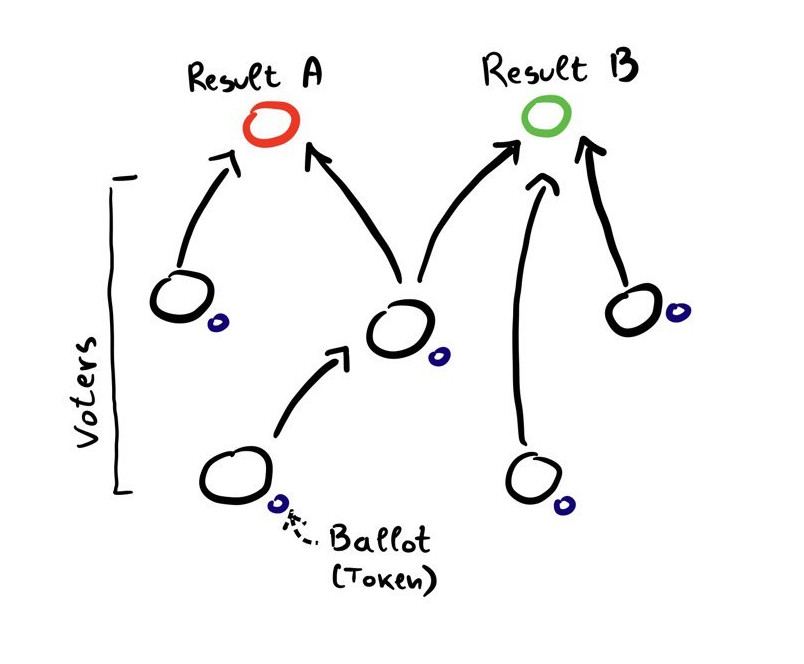
The architecture we’re going to construct is the following:
We’ll create a network, where each node will correspond to a voter. Every time a new election is needed, the UN (which is the network admin) will generate a new kind of token and distribute one token to each person who is eligible to vote in that election.
There will be a special subgroup of nodes (which will correspond to the voting options) that will be able to receive the token, but cannot move them elsewhere.
To express their vote, a user just needs to transfer that token to a “voting option” account.
Delegating a vote will then consist only of the act of moving the token to another account, which will then receive the ability to transfer it elsewhere.
Every single voter will have their own private key that they will use to access the corresponding account on the blockchain.
Counting the votes will thus consist only of the act of counting the number of tokens (of a specific type) that are associated with the voting option.
There are a ton of edge cases that should be taken care of, but for the sake of this prototype we’ll stop here.
Let’s Start Coding
We’ll adopt Hedera as a distributed ledger to work on. If you’re interested in understanding what’s behind this ledger, take a look at their main page.
First of all, we should register with a network. Luckily Hedera offers a free test network we can use. Let’s sign up.
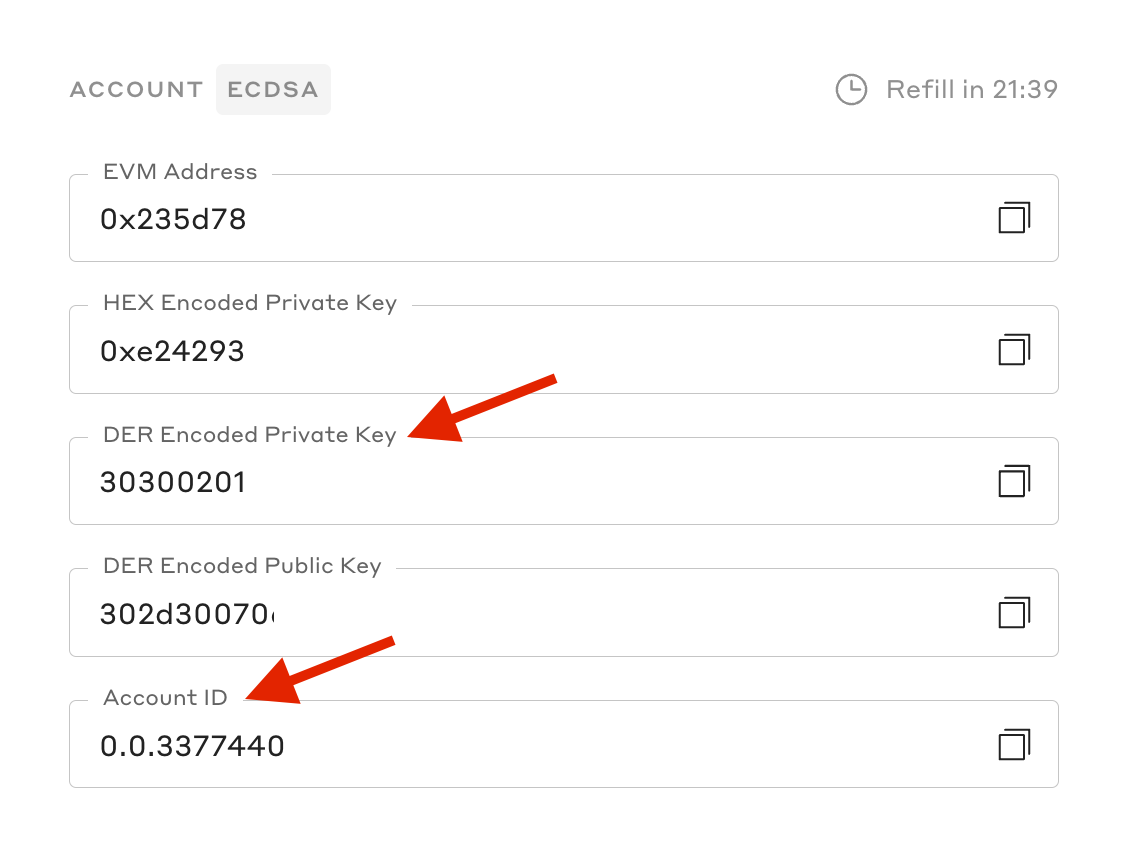
Once we’re done, we will get a bunch of codes. The interesting ones are:
- Account ID
- DER Encoded Private Key
We’ll use them to authenticate every transaction. We can now connect to the network!
Do we need some high tech language? Nope, just some good old Javascript and the Hashgraph library. Wait, hashgraph? What’s that? Long story short, Hedera has some cool features which makes it branch off the classical Blockchain algorithm. But let’s leave these questions to the extra reads at the bottom and focus on the code!
import { Client, Hbar, TransferTransaction } from "@hashgraph/sdk"

connectToHedera(account_id, private_key) {
   // No parameters, no set up (of course)
   if (account_id === null || private_key === null) {
     throw new Error(
       "account_id and private_key must have a value"
     );
   }

   // Create your connection to the Hedera (test) network
   const client = Client.forTestnet();

   //Set your account as the client's operator
   client.setOperator(account_id, private_key);

   // Set default max transaction fee & max query payment
   client.setDefaultMaxTransactionFee(new Hbar(100));
   client.setMaxQueryPayment(new Hbar(50));
   return client;
 }
Whoa, is it so easy to use Blockchain?
Yes! As you can see it’s pretty self explanatory, we just connect to the network and set a few parameters that protect us from burning out all our Hbars by mistake.
You may ask what an Hbar is. Well, every transaction in a blockchain needs some computing power, and given that nothing is free in our world we’ll need to pay for it. Hbars is the native currency of the Hedera network and it’s what is used to fuel our transactions.
Let’s Create Our Voter Accounts
First of all we’ll have to somehow identify the voters. Is there an easy way to do so? Of course, we just need to create a new account for them.
We’ll have to specify two things:
- The initial Hbar balance
- The public key that will be used to validate transactions
As everyone knows, the public key is bound to a private one, which we’ll assume the United Nations will share (privately) with the voter.
And to generate it, the UN will have to:
let accountPrivateKey = PrivateKey.generateED25519();
After that, one function is all we need to create the account (for reference, the variable this.client will symbolize the UN account and is the object returned bu the connectToHedera() function):
async createAccount(accountPrivateKey, initialBalance) {
 // Create a new account with the specified starting balance
 const newAccountTransactionResponse = await new AccountCreateTransaction()
     .setKey(accountPrivateKey.publicKey)
     .setInitialBalance(initialBalance)
     .execute(this.client);
 // Get the new account ID
 const getReceipt = await newAccountTransactionResponse.getReceipt(this.client);
 let accountId = getReceipt.accountId;
 return accountId
}
What we’ll get in response is the unique ID the ledger will use to identify the new account.
Quickly and painlessly we now have an account ready to be used. Wait… but how?
Some of you may already have guessed that every account is the same as far as the ledger is concerned, consequently the connectToHedera() function will do just fine!
Let’s Create Ballots
Okay, now we have to print the ballots people will use to vote. To do so, we are going to generate some fungible tokens. Fungible? A fancy word to say that the tokens are identical; once they stack you can’t distinguish them, but you can differentiate the tokens that are not of the same kind (relative to two different pools).
Consider this example: two 1 euro coins have the same value and are indistinguishable, but they can easily be differentiated from the 2 euro ones. To get back to the old terminology, the 1€ and 2€ are two different kinds of fungible tokens.
So yes, next time you can ask your friends to lend you some fungible tokens to pay for coffee.
Let’s print our ballots, then… Wait a moment, where do ballots go once they are printed? More specifically, where do tokens go once they are created?
Every token should be associated with an account, it can’t just sit in thin air. That’s the reason we’ll need a treasury. A treasury is an account that will receive every token (of a given type) when it’s created.
What’s the difference from a standard account? Again, none! We can even set our own account (even though it’s not good practice) as the treasury. It’s just a custom title that we can arbitrarily assign.
async generateToken(treasuryID, treasuryKey, initalSupply){
 //Create the transaction and freeze for manual signing
 const adminKey = PrivateKey.generateED25519();
 const transaction = await new TokenCreateTransaction()
      .setTokenName("CustomToken")
      .setTokenSymbol("F")
      .setTreasuryAccountId(treasuryID)
      .setInitialSupply(initalSupply)
      .freezeWith(this.client);

 //Sign the transaction with the token adminKey and the token treasury account private key
 const signTx =  await (await transaction.sign(adminKey)).sign(treasuryKey);

 //Sign the transaction with the client operator private key and submit to a Hedera network
 const txResponse = await signTx.execute(this.client);

 //Get the receipt of the transaction
 const receipt = await txResponse.getReceipt(this.client);

 //Get the token ID from the receipt
 const tokenId = receipt.tokenId;

 console.debug("The new token ID is " + tokenId);
 return tokenId;
}
You might wonder what an adminKey is. I don’t want to get technical, so just think of it as a key that can be used to manage existing tokens (freeze them, burn them…). Sadly, it will have no use in our example. It’s just a technicality needed for validating the transaction.
Now, all the ballots are printed and held in the treasury. Let’s distribute them!
Expressing a Vote
As you might imagine, the Hashgraph doesn’t care if you are voting or just distributing the ballots, at the end they both consist of the same basic operation: moving tokens around.
async transferToken(tokenId, senderID, senderPKey, target, amount){
 this.showTokenBalance(target, "Target balance before the transfer")

 //Create the transfer transaction
 const transaction = await new TransferTransaction()
      .addTokenTransfer(tokenId, senderID, -1*amount)
      .addTokenTransfer(tokenId, target, amount)
      .freezeWith(this.client);

 //Sign with the sender account private key
 const signTx = await transaction.sign(senderPKey);

 //Sign with the client operator private key and submit to a Hedera network
 const txResponse = await signTx.execute(this.client);

 //Request the receipt of the transaction
 const receipt = await txResponse.getReceipt(this.client);

 //Obtain the transaction consensus status
 const transactionStatus = receipt.status;

 console.debug("The transaction consensus status " +transactionStatus.toString());
 this.showTokenBalance(target, "(after xfer)")

}
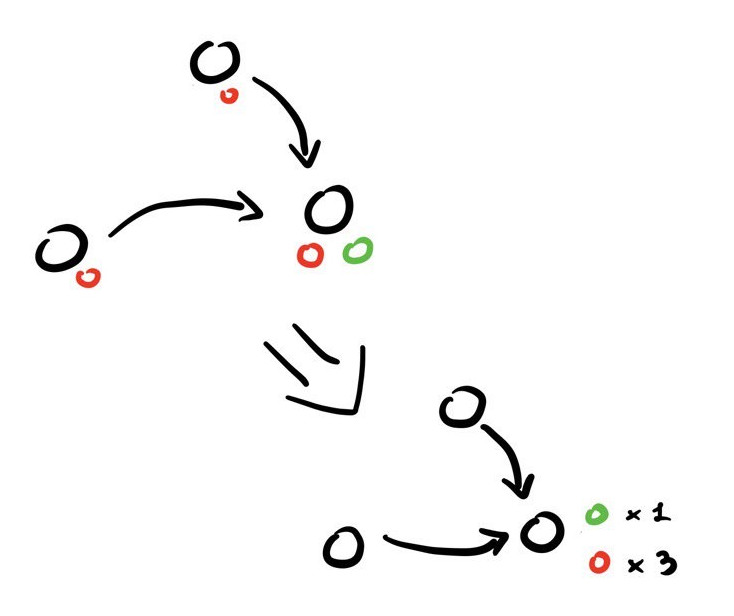
Voting consists of a transaction. A single transaction doesn’t necessarily need one sender and one receiver; you could do several transfers at the same time. What matters is that the total number of tokens added to others’ accounts matches the amount of those subtracted from the sending account.
It’s like the first rule of thermodynamics, the energy of the system must stay the same. You subtract some amount from yourself, and then you add the same amount to the receiving wallet.
To verify that a transaction is valid, it must be signed with the private key owned by the sending account. This is the guarantee that the one moving the tokens is the actual owner.
However, there is an extra security step that must be fulfilled. You can’t send custom tokens to an account which has not explicitly given permission to receive that kind of token.
It’s a way to make sure you’re not flooding the network with random tokens without anyone’s consent.
async associateToken(tokenId, target, signPKey) {
 // Explicitly associate recipient account for use with custom token
 let associateTx = await new TokenAssociateTransaction()
     .setAccountId(target)
     .setTokenIds([tokenId])
     .freezeWith(this.client)
     .sign(signPKey);
 let associateTxSubmit = await associateTx.execute(this.client);
 let associateRx = await associateTxSubmit.getReceipt(this.client);
 console.debug("Token Association: " + associateRx.status);
}
What this function does is tell the network that a specific account (verified by signing the request with its private key) is willing to take part in transactions related to a specific kind of token. It only has to be specified once for any kind of token. After that, that account can move tokens around and express its vote (or delegate the vote to another person).
To collect the results, you just need to count the number of tokens that the voting options receives. Et voilà, the voting has been done. Using different kinds of tokens will allow you to run multiple ballots in parallel.
With these functions you can construct the remaining steps. I’ll leave that to you as a playground to have fun with. And remember… this tutorial is intended as a basic project to interact with the ledger, not a real world application. You can construct a lot of additional features on top of it!
Interested in More? Take a Look at These
- Blockchain sounded cool, but Hedera is actually a Hashgraph. What’s the difference? Find out here. It’s one of the biggest corners I had to cut due to “blog constraints”.
- To implement a real world application we would need more features and constraints. To do so… Smart Contracts comes to our aid! Though writing those ain’t as easy. You can take a look at Solidity to understand the core concepts.
- Okay, but the results of the votes are shown live! There’s no secret regarding who is winning the election! I know, and I will willingly leave this question open for you. Is it possible to hide the results? Can it be achieved by processing all of the transactions at once? Good luck finding out!
These Solutions are Engineered by Humans
Did you find this article interesting? Does it match your skill set? Programming is at the heart of how we develop customized solutions. In fact, we’re currently hiring for roles just like this and others here at Würth Phoenix.
Author
Latest posts by Alessandro Taufer
31. 03. 2026
DevOps, Kubernetes
Abusing Trust Boundaries between TLS and HTTP
31. 12. 2025
Development, DevOps
What Tests Can Tell You About Your Codebase
19. 09. 2025
Development, DevOps
How to Debug Your Kernel Calls