


30. 10. 2025
Documentation

19. 12. 2025
Charles Callaway
Documentation
A Complete, Mobile, and Quick-Setup Video Recording Platform
If you make a lot of videos, and you don’t have a single dedicated space where you can keep all of your gear permanently set up, connected and oriented properly, you most likely spend a lot of time setting up and tearing down before and after a shoot.
Of course, “a lot of time” is not a thing we want to be involved in.
Over the years, many people have noticed this, and have created what are called “All-in-one” solutions, either a small desk that can stay in a corner, or mobile stands that can be rolled around to the desired spot. These things are catnip to content creators, so obviously they made YouTube videos about their setups.
Once in place, you just plug it in to the wall, flip a few switches, and voila’ you’re filming in under a minute. Great for filming on the spur-of-the-moment when an idea comes into your head, just for speeding things up, and taking your rig to other rooms or up/down stairs.
As makers of budget video tutorials, we’re more interested in the latter, and I can confirm first-hand that you can do this in under a minute. Well, excluding loading script into the teleprompter or going long distances (car trip, outdoors).
But even then, you can get it under 3 minutes. You just need a “go-bag”, a checklist, and a bit of planning.
About Those Other Efforts…
So what have people doing in this space? Apparently, making loads and loads of videos about how they did it. I guess now that everything is sped up, they have the extra time?
Let’s dive in.
The first all-in-ones were desktop setups. They were a reaction to having a stand or tripod for every element: One for the camera, another for the microphone, a third for a light, then another light, a teleprompter, etc., etc.
These are “mobile” in the sense that you can move each stand around. But you also have to worry about cables for power, putting them in the right orientation and at the right distance, and just the time for all that work.
Desktop Version
With a desk, you don’t have to do that. All the equipment stays in place, and you just have to flip a few switches. Unfortunately, it’s not a mobile solution (though some people have added wheels to their desks).
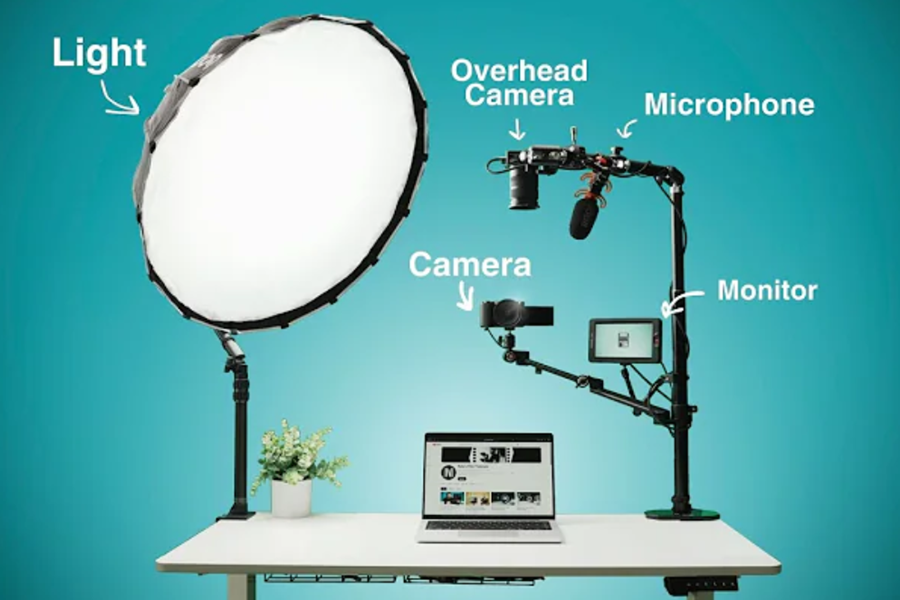
Here’s one with clamps that support vertical poles holding all of the various electronics (including an overhead camera), and a basket underneath to hold all the power cables.
This version has a monitor, which is required since you can’t go around the back of the desk to see what the camera sees, as it’s against the wall. The monitor is rather small, since you won’t be far away from it.
There’s no teleprompter, although you could use one if you want, and since the speaker will always be sitting at the desk, the fixed distance lets you use just about any type of microphone.
Mobile Version
But what if you want more control over your background? Or you need to film in one room one day, and a different room a different day?
That’s when you want a mobile setup. And since we need height, that means a C-Stand or tripod. Just be sure it’ll be stable: those cameras, tablets, mics and teleprompters will be expensive to replace if your stand tips over!
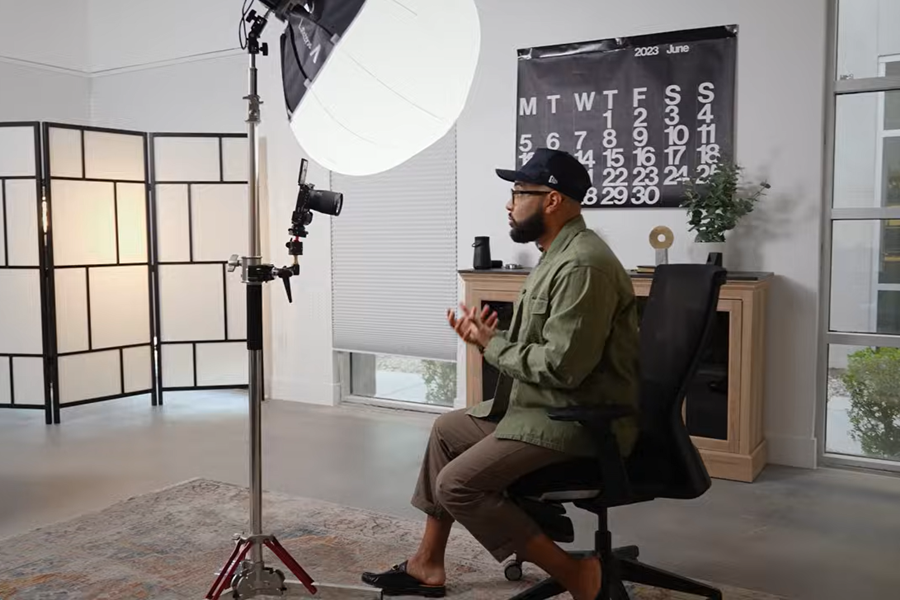
This one uses a C-Stand, which is much more robust than a tripod (steel rather than aluminum, so it can carry much more weight) and has caster wheels so you can roll it around on a floor. This type of setup is quite popular.
You can see how everything is more “vertical” than the desktop version, which lets you have stands on both the left and the right. While it gives you more mobility, this change also leads to some disadvantages and thus a set of trade-offs:
- Putting the light(s) above or below the camera will take away the possibility of having “cinematic lighting” where you have a key light and fill light to the sides.
- Having a heavy structure with caster wheels means you can’t go outside, go up or down stairs, and even elevators may give you problems. It’s mobile, not not in an unlimited sense.
- C-Stands don’t fold down as small as tripods do. Don’t think you can easily put it in a car and drive to another location, or put it in a shopping bag.
- C-Stand accessories tend to be very robust, since it doesn’t make sense to have cheap, weak arms on an expensive, robust stand.
So I would still prefer this approach over the desktop version, because I don’t have a dedicated space: I’m always on the move.
What I’ve Learned
After not having the budget for a C-Stand and its accompanying accessories, but with 2 years of experience in a similar mobile solution, I’ve learned a few things:
- Weight balance: Everything really needs to be as centered as possible to avoid having your whole stand tip over. So the base should be as wide as possible, and you need to put the heaviest things as low as possible.
- Weight in general: Try to use the lightest equipment possible, without giving up robustness. It makes the stand less likely to tip over, pieces less likely to fall off, and the whole setup easier to carry if needed.
- Remote control: Try to get everything Bluetooth enabled or with some other method (many lights come with dedicated controllers). It speeds things up more than you think, so it’s worth it if you can get them cheaply.
- Slippage: Mobile equipment means things will move around, so holders might loosen over time, and pieces might end up falling off.
- Distance: If you always use the same camera setup, measure the optimal distance to stand so that you take up the right amount of screen space. Keep a tape measure handy if necessary.
Two other items need more detail.
First, ignore the suggestion to put your lights on your stand. That means you won’t technically have an “all-in-one” setup, but in exchange you will get much better lighting. I recommend getting a second, cheap tripod with one of the new, small, cheap flat panel lights with built-in batteries, and that weigh hardly anything.
You could even do two of these and still have space left over in your bag. But you will need to remember to charge the batteries ahead of time. Pro Tip: Make a checklist, and make sure charging batteries is on that list.
Second, you’re going to need to know how that lighting makes you look. Traditionally, you buy a small TV screen called a “monitor” that costs almost as much as your camera, because it has to connect to the camera over a proprietary protocol.
Luckily, we don’t use expensive cameras, we use our smartphone which has a USB-C port! That means we can connect it to peripherals, like say a portable, external USB-C computer monitor:
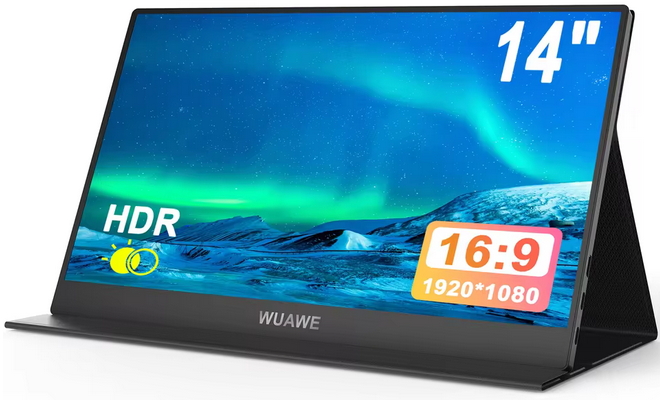
Attach it to your stand (pointing at you), connect it to the smartphone, and you have a cheap (~70euro) monitor. Even better, connect it to a USB-C hub so that you can also attach microphones and other devices, along with a standard power pack.
The color range may not be as good as one of the expensive monitors, but we aren’t really looking for results that can convince professional photographers here. We’re making YouTube tutorials. We just want to know that the lighting is good and the top of our head isn’t cut off.
I don’t think anything else in this article has saved me as much time as having a forward-facing monitor so that I don’t have to constantly run behind the camera to look at a video I just recorded to see if everything is okay, and then start a new video.
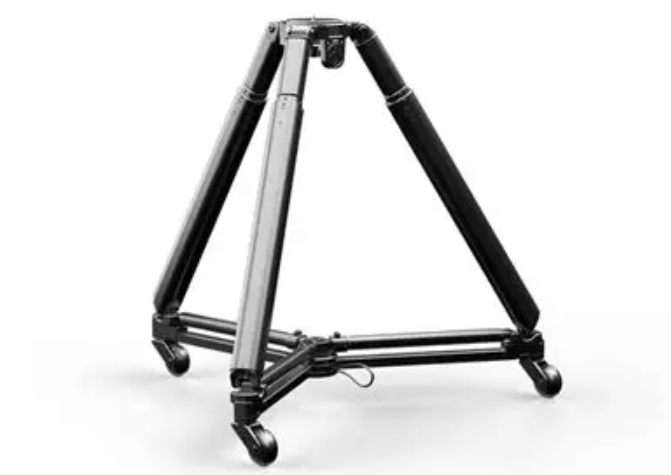
Using a Tripod Instead of a C-Stand
I valued increased mobility over stability: I’m willing to use cheaper and lighter equipment, and I film videos both at work and at my home office. So rather than a full C-Stand, I opted for an equipment tripod (not the camera-friendly tripod that professional photographers use).
Following my own advice above, I put the lights on a separate tripod. Everything else goes on the main tripod:
- A teleprompter box on top with the smartphone behind the glass
- An old Android tablet as the script display on the teleprompter tray
- A 15″ portable/external USB-C (power) and microHDMI (data) monitor attached below the teleprompter with a 75mm VESA mount clamp (I had to create and 3D print one myself…)
- A USB-A/C/PD hub with HDMI connected to all the above components, as well as the BT receiver for my Lavalier microphone
- A tray clamped to the tripod, which can hold the battery and accessories
Because the USB hub can power all the devices, and it accepts PowerDelivery, it can be powered either by an electric cord from the wall through a cheap smartphone charger, or directly from a PD-enabled power bank.
And everything can be packed down in 2 minutes into a shopping bag, and reassembled in another 2 minutes in another place.
Final Notes
So, what else…
I usually use a Lavalier-type microphone with a wind guard because I don’t have to edit the audio afterwards: breathing and other minor environmental noises never get picked up in the first place.
But I’ve noticed that these clip-on mics always make visible lines on your shirt, and putting them close enough to your mouth means you’re limiting your camera shot. Luckily though it turns out you can attach your mic to another arm on your tripod, and point it straight at your mouth, while you can move it where needed to stay out of view.
<1 schematic diagram of (monitors, hubs, etc.)>
With all these devices, we also have to worry about how much power they need. Here’s a typical range:
- Smartphone (camera): 4 watts
- Tablet for teleprompter script: 4 watts
- Portable 15″ monitor: 10 watts
- Microphone receiver: negligible
So excluding the lights, we’re easily in the range of a PD power bank or a PD smartphone adapter connected to the grid. The hub to connect these needs to have multiple USB-C and USB-A ports, one of which is a PD input port, and an HDMI port (to pair with an HDMI-to-microHDMI cable).
When you connect your smartphone to the hub, you’ll need to enable screen mirroring output, and the hub will then magically pass through the on-screen camera view straight to the monitor, so you can see yourself even though the smartphone’s screen is facing the opposite direction (the best cameras are on the back side).
All that’s left is to remind you to pay attention to weight distribution and cable management. I solve both by clamping a tray on the reverse side, and putting a large power bank on it, with no cables longer than 40cm.
And the whole thing weighs only about 10 pounds / 4 kilograms, so I can carry it around with one hand. Though it turns out they sell detachable tripod wheels, too. Who knew?
Charles Callaway
Author
Latest posts by Charles Callaway
25. 02. 2026
Documentation
Making Your Own Video Tutorials, Part 20: Recording a Good Task-based Screencast
30. 10. 2025
Documentation
Tutorial Video Editing Technical Tips, Part 2: No Country for Boring Men (or Women)
30. 04. 2025
AI, Documentation, Knowledge Management
Would You Use an AI Chatbot to Write Your Blog Post?