19. 12. 2025
Documentation

Welcome back to our continuing series on budget-friendly methods for making video tutorials. With today’s post I’m going to start a 3-parter on Teleprompters. I’ve previously described Teleprompter hardware and setup, but today I want to talk more about usage recommendations now that I’ve been using one for several years.
Also remember that a teleprompter was part of my mobile recording platform. One reason for that is a teleprompter provides a stable platform for both the camera (smartphone) and the reader (tablet). It also makes sense to turn it into a power and data hub to simplify things even further.
Components in a Teleprompter Hub
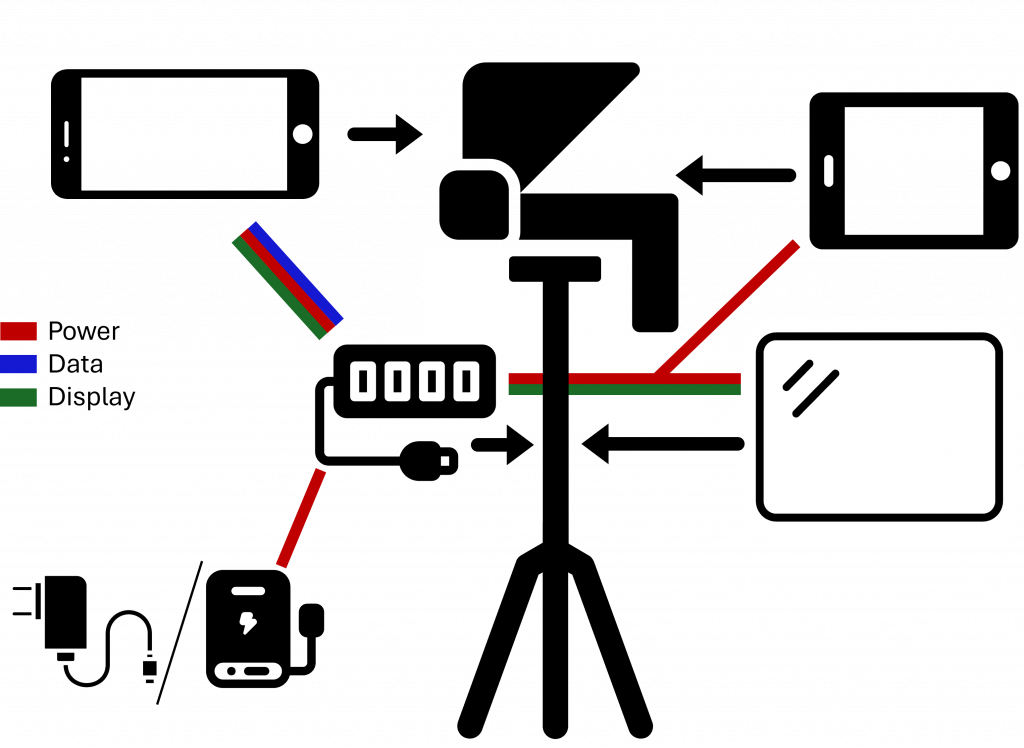
First let’s look at the individual devices and connectors:
- Teleprompter: Sits atop the tripod and holds the camera (smartphone) and reader screen (tablet) for the script. An angled pane of glass reflects the script to the user while maintaining a clear view, a frame holds the camera in the right position, a flat surface holds the reader, and a box and shroud keeps light out so you can easily read the script.
- USB-C hub: Connects principally to the USB-C port of the smartphone, and provides a PD port for distributing power (from a battery or a wall wart), HDMI output for connecting a monitor to mirror the camera (I just use an external HDMI monitor), and some additional USB ports for a microphone and providing power to the reader and monitor.
- The reader: Typically a tablet, it rests below the glass. It should have the script loaded beforehand, but while in use it only needs power and optional Bluetooth set up if you want to connect a scrolling device.
- The rest: Connect to the hub and also sit on the tripod.
Not that “the rest” aren’t important, they just don’t play a part in the recommendations below.
Tripod Hardware Set Up Tips
The optimum distance from our low-budget, tripod-based teleprompter (using a smartphone and tablet) to the target person is about 2.5-3 meters. In a home studio you may only be able to get about 2 meters, but here’s why you’d want 2.5 even if you have to squeeze it into a corner and shoot across the room to get that distance:
- When it’s closer it’s easier for you to read the script, but viewers are more likely to see your eyes move as you do and your face will lose perspective
- Farther than 3 meters means you’ll have to get a larger reading display than what a tablet has in order to be able to read the script
- In between gives you the best tradeoff between readability, minimized eye movement, and camera perspective
Once you get your tripod in the right spot, take a moment to think about all those thousands of euros/dollars you’re putting on top of that thin cylinder of aluminum. So make sure you didn’t just buy the cheapest tripod possible, and maybe put some sandbags on the tripod legs to keep everything from tipping over.
I have a few more tips from my own experience for you while setting everything else up:
- If you see light leakage behind or around the reflecting glass, don’t hesitate to add your own shroud: You just need a bit of dark fabric thrown on top of the prompter if you don’t want anything more permanent, even a jacket will do. You want it to be both dark behind the glass to keep the contrast with the text strong, and also to keep out reflections from the light to the sides. Alternatively, keep the entire part of the room behind the teleprompter very dark.
- Get some rubber or other non-slip material to put under the reader to keep it from sliding off the teleprompter platform and falling on the floor. Other solutions to keep the tablet on the tray include large clips or some very big rubber bands.
- There are three basic ways to control the speed the text scrolls: static/single speed, dynamic speed that’s pre-programmed into the script, and device-controlled with something like a handheld Bluetooth device. The third option is difficult to do unless you pay a lot of money for the software integration. If you use a web browser to scroll your script, there has been a Web Bluetooth API in the works for years now, but it still isn’t a standard.
I went with a variant of the second scrolling solution where I just insert pauses into the script itself (more on that in part 2).
Note that if you go for the single speed option, you’re going to have to adjust your timing by speaking more quickly or slowly, so make sure you practice that ahead of time.
Script Writing Tips
It’s common knowledge that the kind of “voice” you use when speaking conversationally is not the same as reading out loud something that was intended only to be read.
In fact, speaking uses a slightly different grammar and vocabulary, and you need to write your script to reflect that, or else your viewers will interpret this difference as a lack of authenticity. The easiest way to start fixing your script is just to read it out loud.
You should then either listen to yourself while speaking, or record yourself and watch the playback. If it doesn’t sound odd at all, then congratulations, you already know how to write for a speaking voice. Everyone else, all you need to do is rewrite the parts that sound strange. Then record and listen to yourself again, rewrite the odd parts, and repeat until you don’t hear anything that you need to change.
Some other tips on writing scripts specifically for teleprompters:
- Write in single sentences: If you write paragraphs, you’ll get completely lost trying to read the script because you’ll only see a mass of text. Writing in separated sentences keeps vital “empty space” surrounding the words so you can pick them out more easily while reading.
- Write pauses into your scripts: Especially if you don’t have dynamic scroll speed control while speaking, you can add fully or partially blank lines where needed. As I suggest below, you should reread your script in the teleprompter each time you rewrite it, and here I’ll suggest you should deliberately insert and move the pauses as part of that rewriting process.
- An aside on pauses: The more important a break point is, the longer the pause should be (although we’re talking tenths of seconds here) so use longer pauses when for example you change topic.
- Add other types of notes into your script: For instance, when’s a good time to look away on purpose, when you don’t need to have “camera face” because you’re going to be using B-Roll, what to emphasize, how many items are in a list, when to slow up or speed down, etc. Any aid you can give yourself ahead of time will make it easier to read when you’re making the final recording.
Readback/Display Tips
Beyond writing and rewriting, there are still a number of things we can do to improve our reading.
- Use all capital letters instead of mixed case. If you’ve ever caught a glimpse of a teleprompter in a television studio while they’re showing something behind the scenes, you’ll see the text is always in all caps.
- Use as narrow a column of text as you can in order to minimize sideways eye movement. Changing parameters like column width, font size and line spacing always have an effect on scroll speed, so be sure to fix these parameters before you make any other rewrites or changes like pauses that as a side effect will alter scroll speed.
- Use color schemes and even emoji in your script if possible. You won’t notice the use of Italics or Bold on a teleprompter, but you will notice colors and shapes. So have a color for emphasis, a color for “slow down here”, a happy face emoji if you should smile, etc. Written-out stage instructions don’t work because (1) you won’t have time to read them, and (2) every bit of screen real estate is important.
- Practice, practice, practice: Even besides the iteration for rewriting, practice two days before you record, then the day before you record, and even several times the day you record. At this point you shouldn’t be trying to rewrite any more, but you should be trying to perfect how long you pause, when you should look away, and what additional cues you can add to your script.
When it’s time to record the final take, here are a few tips specifically for that:
- You should try to keep the text you’re actively reading in front of the camera lens, which is quite small (it’s not necessarily in the center). If you want, put a small white ring-shaped sticker around the lens so you can see it faintly through the glass pane.
- Practice reading the text peripherally, without letting your eyes drift to the top or bottom of the glass (because you’re faster or slower than the scroll speed). Note that just as you may be able to see eyes move left to right while reading, you can also see them moving up and down.
- If you find yourself going too fast and you need to slow down, try to do a half-second pause between sentences where no part of your body moves during that time. That makes it much, much easier to cut the delay in post-edit.
- Give yourself plenty of time. If you start getting nervous and in a hurry because you’re running out of time, it will be noticeable.
How many takes should you do for the final recording? From the point of view of audio hardware you’ll want as few takes as possible, even all in a single continuous take, since tone and background noise change in a room even over the course of minutes.
As a “voice actor” however, you might find it better to do a large number of short takes, so that you can rest your mouth, do a quick preview of the next section, focus better, etc.
I prefer a single take (actually, multiple single takes so I have the possibility to mix and match). So remember that the choice implies tradeoffs, but by all means try out each approach to see if you like one better.
Speaking Tips
And when it comes to actually speaking and showing your face on camera?
You should treat your voice and face as if they are worthy of acting classes. And you should make that investment before you start making videos, not after.
For instance, you should know:
- How fast or slowly you can speak
- How long you can talk at a fast speed
- Whether drinking something between takes will clear your throat
- What facial expressions, posture and gestures look good on you
Pick up a book, read a blog, or watch some online videos about voice recording, acting and podcasting. Try standard acting tips to see if they work for you, and learn about communicating with an audience. Record yourself and critique what you see. Watch critically how other people do the same thing.
That said, don’t actually be an actor, or you’ll look it onscreen. You just want to be aware of what works best for you and what choices you have and what they imply; you don’t want to try (at least initially) to learn new skills just because you see others doing them. But also know that the more time you spend in front of a camera, the more natural you will get at it.
Once you know what works for you, try to make your recording environment (including equipment and scripts) match and even support that.
Charles Callaway
Author
Latest posts by Charles Callaway
25. 02. 2026
Documentation
Making Your Own Video Tutorials, Part 20: Recording a Good Task-based Screencast
30. 10. 2025
Documentation
Tutorial Video Editing Technical Tips, Part 2: No Country for Boring Men (or Women)