30. 06. 2026
Documentation

24. 10. 2023
Charles Callaway
Documentation
Making Your Own Video Tutorials, Part 15: Using a Teleprompter
Have you (like me) been spending too much time memorizing a script so in the final video you look as natural as possible?
Maybe it’s because the ideas behind each video keep becoming more and more complicated, but I’m sure my scripts are longer than they used to be. And for me, there’s a point beyond which I just can’t remember more words. Or at least, it starts taking me more time to remember than I have available for each shot.
So if my next video is short, I imagine I’ll still memorize it. But if it goes over some line, it’s time to get a bit more serious. And that calls for a technique to avoid memorization. Have I mentioned listening to recordings of you reading your script over a Bluetooth earbud? If not, I’ll write a blog post about that next time.
Today though let’s look at the teleprompter method.
Why Use a Teleprompter?
As I mentioned above, if you can usually break your script down into short scenes, you probably don’t need to use one at all. For instance, the topic may just naturally change. But more likely it’s because you’ve found a way to insert a full screen transition, which in our case is probably a screenshot or animation.
Because the real reason to use a teleprompter is when you need to talk during a long scene without interruption. (If your video has only a few very long scenes, feel free to use a teleprompter only in those scenes!)
And that means being as natural as possible, maintaining the continuity of everything you show in the video, but especially the ideas behind the narration. When there are no interruptions, you’re the only thing holding viewers’ attention, and you’ll need to keep talking while gesturing, while moving, and while showing appropriate facial expressions.
So if your plan to do a long single take of a number of scenes in one shot, by all means use a teleprompter for it. Then you can concentrate on everything else going on in your shot rather than concentrating on remembering the next word in the script:
- Posture
- Gesture
- Facial expressions
- Vocal emphasis
- Diction
- All of the above in a coordinated fashion
So, Why Don’t I Just Make a Teleprompter?
Wow, it turns out that lots of people have lots of advice on YouTube about teleprompters. Just what you need then, more advice from me! But if you like suffering a little, I won’t stop you.
Now, you know that I’m a budget-conscious person. I don’t think I’ve spent more than 300 euros/dollars on equipment (excluding my smartphone as my only camera).
So one of the first things I thought about was making a teleprompter myself. After all, “they” say online you can make one for just 4 or 5 bucks! I spent a little bit more than that. But as a spoiler alert, let me say that it really wasn’t worth it. Especially after I found a quite workable one online for only 60 euros.
So why wasn’t it worth it (unfortunately)? I’d like to think it’s not because I’m bad at building, while everyone on YouTube has no problems. Well, remember first that no matter whether you DIY or buy, you’re going to be putting an expensive tablet or phone a meter high in the air to project your script. How safe do you want that equipment to be?
It turns out that your tablet/phone is heavy, and you’ll need a platform and an arm to attach it to your rig at the right height for your recording camera. That means a metal arm, and unless you have some good metalwork skills, you will be buying one. Add up those costs, and you’ve spent more than just buying a teleprompter.
One online video even suggested you use a music stand to hold the glass and tablet in front of the camera… but have you seen how much those cost? Almost half as much as a budget teleprompter by itself.
The other (cost-insurmountable) problem I came across was blocking out light. Unless you have great skills and lots of time, you won’t be able to build a (presumably fabric) light blocker that will always stay out of the way of the camera, and will also last month after month of usage. Especially if you want the kind that folds up so you can keep it clean and out of the way.
The cost/benefit ratio just isn’t there. It’s going to take more building time than you think, the result won’t be nearly as good, and you’ll end up spending more time fixing it and throwing away useless video than it’s worth.
Oh well, I guess I’ll still have my $4 DIY teleprompter as a backup. Or as a conversation starter.
Instead, What to Look for When Buying One
I found these three factors to be most relevant:
Platform style
At least, outside of the expensive stuff, there are two main styles:
- Stand > Arm > Platform, where a small arm attaches to the camera tripod below the camera level, and you add to it the platform and then your tablet or smartphone. This seems to be the most common style. It allows you to move the camera and projector independently.
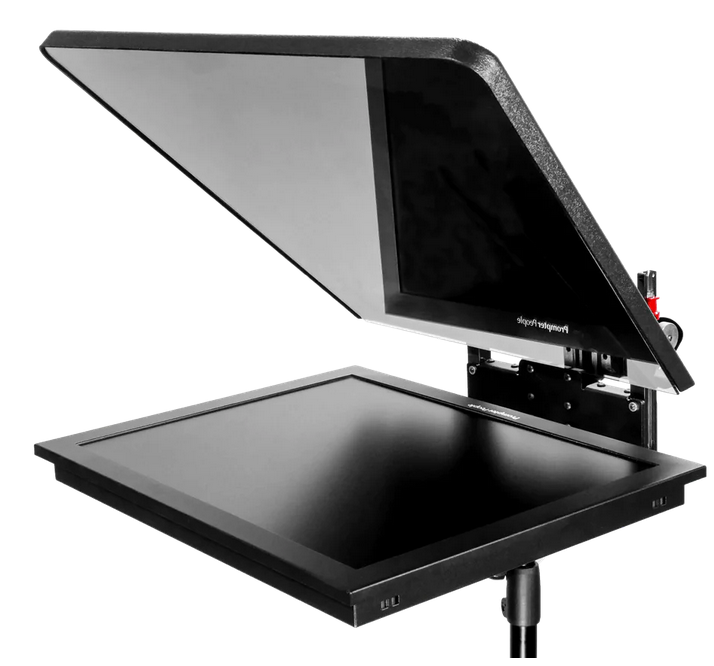
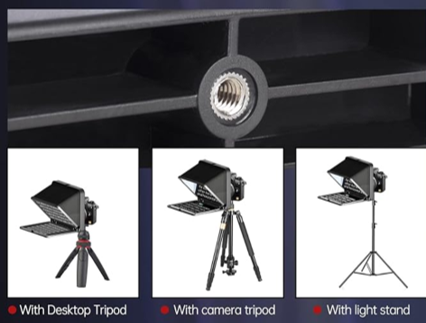
- Stand > Platform, where a combined platform and camera holder has a standard 1/4″ screw hole underneath, where you can attach everything at once on top of the main tripod:
I found that the stand style is not just usually cheaper, it’s also smaller and easier to manage. The only problem is that they are smaller (wait, wasn’t that an advantage? oh right, text size vs. manageability) and thus using a tablet will be less secure than a smartphone as a projector.
Glass size
The projector faces the pane of glass, typically at a 45-degree angle, so that the light bounces towards you and not into the camera. If you use a tablet, you might need a larger glass pane than if you use a smartphone. Smaller ones are usually around 8 inches diagonal, in between the sizes of a tablet and a smartphone.
However, note that if you use a teleprompter with a small glass pane, you’ll be limiting yourself to sitting closer to the camera, since the text won’t be as legible from a farther distance.
Also note that when you sit close to the camera, if you use the entire width of a large pane of glass, your eyes will stray far away from the center and viewers will probably notice your eye movement, even to the point of distraction. There’s a tight relationship between distance and size, and thus visibility and legibility.
Software
Finally, unless you’re like Leonardo da Vinci, you’d probably like to read text in a normal way. That means you’ll need to reverse the text, which in turns means you’ll need an extra bit of software to manage the reversal.
You can use an app for that if you’d like, but most of them require either payment or are ad-based, and you can’t customize them at all. Sometimes when you buy a teleprompter you’ll also get a link to download extra software from an app store.
I found a much better solution was to use free, browser-based software like CuePrompter. Since it’s browser-based, with just HTML/CSS/SVG/JS, you can save the page and then customize it as much as you want. I put the script in the text box contents inside the HTML file itself, and change the font color, size or brightness for things like emphasis or gesture notes.
How I Set Everything Up
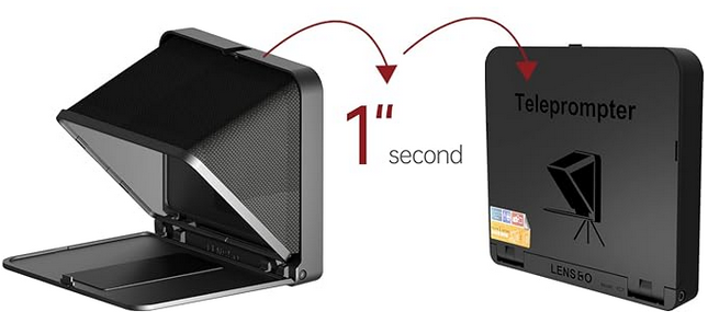
So what did I do in the end? I bought a $60 stand-style teleprompter with a Bluetooth remote control and a standard camera “shoe” attachment on top for lights or microphones, and that folds up and packs away very quickly. (I’m very satisfied with it, and the reviews I saw for almost all teleprompters were above 4.)
For me perhaps the most important characteristic was the 1/4″ screw hole on the bottom, which allows you to attach it to the top of a standard camera tripod, and thus everything is in one bundle.
It also comes with holders for both a smartphone and SLR camera, and variously sized adapters (metal and foam) that ensure no light gets in unless it comes straight through the glass.
Setting up was just putting the teleprompter on the tripod, opening it up, putting the camera in the holder, adjusting the light blockers, and putting a tablet with the script loaded on the folded-down platform.
To get the software started, you select the font size and screen width available for text (dependent on your distance from the ‘prompter), flip the vertical so that the text isn’t backwards when you look at it in the glass, and then press the play button.
I suggest you try your script at several speed settings to figure out what’s best. I found that a continuous, steady pace worked better than using the remote control in that it’s one less worry you have to bother with, that the remote sometimes leaves a clicking noise in the recorded audio, and the whole reason to get a teleprompter in the first place was to create long, seamless shots. You’ll also want to use both hands at the same time for gestures, without having a remote control be visible.
Final Thoughts
Don’t be afraid to change and reload your script after you’ve read through it a few times. And be sure to turn off the tablet’s screen timeout!
Some other bits of advice:
- Don’t scratch the teleprompter’s glass, or let dust get inside. It’ll show up on the recorded video even if the scripted text doesn’t.
- There are lots of how-to teleprompter videos on the internet as mentioned above, take advantage of them! (Some are better than others.)
- And take advantage of this new opportunity to up your game on your gestures, facial expressions, and speech quality.
So count me a fan when the situation calls for it. Not “if you have a hammer, everything looks like a nail”, but “the right tool for the job”.
Happy teleprompting!
Charles Callaway
Author
Latest posts by Charles Callaway
30. 06. 2026
Documentation
Teleprompter Tips, Part 2
30. 04. 2026
Documentation
Teleprompter Tips, Part 1
25. 02. 2026
Documentation
Making Your Own Video Tutorials, Part 20: Recording a Good Task-based Screencast
30. 10. 2025
Documentation
Tutorial Video Editing Technical Tips, Part 2: No Country for Boring Men (or Women)