
10. 12. 2020
Patrick Zambelli
NetEye, Unified Monitoring
Microsoft Icinga2 Agent Deployment Automation with Tornado
When implementing monitoring with Icinga2 you will soon reach the point where you will have to install Agents in order to monitor your infrastructure in-depth. Here the Icinga2 Agent provides concepts to access information about and the properties of an operating system over a secure remote connection.
In an enterprise environment consisting of thousands of hosts, you need a standardized and automated deployment method so that you can reduce errors and costs (time). Established approaches already exist, and one to start off with is the “Icinga2 Powershell module”, a script base to automate:
- Downloading the Agent from a central repository
- Setting up the agent and generating signed SSL certificates
- Registering the Agent with central monitoring
The Distributed Monitoring Scenario
This works fine while operating on a single central site, organized with a single “master” monitoring node. When extending Icinga2 deployment and adopting the concept of distributed monitoring, things come to a halt, however, when security regulations deny access to the central master zone.
Let me introduce a deployment scenario here:
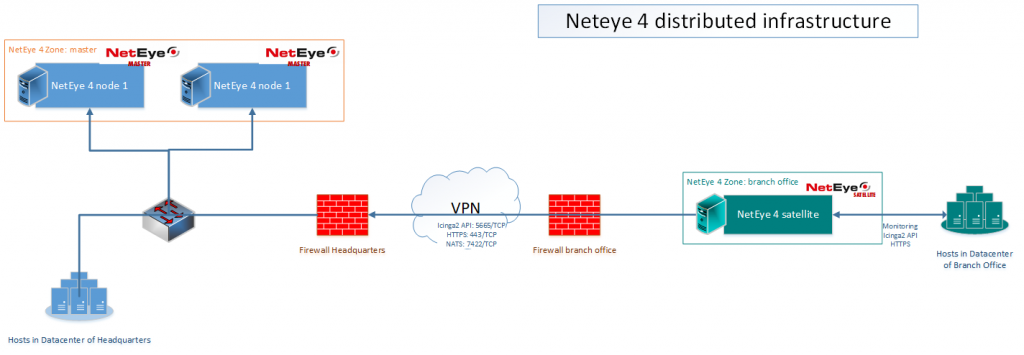
Agents installed within a remote zone (here the “branch office”) will need to obtain a certificate and register themselves as monitoring objects in the master zone. Now here comes the difficult part: due to reasonable security restrictions, direct communication is not allowed from a host in the branch office to the NetEye master nodes.
In this blog post I would like to present the logic we implemented within a PowerShell script to automate the deployment of Icinga2 Agents, and to highlight the approach for communicating with Tornado from any remote “Satellite” zone. The script “neteye_agent_deployment.ps1” is published on github and is available here.
Identify the Monitoring Zone for the Agent
Before running any Agent setup or sending configurations to the central master, the script will need to identify the zone for the new host. Hence, a range of known sub-nets providing a mapping with Icinga2 Zones and Endpoints seems a good place to start.
This array example defines the subnets, the related endpoint(s), zone names, whether Master or Satellite zone, and finally the host template to assign to new hosts in that range:
[array]$arr_subnet_ranges = @(
("10.10.0.0/15", "myclusterhost.mydomain.lan", $null, "neteye_zone_master", $TRUE, "" ),
("10.90.90.0/21", "satellite1.mydomain.lan", "satellite2.mydomain.lan", "sat_neteye_zone1", $FALSE , "generic-agent-windows-zone1"),
("192.168.0.0/24", "dmz1.mydomain.lan", "dmz2.mydomain.lan", "sat_dmz_zone", $FALSE , "generic-agent-windows-dmz")
)
In the next step in the script, I discover the local IP addresses and check which ones belong to the array above. Thanks to some functions available for PowerShell published by Joakim Svendsen, this check is accomplished on the fly.
First, I iterate over the array of subnets using the functions from Svendsen’s PSipcalc and, in the case of a match, assign the identified zone name, endpoints and host template to variables:
for ($x=0; $x -lt $arr_subnet_ranges.Length; $x++){
	[array] $arr_subnet2test = $arr_subnet_ranges[$x]
	Get-ProperCIDR $arr_subnet2test[0] | ForEach-Object { $IP_Subnet_discovered = Get-NetworkInformationFromProperCIDR $_ }

	if ( $IP_Subnet_discovered -eq $TRUE){

		$neteye4endpoint = $arr_subnet2test[1]
		if ($arr_subnet2test[2] -ne $NULL){
			$neteye4endpoint2 = $arr_subnet2test[2]
		}
		$neteye4parent_zone = $arr_subnet2test[3]
		$is_neteye4endpoint_master = $arr_subnet2test[4]
		$host_template = $arr_subnet2test[5]
	}
}
Once this information is collected, we can configure the Agent’s settings and then register the new host within the central monitoring master. First though we’ll need a secure channel, and we’ll need to configure a Tornado Webhook collector.
Configuration of the Icinga2 Agent
Before proceeding to Tornado, let me introduce the next relevant steps to configure the Icinga2 agent on the host.
You’ll find a section in the script that downloads the suitable .msi setup file from a web repository. An alternative section fetches the file from a common fileshare.
$parms = '-k', '-s', "https://${neteye4endpoint}$url_icinga2agent_msi", '-o', "${workpath}\Icinga2-v${icinga2ver}-x86_64.msi"
$cmdOutput = &"$workpath\curl.exe" @parms

$MSIArguments = @(
	"/i"
	$workpath + "\Icinga2-v${icinga2ver}-x86_64.msi"
	"/qn"
	"/norestart"
)
Start-Process "msiexec.exe" -ArgumentList $MSIArguments -Wait -NoNewWindow
To set up the Agent properly along with the configuration of icinga2.conf and zones.conf, you’ll need to generate a certificate and sign it with the Icinga2 CA.
Before running icinga node setup, the certificates are created after a handshake using a specific ticket for this host:
# 2 step: generate ticket from satellite
$parms = '-k', '-s', '-u', "${neteye4_icinga_api_user}:${neteye4_icinga_api_password}", '-H', '"Accept: application/json"', '-X', 'POST', "`"https://${neteye4endpoint}:5665/v1/actions/generate-ticket`"", '-d', "`"{ `\`"cn`\`":`\`"${icinga2_agent_hostname_short}`\`" }`""
log_message -message "[ ] Fetching Ticket via Icinga API: $parms"
$cmdOutput = &"$workpath\curl.exe" @parms | ConvertFrom-Json

$ticket = $cmdOutput.results.ticket

# 3 step: generate local certificates
$parms = 'pki', 'new-cert', '--cn', "${icinga2_agent_hostname_short}", '--key', "${CertificatesPath}\${icinga2_agent_hostname_short}.key", '--cert', "${CertificatesPath}\${icinga2_agent_hostname_short}.crt"
$cmdOutput = &$icinga2bin @parms


# 4 step: get trusted certificates
$parms = 'pki', 'save-cert', '--host', "${neteye4endpoint}", '--port', '5665', '--trustedcert', "${CertificatesPath}\trusted-parent.crt"
$cmdOutput = &$icinga2bin @parms
Once the ticket is retrieved, the certificates are generated and all other relevant information is then available; the configuration of the Agent can be triggered:
# 5 step: node setup
$parms = 'node', 'setup', '--parent_host', "${neteye4endpoint},5665", '--listen', '::,5665', '--cn', "${icinga2_agent_hostname_short}", '--zone', "${icinga2_agent_hostname_short}", '--parent_zone', """${neteye4parent_zone}""", '--trustedcert', "${CertificatesPath}\trusted-parent.crt", '--endpoint', "${neteye4endpoint},${neteye4endpoint}", '--endpoint', "${neteye4endpoint2},${neteye4endpoint2}" , '--ticket', "${ticket}", '--accept-config', '--accept-commands', '--disable-confd'
$cmdOutput = &$icinga2bin @parms
After these steps you will find yourself with a running Icinga2 Agent on your new host, which is ready to receive its first monitoring jobs. But to start that, you’ll also need this host to be created as a monitoring object in the monitoring configuration of the master instance. Here’s the moment when Tornado comes in action!
Tornado Webhook Collector as a Secure Channel
The NetEye 4 Tornado event processing engine comes with a series of collectors, able to “listen” for incoming events. Those events are then processed by the Tornado engine as presented in this use case, or forwarded from the satellite zone towards the master zone via the secure NATS channel.
On the new host the PowerShell script executes a single HTTPS call, where information collected up to this point is used to pass along the information relevant for creating a new host:
https://${neteye4endpoint}is the FQDN of the satellite available in the current zonetoken=icingais the secret token to let Tornado Webhook collector accept my call-d { host_name ...}is the payload sent to the master node to arrange the creation of the new host
# 6 step: host creation on Director
$parms = '-k', '-s', '-H', '"Accept: application/json"', '-X', 'POST', "`"https://${neteye4endpoint}/tornado/webhook/event/hsg?token=icinga`"", '-d', "`"{`\`"host_name`\`": `\`"${icinga2_agent_hostname_short}`\`",`\`"host_address`\`": `\`"${icinga2_agent_hostname_fqdn}`\`", `\`"host_template`\`": `\`"${host_template}`\`", `\`"host_status`\`": `\`"0`\`", `\`"output`\`": `\`"Major_problem`\`", `\`"zone`\`": `\`"${neteye4parent_zone}`\`" }`""
log_message -message "[ ] Creation of Client in Director: $parms"
$cmdOutput = &"$workpath\curl.exe" @parms
Once the configured webhook is called, the payload finds its way over the secure NATS channel to the master nodes. Here suitable Tornado rules and actions then create the desired host objects. The details on how to configure the Tornado side of things will be presented in an upcoming article. Stay tuned!
Reference
Icinga Agent deployment script on github

Patrick Zambelli
Project Manager at Würth IT Italy
After my graduation in Applied Computer Science at the Free University of Bolzano I decided to start my professional career outside the province. With a bit of good timing and good luck I went into the booming IT-Dept. of Geox in the shoe district of Montebelluna, where I realized how a big IT infrastructure has to grow and adapt to quickly changing requirements. During this experience I had also the nice possibility to travel the world, while setting up the various production and retail areas of this company. Arrived at Würth Phoenix (now Würth IT Italy) I started developing on our monitoring solution NetEye. Today, in my position as Consulting an Project Manager I am continuously heading to implement our solutions to meet the expectation of your enterprise customers.
Author
Latest posts by Patrick Zambelli
16. 01. 2024
NetEye, Unified Monitoring
Icinga 2 DSL for Defining the Monitoring Status of Objects with Director
23. 12. 2020
NetEye
Tornado – Getting in Action with Sample Rules
05. 05. 2020
NetEye, Unified Monitoring
Import Data Correlation and Automation with Icinga2 Director
20. 12. 2019
Icinga News, NetEye
One Year of Community for NetEye 4 Projects