21. 05. 2026
APM, Kubernetes

Within our Research and Development team we maintain a set of both physical and virtual machines for many purposes: internal repository mirrors, CI/CD, testing, internal docker registry, etc… Maintaining them is demanding, especially considering that our infrastructure has grown over the years and was often configured by different colleagues using different software and tools. And it will only get worse and worse with time since the machines won’t be periodically updated and the software on them will eventually reach their End of Life.
During the last year we started dismissing older machines in order to remove EoL software, standardize everything as much as possible and reduce the machine count. As part of this migration journey we also decided to start using OpenShift in order to replace our Swarm-based CI and migrate as many services as possible to containers.
OpenShift has a steep learning curve, and we went through both the official and unofficial documentation to figure out how to install the required cluster. This post shows the overall procedure we followed, various pitfalls we found and how we addressed them.
Requirements
The initial idea was to have a hybrid cluster with a virtual control plane and physical workers, but this configuration is not officially supported. We decided to go for a 3-node bare metal cluster with support for virtualization in order to be able to add further machines in the future, and then make the control plane unschedulable at a later time.
We had the following minimal requirements dictated by both the minimal Control Plane requirements as well as additional requirements by the Virtualization Module:
- More than 16GB of RAM: 16GB as a basic requirement plus 250mb for virtualization
- At least 4 vCPU
- At least 4 120GB HDDs : 2 RAID-1 HDDs for CoreOS plus 2 RAID-1 HDDs for virtualization
- Access to IDRAC or ILO interfaces to mount ISO images remotely
You also need two small machines as load balancers configured e.g. as:
- 2 vCPU
- 2GB RAM
- 32GB HDD
in our case these are VMs on the same network as the physical machines.
Finally you have to be in control of your DHCP and DNS to configure the above machines properly, otherwise you will not be able to complete the installation.
Networking
You’ll have to satisfy some network requirements. First of all you have to configure your DHCP to provide:
- A static IP for each node
- A static IP for the Ingress load balancer and API load balancer
In dhcpd you have to set up something like this for each machine:
host node01.openshiftcluster.company.lan {
        hardware ethernet 11:22:33:aa:bb:cc;
        fixed-address 10.01.02.03;
}
Then you have to set up your DNS by adding these entries for each node:
node01.openshiftcluster.company.lan.       IN    A 10.01.02.03
etcd-node01.openshiftcluster.company.lan.  IN    A 10.01.02.03
_etcd-server-ssl.-tcp.openshiftclustercompany..lan.    86400    IN    SRV    0    10    2380   etcd-node01
and you also have to configure DNS for the Ingress and API load balancers:
; Openshift Api  Loadbalancer
api.openshiftcluster.company.lan.            IN    A 10.01.02.254
api-int.openshiftcluster.company.lan.        IN    A 10.01.02.254

; Openshift Ingress Loadbalancer
*.apps.openshiftcluster.company.lan.         IN    A 10.01.02.253
Now you can finally configure your load balancers. In this example we use HAproxy as shown in the Red Hat official guide. The official documentation also suggests using two different machines: one for API and the other for Ingress. We decided to go for two machines since this will be a production environment in the future, but it’s also possible to use a single machine and put the entire configuration in the same file.
You next have to create four sections like the following for ports 80/tcp and 443/tcp on Ingress and 6443/tcp and 22623/tcp for API:
 frontend k8s_api_frontend
    bind :6443
    default_backend k8s_api_backend
    mode tcp

backend k8s_api_backend
    mode tcp
    balance source
    server      node01.openshiftcluster.company.lan 10.01.02.03:6443 check
    server      node02.openshiftcluster.company.lan 10.01.02.04:6443 check
    server      node03.openshiftcluster.company.lan 10.01.02.05:6443 check
At this point you have to also configure the firewall to open related ports:
firewall-cmd --add-port=6443/tcp
firewall-cmd --reload
and set selinux
setsebool -P haproxy_connect_any 1The outcome should be similar to this schema:
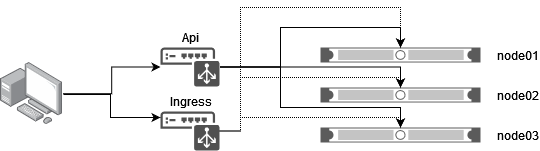
As mentioned above we are using only 3 nodes, therefore all of them act both as Control Planes and Workers. In general the API load balancer (ports 6443 and 22623) must point to Control Plane nodes while the Ingress load balancer (ports 80 and 443) points to Workers and schedulable Control Planes.
Installation
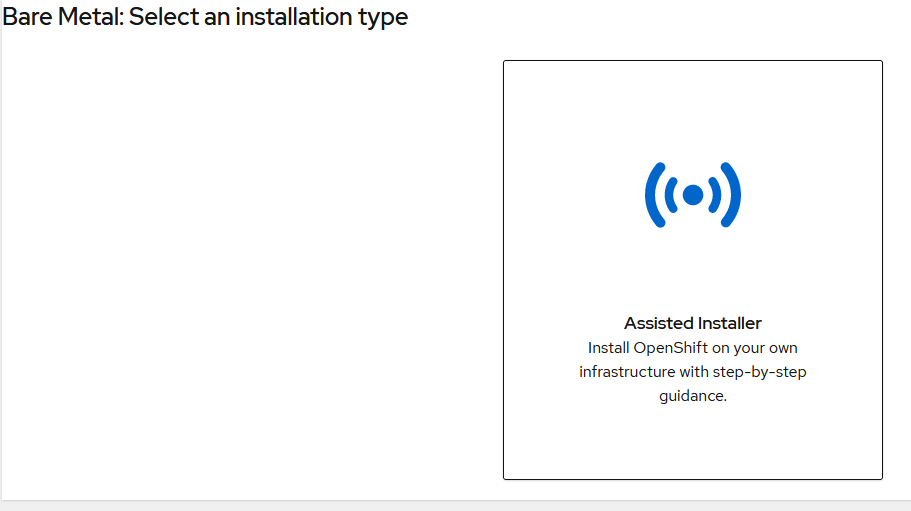
We also decided to use the assisted installer: this is a very useful OpenShift feature which provides you with a custom ISO image. You can reach it via Create Cluster → Datacenter → Bare Metal (x86_64) → Assisted Installer. In this way you can also avoid creating a bastion host machine because that role is filled by the Red Hat console.
The ISO also embeds an SSH public key to let you access the machine both while in live mode and also after the installation. Please note that this image does not have a default password so you can only access it via SSH.
You also have to specify a cluster name and base domain. In accordance with our configuration above these will be openshiftcluster and company.lan. Their concatenation will be the base domain for all your resources (nodes, APIs, apps etc…) so we suggest you set the host names accordingly.
Once you boot with this ISO your machine will appear in the list of available nodes for the cluster, and the requirements will be automatically verified. The machines should either go into a green state, or else give you a warning explaining what went wrong. We noticed multiple times an NTP syncronization failure error: it disappears by itself after a couple of minutes so you can ignore it.
Once you’ve set everything you can confirm and go to the next page. At this point we suggest you choose User-Managed Networking: in our case we have our own subnet which includes both virtual and physical machines. In this case you should go for Cluster-Manager Networking to be sure that virtual IPs (corresponding to the two load balancers) are different and belong to different subnets than the cluster nodes, otherwise the installation will fail after a while.
A this point you can click on Next, review the configuration and then click on Install Cluster.
The installation process is automated and should take about an hour to complete.
The last thing you have to do is to set the number of Ingress controllers with your schedulable nodes count, in our case 3.
oc -n openshift-ingress-operator scale ingresscontroller/default --replicas=3By default the cluster will come up with 2 Ingress controllers and this can cause some weird behavior, which is basically like a network error when trying to contact a node without an Ingress controller.
Conclusion
At this point you should have your OpenShift cluster ready to deploy applications (I’ll cover this part in a future blog post). We hope that showing our mistakes and the issues we faced will help other OpenShift beginners on their own installations.
Anyway, with this experience we are only scratching the surface of the OpenShift world: there’s a lot yet to discover.
References
User-provisioned DNS requirements
Load balancing requirements for user-provisioned infrastructure
How to Install OpenShift 4.9 on Bare Metal
RedHat CoreOS worker node is not listening to port 80 and 443
These Solutions are Engineered by Humans
Did you find this article interesting? Are you an “under the hood” kind of person? We’re really big on automation and we’re always looking for people in a similar vein to fill roles like this one as well as other roles here at Würth Phoenix.

Alessandro Valentini
DevOps Engineer at Würth IT Italy
Platform Engineer at Würth IT Italy
Author
Latest posts by Alessandro Valentini
05. 08. 2025
DevOps, Kubernetes
Use S3 Storage with OpenShift Data Foundation
04. 03. 2025
Automation, DevOps, Service Management
Group-aware Reboot with Ansible
31. 12. 2024
DevOps
GitOps: Pull-based vs Push-based Approaches