
02. 10. 2018
Charles Callaway
Documentation, NetEye, Unified Monitoring
Creating Action Shortcuts in your NetEye 4 Custom User Guide
In my last user guide blog I showed you how to create your own menu item, create a space on the file system, write a sample page, and store an image for that page, all in a way that will survive future updates. This time I want to show you how to use your custom user guide to organize and speed up your most common actions when using NetEye 4.
Custom GUI elements in NetEye 4 can be very useful. For instance, the dashboard is great for structuring the monitoring views you use most often. They let you both see at a glance the current state of your monitoring environment, and easily drill down to the details of the problems that catch your eye. But the dashboard is for organizing views, it doesn’t let you organize shortcuts for the configuration tasks you do most often.
If you have a particular workflow that consists of a sequence of configuration steps, it would be great to group those together in one place so you can do each in the proper order, even if they are across different modules. It might be even better if next to each shortcut you could add notes (for example, which values you should set in given fields), or text that you could cut-and-paste when you’re filling in the forms.
Creating Action Shortcuts
How can you put action shortcuts in your custom user guide? First make sure you’ve already created a place for it. Now let’s add a new page there, say modules/custom/doc/10-Shortcuts.md, and give it a title and structure as in the following example:
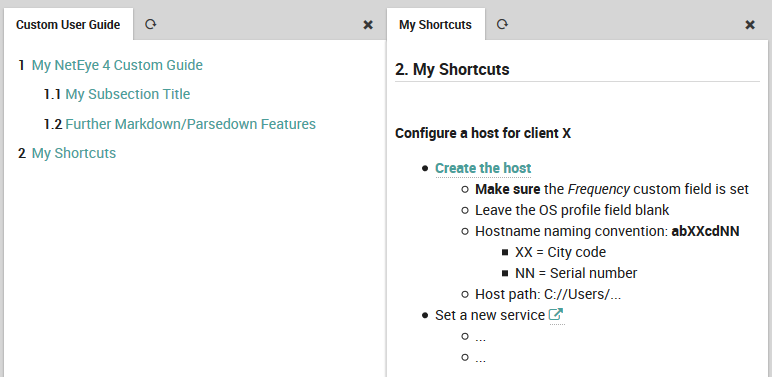
# <a id="my-shortcuts"></a> My Shortcuts

**Configure a host for client X**
* [Create the host](https://<hostname>/neteye/director/hosts#!/neteye/director/host/add?type=object)
    * **Make sure** the *Frequency* custom field is set
    * Leave the OS profile field blank
    * Hostname naming convention: **abXXcdNN**
        * XX = City code
        * NN = Serial number
    * Host path:  C://Users/...
* Set a new service [<span class="icon-link-ext" style="width: 33%; height: 1em;"/>]
             (https://<hostname>/neteye/director/services#!/neteye/director/service/add?type=object)
    * ...
    * ...
For each shortcut you want, navigate to it in the interface, just as you would to add a monitoring view to the Dashboard. For example, if you want to add a host, click on Director > Host objects > Hosts > Add. When you have both the left and right panels as you want them, copy the full URL and add it to your custom user guide. Use the link syntax in the example above (link text in square brackets, link target in parentheses, and no space between them).
Then add notes, reminders, and other specialized instructions as you see fit. Optionally, you can include icons from the icon page in the user guide. For instance, this icon typically indicates an external link:
[<span class="icon-link-ext" style="width: 33%; height: 1em;"/>](https://...)
Add, change or delete additional information or links whenever you want.


Charles Callaway
Author
Latest posts by Charles Callaway
25. 02. 2026
Documentation
Making Your Own Video Tutorials, Part 20: Recording a Good Task-based Screencast
30. 10. 2025
Documentation
Tutorial Video Editing Technical Tips, Part 2: No Country for Boring Men (or Women)