


31. 03. 2026
Asset Management, GLPI, Service Management

28. 06. 2023
Andrea Mariani
Asset Management, NetEye, Unified Monitoring
GLPI Remote Inventory – Part 2 (Windows)
In GLPI Remote Inventory – Part 1 I described how to perform a remote inventory of Linux machines. Here in Part 2 I’ll describe instead how to perform a remote inventory on Windows machines using the WinRM (Windows Remote Management) protocol through an HTTPS listener.
In order to create and use an HTTPS Listener on WinRM it’s necessary to use server certificates. In this guide I’ll show you how to generate the right certificates for WinRM and how to configure the HTTPS listener.
Obviously the section relating to the prerequisites and the installation of the agent described in Part 1 also remains valid for Part 2.
Prerequisites
There are two ways to obtain a valid certificate for operation with WinRM. One is to auto-generate it on the machine where you want to activate it. But since this is not a trusted certificate, we will necessarily have to set the non-verification parameter of the certificate on our GLPI-Agent. The other approach is to set up your own Certificate Authority.
Furthermore, to generate a valid certificate for use via WinRM we need to know what characteristics are needed for the certificate we’re going to create.
WinRM requires a valid SSL/TLS certificate to establish an encrypted connection and authenticate the server. The certificate must meet the following requirements:
- Must be a valid X.509v3 certificate
- Must be signed by a trusted certificate authority (CA) or trusted root CA
- Must have the correct Enhanced Key Usage (EKU) purpose for server authentication
- It must be valid, unexpired and non-revoked
- The Common Name (CN) field or the Subject Alternative Name (SAN) field of the certificate must match the host name of the server with which it is associated
- It is important to note that the certificate can be generated by a public CA or a private CA within your organization, as long as it is trusted by clients connecting to the WinRM server
An important point to remember is to add name resolution of the Windows machine to the /etc/hosts file of the test server:
[root@centos7 certs]# vi /etc/hosts
127.0.0.1   localhost localhost.localdomain localhost4 localhost4.localdomain4
::1         localhost localhost.localdomain localhost6 localhost6.localdomain6
192.168.1.242 centos7
192.168.1.251 neteye4
192.168.1.216   win10pro-vm1
In this guide I’ll show you both solutions.
Auto-Generating a SSL/TLS Certificate
First, on our Windows machine we’ll have to carry out an initial configuration of WinRM which will activate an HTTP listener by default.
From a command prompt with administrative privileges run:
winrm quickconfig
We’re also going to configure WinRM so that it can accept Basic Authentication and accept unencrypted passwords.
- View/Set Basic Authentication

winrm get winrm/config/service/Auth
Auth
    Basic = false
    Kerberos = true
    Negotiate = true
    Certificate = false
    CredSSP = false
    CbtHardeningLevel = Relaxed

winrm set winrm/config/service/Auth @{Basic="true"}
Auth
    Basic = true
    Kerberos = true
    Negotiate = true
    Certificate = false
    CredSSP = false
    CbtHardeningLevel = Relaxed

winrm set winrm/config/service @{AllowUnencrypted="true"}
Service
    RootSDDL = O:NSG:BAD:P(A;;GA;;;BA)(A;;GR;;;IU)S:P(AU;FA;GA;;;WD)(AU;SA;GXGW;;;WD)
    MaxConcurrentOperations = 4294967295
    MaxConcurrentOperationsPerUser = 1500
    EnumerationTimeoutms = 240000
    MaxConnections = 300
    MaxPacketRetrievalTimeSeconds = 120
    AllowUnencrypted = true
    Auth
        Basic = true
        Kerberos = true
        Negotiate = true
        Certificate = false
        CredSSP = false
        CbtHardeningLevel = Relaxed
    DefaultPorts
        HTTP = 5985
        HTTPS = 5986
    IPv4Filter = *
    IPv6Filter = *
    EnableCompatibilityHttpListener = false
    EnableCompatibilityHttpsListener = false
    CertificateThumbprint
    AllowRemoteAccess = true
With the following command we’ll see the currently configured listeners:
C:\Windows\system32>winrm enumerate winrm/config/Listener
Listener
    Address = *
    Transport = HTTP
    Port = 5985
    Hostname
    Enabled = true
    URLPrefix = wsman
    CertificateThumbprint
    ListeningOn = 127.0.0.1, 192.168.1.216, ::1
To create a new self-signed certificate and configure an HTTPS listener, start a Powershell window with administrative privileges, and run:
$server = "WIN10PRO-VM1"
New-SelfSignedCertificate -DnsName "$server" -CertStoreLocation cert:\LocalMachine\My
$cert = Get-ChildItem -Path cert:\LocalMachine\My | Where-Object { $_.Subject -like "*$server*"}
$thumbprint = $cert.Thumbprint
$port = 5986
$cmd = "winrm create winrm/config/Listener?Address=*+Transport=HTTPS '@{Port=`"$port`";Hostname=`"$server`";CertificateThumbprint=`"$thumbprint`"}'"
Invoke-Expression -Command $cmd
The only parameter to modify will be the name of the machine, which in my example will be called WIN10PRO-VM1.
Also through Powershell we’ll be able to view the status, stop, or even start the WinRM service.
Get-Service WinRM
Stop-Service WinRM
Start-Service WinRM
Again using the previously described command, we can see the new status of the configured listeners:
C:\Windows\system32>winrm enumerate winrm/config/Listener
Listener
Address = *
Transport = HTTP
Port = 5985
Hostname
Enabled = true
URLPrefix = wsman
CertificateThumbprint
ListeningOn = 127.0.0.1, 192.168.1.216, ::1

Listener
Address = *
Transport = HTTPS
Port = 5986
Hostname = WIN10PRO-VM1
Enabled = true
URLPrefix = wsman
CertificateThumbprint = 62AC23620BDE5A02B0EA2170ABD295D4D51292F0
ListeningOn = 127.0.0.1, 192.168.1.216, ::1
Now all that remains is to open the firewall ports to allow correct communication, again via Powershell:
# Add a new firewall rule
$port=5986
netsh advfirewall firewall add rule name="Windows Remote Management (HTTPS-In)" dir=in action=allow protocol=TCP localport=$port
At this point, returning to our CentOS 7 test machine, we can also add the Windows machine to the list of remote hosts and then perform a remoteinventory:
[root@centos7 ~]# glpi-remote add winrm://administrator:[PASSWORD]@win10pro-vm1?mode=ssl --target server0 --no-ssl-check --debug --debug
Current vardir: /var/lib/glpi-agent
[debug] Logger backend Stderr initialized
[debug] Remote mode enabled: ssl
[debug2] [http client] Using Compress::Zlib for compression
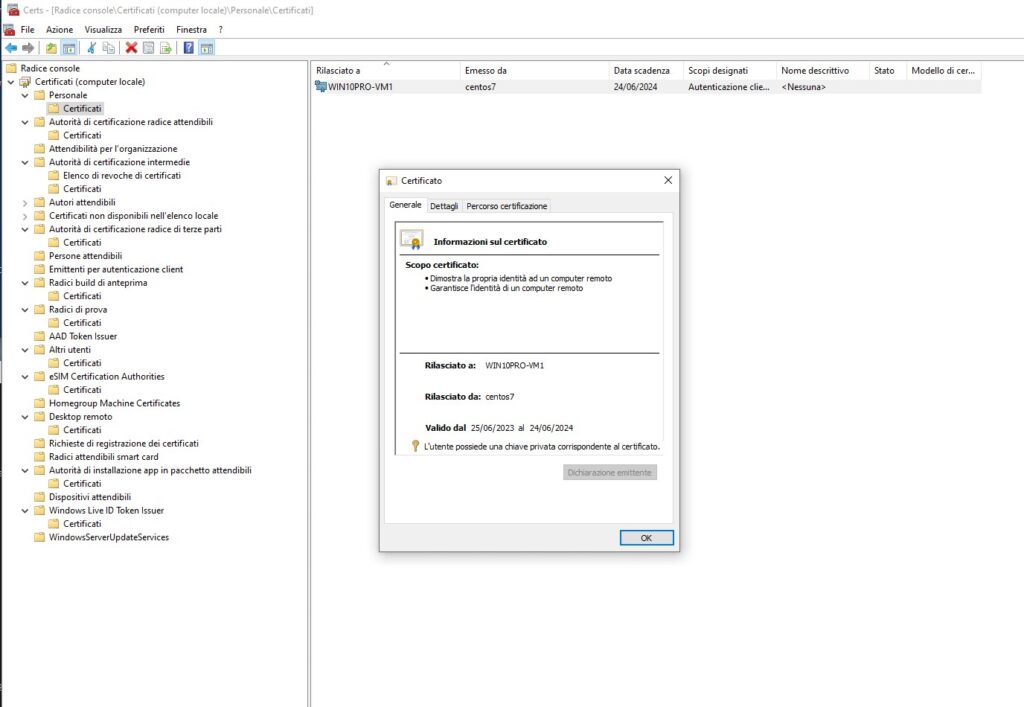
[info] [http client] SSL Client warning: Peer certificate not verified
[info] [http client] SSL Client info: Cert-Issuer: '/CN=WIN10PRO-VM1', Cert-Subject: '/CN=WIN10PRO-VM1', Cipher: 'ECDHE-RSA-AES256-GCM-SHA384'
[debug] [http client] authentication required, submitting credentials
[debug] [http client] authentication required, trying basic with andrea.mariani@live.it user (WSMAN)
[debug2] Identify response: Microsoft Corporation - OS: 10.0.19045 SP: 0.0 Stack: 3.0
[debug2] Looking for HKEY_LOCAL_MACHINE/Software/GLPI-Agent/Remote/deviceid registry value via winrm
[info] [http client] SSL Client warning: Peer certificate not verified
[info] [http client] SSL Client info: Cert-Issuer: '/CN=WIN10PRO-VM1', Cert-Subject: '/CN=WIN10PRO-VM1', Cipher: 'ECDHE-RSA-AES256-GCM-SHA384'
[info] [http client] SSL Client warning: Peer certificate not verified
[info] [http client] SSL Client info: Cert-Issuer: '/CN=WIN10PRO-VM1', Cert-Subject: '/CN=WIN10PRO-VM1', Cipher: 'ECDHE-RSA-AES256-GCM-SHA384'
Updating WIN10PRO-VM1-2023-06-16-17-20-00 remote for server0
Updated WIN10PRO-VM1-2023-06-16-17-20-00 remote agent for server0
[root@centos7 ~]# glpi-remote list
index deviceid url target Next run date
1 WIN10PRO-VM1-2023-06-16-17-20-00 winrm://administrator:****@win10pro-vm1?mode=ssl server0 on next agent run
2 centos7-2023-06-16-16-29-47 ssh://root:****@192.168.1.242/?mode=libssh2 server0 Fri Jun 23 20:33:10 2023
Now modify the no-ssl-check = 1 parameter in the file /etc/glpi-agent/agent.cfg and launch the remoteinventory again:
glpi-agent --tasks remoteinventory --logger=stderr
Running the command with the –logger=stderr parameter will show errors where the client is unable to verify the certificate, but the inventory will succeed nonetheless.
With CA SSL/TLS Certificate
The optimal configuration is to use a certificate created by a trusted CA. First, on the test server we will install and configure a CA from which we’ll generate the certificates we need.
To do this we’ll use OpenSSL and within the root directory we’ll create our tree.
cd
mkdir certs
al suo interno:
cd certs
mkdir private
mkdir certs

[root@centos7 certs]# openssl genpkey -algorithm RSA -out private/ca.key.pem
...............++++++
...++++++

[root@centos7 certs]# openssl req -new -x509 -sha256 -days 3650 -key private/ca.key.pem -out certs/ca.cert.pem
You are about to be asked to enter information that will be incorporated
into your certificate request.
What you are about to enter is what is called a Distinguished Name or a DN.
There are quite a few fields but you can leave some blank
For some fields there will be a default value,
If you enter '.', the field will be left blank.
-----
Country Name (2 letter code) [XX]:it
State or Province Name (full name) []:BZ
Locality Name (eg, city) [Default City]:Bolzano
Organization Name (eg, company) [Default Company Ltd]:Wuerth-Phoenix
Organizational Unit Name (eg, section) []:SI
Common Name (eg, your name or your server's hostname) []:centos7
Email Address []:andrea.mariani@wuerth-phoenix.com
Once the CA certificate has been created, I check it:
[root@centos7 certs]# openssl x509 -in ca.cert.pem -text
Certificate:
    Data:
        Version: 3 (0x2)
        Serial Number:
            97:65:55:b9:6a:30:ce:12
    Signature Algorithm: sha256WithRSAEncryption
        Issuer: C=it, ST=BZ, L=Bolzano, O=Wuerth-Phoenix, OU=SI, CN=centos7/emailAddress=andrea.mariani@wuerth-phoenix.com
        Validity
            Not Before: Jun 20 20:47:15 2023 GMT
            Not After : Jun 17 20:47:15 2033 GMT
        Subject: C=it, ST=BZ, L=Bolzano, O=Wuerth-Phoenix, OU=SI, CN=centos7/emailAddress=andrea.mariani@wuerth-phoenix.com
        Subject Public Key Info:
            Public Key Algorithm: rsaEncryption
                Public-Key: (1024 bit)
                Modulus:
                    00:93:fc:c9:cc:27:52:79:e2:60:6f:03:05:0b:db:
                    32:18:10:9e:0c:9a:35:e6:f1:04:17:a9:bc:ac:a0:
                    69:d9:fb:3e:2c:ac:3b:66:cd:2d:64:9a:f0:91:87:
                    f8:5a:ac:fa:77:c6:b7:00:e0:b4:e1:c6:ba:f1:54:
                    ee:be:4e:15:3f:43:f8:35:fe:de:1e:01:73:b9:88:
                    1d:22:5b:cb:74:e6:3d:a8:a9:77:5e:97:f9:b1:55:
                    df:d3:03:a2:53:53:14:90:a4:a9:82:df:0c:f0:d5:
                    75:b7:7d:33:29:ee:aa:be:19:88:ac:51:5d:99:ba:
                    d6:98:75:02:14:93:1f:bf:f7
                Exponent: 65537 (0x10001)
        X509v3 extensions:
            X509v3 Subject Key Identifier:
                71:80:E1:5F:9E:34:03:F1:11:C8:10:C3:51:37:4D:58:AA:86:B3:50
            X509v3 Authority Key Identifier:
                keyid:71:80:E1:5F:9E:34:03:F1:11:C8:10:C3:51:37:4D:58:AA:86:B3:50

            X509v3 Basic Constraints:
                CA:TRUE
    Signature Algorithm: sha256WithRSAEncryption
         62:36:3d:6b:02:42:03:b4:6f:ca:71:48:f0:c6:64:5c:ae:fc:
         8d:6d:73:a8:ed:53:06:c4:9a:72:bb:01:57:64:1e:57:e7:64:
         4c:b2:bd:8a:78:cc:cd:08:bf:b9:50:ce:a0:53:e2:1c:e5:a4:
         fa:be:df:89:62:d2:d0:d2:9d:5f:f3:80:c6:01:28:e3:f0:2f:
         3d:b9:96:c2:9f:2d:92:f0:20:7c:1f:d5:3d:e4:c5:ae:e4:34:
         16:6d:5e:21:e2:e8:f4:c3:66:f1:1a:20:6b:de:3e:b9:2b:f1:
         4c:dd:31:3a:7f:1b:07:01:ab:f5:86:2b:71:f1:b6:e1:36:3c:
         d3:61
-----BEGIN CERTIFICATE-----
MIIC/DCCAmWgAwIBAgIJAJdlVblqMM4SMA0GCSqGSIb3DQEBCwUAMIGWMQswCQYD
VQQGEwJpdDELMAkGA1UECAwCQloxEDAOBgNVBAcMB0JvbHphbm8xFzAVBgNVBAoM
Dld1ZXJ0aC1QaG9lbml4MQswCQYDVQQLDAJTSTEQMA4GA1UEAwwHY2VudG9zNzEw
MC4GCSqGSIb3DQEJARYhYW5kcmVhLm1hcmlhbmlAd3VlcnRoLXBob2VuaXguY29t
MB4XDTIzMDYyMDIwNDcxNVoXDTMzMDYxNzIwNDcxNVowgZYxCzAJBgNVBAYTAml0
MQswCQYDVQQIDAJCWjEQMA4GA1UEBwwHQm9semFubzEXMBUGA1UECgwOV3VlcnRo
LVBob2VuaXgxCzAJBgNVBAsMAlNJMRAwDgYDVQQDDAdjZW50b3M3MTAwLgYJKoZI
hvcNAQkBFiFhbmRyZWEubWFyaWFuaUB3dWVydGgtcGhvZW5peC5jb20wgZ8wDQYJ
KoZIhvcNAQEBBQADgY0AMIGJAoGBAJP8ycwnUnniYG8DBQvbMhgQngyaNebxBBep
vKygadn7PiysO2bNLWSa8JGH+Fqs+nfGtwDgtOHGuvFU7r5OFT9D+DX+3h4Bc7mI
HSJby3TmPaipd16X+bFV39MDolNTFJCkqYLfDPDVdbd9Mynuqr4ZiKxRXZm61ph1
AhSTH7/3AgMBAAGjUDBOMB0GA1UdDgQWBBRxgOFfnjQD8RHIEMNRN01YqoazUDAf
BgNVHSMEGDAWgBRxgOFfnjQD8RHIEMNRN01YqoazUDAMBgNVHRMEBTADAQH/MA0G
CSqGSIb3DQEBCwUAA4GBAGI2PWsCQgO0b8pxSPDGZFyu/I1tc6jtUwbEmnK7AVdk
HlfnZEyyvYp4zM0Iv7lQzqBT4hzlpPq+34li0tDSnV/zgMYBKOPwLz25lsKfLZLw
IHwf1T3kxa7kNBZtXiHi6PTDZvEaIGvePrkr8UzdMTp/GwcBq/WGK3HxtuE2PNNh
-----END CERTIFICATE-----
Then I update the certificate chain in the CA-Trust:
[root@centos7 certs]# cp ca.cert.pem /etc/pki/ca-trust/source/anchors/
[root@centos7 ~]# update-ca-trust
[root@centos7 certs]# cd /etc/pki/ca-trust/source/anchors/
[root@centos7 anchors]# openssl verify -CAfile /etc/pki/ca-trust/extracted/pem/tls-ca-bundle.pem ./ca.cert.pem
./ca.cert.pem: OK
Now let’s create the certificate that we’re going to use on the Windows machine to install the WinRM HTTPS listener.
We’ll first have to create the file openssl.cnf which will contain the parameters necessary for correct operation on WinRM:
[root@centos7 certs]# vi openssl.cnf
[req]
distinguished_name = req_distinguished_name
x509_extensions = v3_req
prompt = no

[req_distinguished_name]
CN = WIN10PRO-VM1

[v3_req]
keyUsage = digitalSignature, keyEncipherment
extendedKeyUsage = clientAuth, serverAuth
subjectAltName = DNS:WIN10PRO-VM1

[ext_usage]
keyUsage = critical, digitalSignature, keyAgreement, keyEncipherment

[root@centos7 certs]# openssl genpkey -algorithm RSA -out private/win10pro-vm1.pem
[root@centos7 certs]# openssl req -new -key private/win10pro-vm1.pem -out win10pro-vm1.csr -config openssl.cnf
[root@centos7 certs]# openssl x509 -req -in win10pro-vm1.csr -CA certs/ca.cert.pem -CAkey private/ca.key.pem -CAcreateserial -out win10pro-vm1.cer -days 365 -extensions v3_req -extfile openssl.cnf
[root@centos7 certs]# openssl pkcs12 -export -inkey private/win10pro-vm1.pem -in win10pro-vm1.cer -out win10pro-vm1.pfx
We can see that with the commands just described we’re going to generate a new private key for the WIN10PRO-VM1 server, a .csr request file, the real .cer certificate for the server and the conversion of the private key from .pem to .pfx that will be used on the Windows server together with the certificate.
On the Windows machine we’ll copy the following files to a path of your choice:
- /root/certs/win10pro-vm1.cer
- /root/certs/win10-pro-vm1.pfx
- /root/certs/certs/ca.cert.pem
Once copied we’ll import the win10pro-mv1.* files into the set of personal certificates through the use of the mmc Certificates, while ca.cert.pem will go to the trusted root certification authorities.
After importing the certificates as described, we can create the HTTPS listener for WinRM.
Now you can retrieve the thumbprint of the certificate through the following Powershell command executed with administrative privileges:
PS C:\Windows\system32> New-SelfSignedCertificate -DnsName "WIN10PRO-VM1" -CertStoreLocation Cert:\LocalMachine\My


   PSParentPath: Microsoft.PowerShell.Security\Certificate::LocalMachine\My

Thumbprint                                Subject
----------                                -------
34DBAF958C3EBA15977A31800476F6CE84C65098  CN=WIN10PRO-VM1
And create the new HTTPS listener:
PS C:\Windows\system32> winrm create winrm/config/Listener?Address=*+Transport=HTTPS '@{Hostname="WIN10PRO-VM1"; CertificateThumbprint="34DBAF958C3EBA15977A31800476F6CE84C65098"}'

PS C:\Windows\system32> winrm enumerate winrm/config/Listener
Listener
    Address = *
    Transport = HTTP
    Port = 5985
    Hostname
    Enabled = true
    URLPrefix = wsman
    CertificateThumbprint
    ListeningOn = 127.0.0.1, 192.168.1.216, ::1

Listener
    Address = *
    Transport = HTTPS
    Port = 5986
    Hostname = WIN10PRO-VM1
    Enabled = true
    URLPrefix = wsman
    CertificateThumbprint = 34DBAF958C3EBA15977A31800476F6CE84C65098
    ListeningOn = 127.0.0.1, 192.168.1.216, ::1
Next, create a firewall rule:
$port=5986
netsh advfirewall firewall add rule name="Windows Remote Management (HTTPS-In)" dir=in action=allow protocol=TCP localport=$port
We’re now ready to add our Windows host to the GLPI remote host list.
We move to the CentOS 7 test machine and after verifying that the no-ssl-check setting is set to 0, execute:
[root@centos7 glpi-agent]# cd /etc/glpi-agent/
[root@centos7 glpi-agent]# vi /etc/glpi-agent/agent.cfg
...
no-ssl-check = 0
...

[root@centos7 glpi-agent]# glpi-remote add winrm://administrator:[PASSWORD]@win10pro-vm1?mode=ssl --target server0 --debug --debug
Current vardir: /var/lib/glpi-agent
[debug] Logger backend Stderr initialized
[debug] Remote mode enabled: ssl
[debug2] [http client] Using Compress::Zlib for compression
DEBUG: .../IO/Socket/SSL.pm:1829: new ctx 62956800
DEBUG: .../IO/Socket/SSL.pm:475: socket not yet connected
DEBUG: .../IO/Socket/SSL.pm:477: socket connected
DEBUG: .../IO/Socket/SSL.pm:495: ssl handshake not started
DEBUG: .../IO/Socket/SSL.pm:530: using SNI with hostname win10pro-vm1
DEBUG: .../IO/Socket/SSL.pm:553: set socket to non-blocking to enforce timeout=10
DEBUG: .../IO/Socket/SSL.pm:566: Net::SSLeay::connect -> -1
DEBUG: .../IO/Socket/SSL.pm:576: ssl handshake in progress
DEBUG: .../IO/Socket/SSL.pm:586: waiting for fd to become ready: SSL wants a read first
DEBUG: .../IO/Socket/SSL.pm:606: socket ready, retrying connect
DEBUG: .../IO/Socket/SSL.pm:1817: ok=1 cert=62727008
DEBUG: .../IO/Socket/SSL.pm:1817: ok=1 cert=64159312
DEBUG: .../IO/Socket/SSL.pm:1300: scheme=www cert=64159312
DEBUG: .../IO/Socket/SSL.pm:1309: identity=win10pro-vm1 cn=WIN10PRO-VM1 alt=2 WIN10PRO-VM1
DEBUG: .../IO/Socket/SSL.pm:566: Net::SSLeay::connect -> -1
DEBUG: .../IO/Socket/SSL.pm:576: ssl handshake in progress
DEBUG: .../IO/Socket/SSL.pm:586: waiting for fd to become ready: SSL wants a read first
DEBUG: .../IO/Socket/SSL.pm:606: socket ready, retrying connect
DEBUG: .../IO/Socket/SSL.pm:566: Net::SSLeay::connect -> 1
DEBUG: .../IO/Socket/SSL.pm:621: ssl handshake done
DEBUG: .../IO/Socket/SSL.pm:1866: free ctx 62956800 open=62956800
DEBUG: .../IO/Socket/SSL.pm:1871: free ctx 62956800 callback
DEBUG: .../IO/Socket/SSL.pm:1874: OK free ctx 62956800
[debug] [http client] authentication required, submitting credentials
[debug] [http client] authentication required, trying basic with andrea.mariani@live.it user (WSMAN)
DEBUG: .../IO/Socket/SSL.pm:1829: new ctx 64008624
DEBUG: .../IO/Socket/SSL.pm:475: socket not yet connected
DEBUG: .../IO/Socket/SSL.pm:477: socket connected
DEBUG: .../IO/Socket/SSL.pm:495: ssl handshake not started
DEBUG: .../IO/Socket/SSL.pm:530: using SNI with hostname win10pro-vm1
DEBUG: .../IO/Socket/SSL.pm:553: set socket to non-blocking to enforce timeout=10
DEBUG: .../IO/Socket/SSL.pm:566: Net::SSLeay::connect -> -1
DEBUG: .../IO/Socket/SSL.pm:576: ssl handshake in progress
DEBUG: .../IO/Socket/SSL.pm:586: waiting for fd to become ready: SSL wants a read first
DEBUG: .../IO/Socket/SSL.pm:606: socket ready, retrying connect
DEBUG: .../IO/Socket/SSL.pm:1817: ok=1 cert=63932016
DEBUG: .../IO/Socket/SSL.pm:1817: ok=1 cert=64477232
DEBUG: .../IO/Socket/SSL.pm:1300: scheme=www cert=64477232
DEBUG: .../IO/Socket/SSL.pm:1309: identity=win10pro-vm1 cn=WIN10PRO-VM1 alt=2 WIN10PRO-VM1
DEBUG: .../IO/Socket/SSL.pm:566: Net::SSLeay::connect -> -1
DEBUG: .../IO/Socket/SSL.pm:576: ssl handshake in progress
DEBUG: .../IO/Socket/SSL.pm:586: waiting for fd to become ready: SSL wants a read first
DEBUG: .../IO/Socket/SSL.pm:606: socket ready, retrying connect
DEBUG: .../IO/Socket/SSL.pm:566: Net::SSLeay::connect -> 1
DEBUG: .../IO/Socket/SSL.pm:621: ssl handshake done
DEBUG: .../IO/Socket/SSL.pm:1866: free ctx 64008624 open=64008624
DEBUG: .../IO/Socket/SSL.pm:1871: free ctx 64008624 callback
DEBUG: .../IO/Socket/SSL.pm:1874: OK free ctx 64008624
DEBUG: .../IO/Socket/SSL.pm:1829: new ctx 64490240
DEBUG: .../IO/Socket/SSL.pm:475: socket not yet connected
DEBUG: .../IO/Socket/SSL.pm:477: socket connected
DEBUG: .../IO/Socket/SSL.pm:495: ssl handshake not started
DEBUG: .../IO/Socket/SSL.pm:530: using SNI with hostname win10pro-vm1
DEBUG: .../IO/Socket/SSL.pm:553: set socket to non-blocking to enforce timeout=10
DEBUG: .../IO/Socket/SSL.pm:566: Net::SSLeay::connect -> -1
DEBUG: .../IO/Socket/SSL.pm:576: ssl handshake in progress
DEBUG: .../IO/Socket/SSL.pm:586: waiting for fd to become ready: SSL wants a read first
DEBUG: .../IO/Socket/SSL.pm:606: socket ready, retrying connect
DEBUG: .../IO/Socket/SSL.pm:1817: ok=1 cert=64015104
DEBUG: .../IO/Socket/SSL.pm:1817: ok=1 cert=64464192
DEBUG: .../IO/Socket/SSL.pm:1300: scheme=www cert=64464192
DEBUG: .../IO/Socket/SSL.pm:1309: identity=win10pro-vm1 cn=WIN10PRO-VM1 alt=2 WIN10PRO-VM1
DEBUG: .../IO/Socket/SSL.pm:566: Net::SSLeay::connect -> -1
DEBUG: .../IO/Socket/SSL.pm:576: ssl handshake in progress
DEBUG: .../IO/Socket/SSL.pm:586: waiting for fd to become ready: SSL wants a read first
DEBUG: .../IO/Socket/SSL.pm:606: socket ready, retrying connect
DEBUG: .../IO/Socket/SSL.pm:566: Net::SSLeay::connect -> 1
DEBUG: .../IO/Socket/SSL.pm:621: ssl handshake done
[debug2] Identify response: Microsoft Corporation - OS: 10.0.19045 SP: 0.0 Stack: 3.0
[debug2] Looking for HKEY_LOCAL_MACHINE/Software/GLPI-Agent/Remote/deviceid registry value via winrm
Added WIN10PRO-VM1-2023-06-16-17-20-00 remote agent to server0
DEBUG: .../IO/Socket/SSL.pm:1866: free ctx 64490240 open=64490240
DEBUG: .../IO/Socket/SSL.pm:1871: free ctx 64490240 callback
DEBUG: .../IO/Socket/SSL.pm:1874: OK free ctx 64490240

[root@centos7 glpi-agent]# glpi-remote list
index  deviceid                          url                                                            target   Next run date
    1  WIN10PRO-VM1-2023-06-16-17-20-00  winrm://administrator:****@win10pro-vm1?mode=ssl      server0  on next agent run
    2  centos7-2023-06-16-16-29-47       ssh://root:****@192.168.1.242/?mode=libssh2                    server0  Sun Jun 25 18:01:53 2023

[root@centos7 glpi-agent]# glpi-agent --tasks remoteinventory --logger=stderr
[info] target server0: server https://neteye_glpi_agent_master:1ZN6IcKbZPevp4CwftnEIzL2VxybwoPZ@neteye4/glpi/front/inventory.php
[info] sending contact request to server0
[info] sending prolog request to server0
[info] running task RemoteInventory
[info] [worker 1] WIN10PRO-VM1-2023-06-16-17-20-00, New inventory from WIN10PRO-VM1-2023-06-16-17-20-00 for server0 (tag=TEST)
[info] [worker 2] centos7-2023-06-16-16-29-47, New inventory from centos7-2023-06-16-16-29-47 for server0 (tag=TEST)
Then we can refresh the GLPI web page to verify that the add was successful:
I hope these two guides can be a help to all those who intend to use the GLPI features in agentless mode.
Andrea Mariani
Author
Latest posts by Andrea Mariani
21. 03. 2026
AI
Reflections on Running LLMs Locally: Why It’s Worth Running Them on Your Own Infrastructure
11. 09. 2025
NetEye, PHP, Unified Monitoring
Using Keycloak to Secure Web Pages and Virtual Directories
20. 06. 2025
NetEye, Unified Monitoring
NEP Telegram Notification