30. 06. 2026
Asset Management, GLPI, Service Management

26. 06. 2023
Andrea Mariani
Asset Management, NetEye, Unified Monitoring
GLPI Remote Inventory – Part 1 (Linux)
Since NetEye version 4.29, the GLPI module has been upgraded to version 10. With this update GLPI introduced a new feature, making it possible to perform agentless inventories.
Given the wide interest regarding this new feature from many of our customers, I decided to describe the steps necessary to be able to configure, link, and inventory both Linux and Windows machines via the relevant protocols used by the GLPI-Agent, namely SSH and WinRM.
I’ll begin this guide by describing the prerequisites needed to install the Agent, configure a Target, add the remote client, and inventory it on a Linux CentOS 7 test machine.
Prerequisites
To perform remote inventories, we recommend installing the agent on a machine external to NetEye. It can be either a Linux machine or a Windows machine.
As a test environment for writing this guide, I opted for a Linux CentOS 7 machine.
After installation, the machine will need to be updated and have the following installed:
[root@centos7 ~]# yum install wget

[root@centos7 ~]# yum install perl

[root@centos7 ~]# yum install perl-CPAN

[root@centos7 ~]# yum install libssh2 libssh2-devel gcc
Once all packages are installed, reboot the server, and then run the following commands:
[root@centos7 ~]# perl -MCPAN -e 'install Net::SSH::Perl'   (all defaults)
[root@centos7 ~]# perl -MCPAN -e 'install Net::SSH2'
Now test the Net::SSH2 library with:
[root@centos7 ~]# perl -e 'use Net::SSH2;'
If there are no errors at this point we can switch to our NetEye server and copy the certificate used by the httpd service to our test machine (in my case with IP: 192.168.1.242):
[root@neteye4 ~]# scp /neteye/shared/httpd/conf/tls/certs/neteye_cert.crt 192.168.1.242:/root/
Now we’ll need to obtain and save the user password neteye_glpi_agent_master so that we can use it later:
[root@neteye4 ~]# cat /root/.pwd_neteye_glpi_agent_master
1ZN6IcKbZPevp4CwftnEIzL2VxybwoPZ
Next, we go back to the test machine and add the certificate we just copied from the NetEye master used by the httpd service to the list of ca-trust certificates:
[root@centos7 ~]# cp /root/neteye_cert.crt /etc/pki/ca-trust/source/anchors/
[root@centos7 ~]# update-ca-trust
Now we’ll need to verify the Common Name or DNS Name that’s inside the certificate (specifically the Subject Alternative Name):
[root@centos7 ~]# openssl x509 -in neteye_cert.crt -text

We then verify the Subject Alternative Name:

            X509v3 Subject Alternative Name:
                DNS:neteye4
And add the detected name to the hosts file:
[root@centos7 ~]# vi /etc/hosts
127.0.0.1   localhost localhost.localdomain localhost4 localhost4.localdomain4
::1         localhost localhost.localdomain localhost6 localhost6.localdomain6
192.168.1.242 centos7
192.168.1.251 neteye4
Now we perform an https connection test to check whether the communication between the test machine and the NetEye server occurs without errors:
[root@centos7 ~]# curl https://neteye4/glpi/front/inventory.php
Install GLPI-Agent
First, download the latest stable package available and install it. When prompted, get the user name and password we previously saved and enter them as described:
[root@centos7 ~]# wget https://github.com/glpi-project/glpi-agent/releases/download/1.4/glpi-agent-1.4-linux-installer.pl

[root@centos7 ~]# perl glpi-agent-1.4-linux-installer.pl
Installing glpi-agent v1.4...
glpi-agent is about to be installed as service

Provide a URL to configure the GLPI server, using the user name and password:
> https://neteye_glpi_agent_master:1ZN6IcKbZPevp4CwftnEIzL2VxybwoPZ@neteye4/glpi/front/inventory.php

Provide a path to configure local inventory run or leave it empty:
>

Provide a tag to configure or leave it empty:
> TEST
Applying configuration...
Enabling glpi-agent service...

[root@centos7 ~]# systemctl status glpi-agent
● glpi-agent.service - GLPI agent
   Loaded: loaded (/usr/lib/systemd/system/glpi-agent.service; enabled; vendor preset: disabled)
   Active: active (running) since Fri 2023-06-16 16:17:37 CEST; 51s ago
     Docs: man:glpi-agent
 Main PID: 5562 (glpi-agent (tag)
   CGroup: /system.slice/glpi-agent.service
           └─5562 glpi-agent (tag TEST): waiting

Jun 16 16:17:37 centos7 systemd[1]: Started GLPI agent.
Jun 16 16:17:37 centos7 glpi-agent[5562]: GLPI Agent starting
Jun 16 16:17:37 centos7 glpi-agent[5562]: [http server] HTTPD service started on port 62354
Jun 16 16:17:37 centos7 glpi-agent[5562]: target server0: next run: Fri Jun 16 17:17:14 2023 - https://neteye_glpi_agent_master:1ZN6IcKbZPevp4CwftnEIzL2VxybwoPZ@neteye4/glpi/front/inventory.php
Add a Server Target
At this point we will have created our first Server Target (by default defined as server0) and we’ll be able to verify its correct creation with the command:
[root@centos7 ~]# glpi-remote list targets
id        type      url/path                                                                                            maxdelay  Next run date
server0   server    https://neteye_glpi_agent_master:1ZN6IcKbZPevp4CwftnEIzL2VxybwoPZ@neteye4/glpi/front/inventory.php  3600      Fri Jun 16 17:17:14 2023
listener  listener                                                                                                      3600      Fri Jun 16 17:16:45 2023
If the parameters you entered for the GLPI server are not correct, you can just edit the configuration file:
[root@centos7 ~]# cat /etc/glpi-agent/conf.d/00-install.cfg
server = https://neteye_glpi_agent_master:1ZN6IcKbZPevp4CwftnEIzL2VxybwoPZ@neteye4/glpi/front/inventory.php
tag = TEST
Add a Remote Host
We’re now ready to add our Linux clients to our list of remote machines to inventory.
If this is the first time we’ve performed these operations, our list will be empty, so to add a new machine we must first verify that it’s present in /root/.ssh/known_hosts.
If not present, you’ll first need to ssh to the remote machine from our test server. Once added to the known_hosts file, we then execute the following commands:
[root@centos7 conf.d]# glpi-remote list
index  deviceid  url  target  Next run date

[root@centos7 ~]# glpi-remote add ssh://root:[PASSWORD]@192.168.1.242/?mode=libssh2 --target server0
Added centos7-2023-06-16-16-29-47 remote agent to server0

[root@centos7 ~]# glpi-remote list
index  deviceid                     url                                             target   Next run date
    1  centos7-2023-06-16-16-29-47  ssh://root:****@192.168.1.242/?mode=libssh2     server0  on next agent run
You can decide which credentials to use to connect to a remote machine, in my case I used the root user.
After adding the machine to the list of remote servers we are ready to run our first remoteinventory without agents:
[root@centos7 ~]# glpi-agent --logger=stderr --task remoteinventory
[info] target server0: server https://neteye_glpi_agent_master:1ZN6IcKbZPevp4CwftnEIzL2VxybwoPZ@neteye4/glpi/front/inventory.php
[info] sending prolog request to server0
[info] server0 answer shows it supports GLPI Agent protocol
[info] running task RemoteInventory
[info] New inventory from centos7-2023-06-16-16-29-47 for server0 (tag=TEST)

[root@centos7 ~]# glpi-remote list
index  deviceid                     url                                             target   Next run date
    1  centos7-2023-06-16-16-29-47  ssh://root:****@192.168.1.242/?mode=libssh2     server0  Fri Jun 16 17:31:42 2023
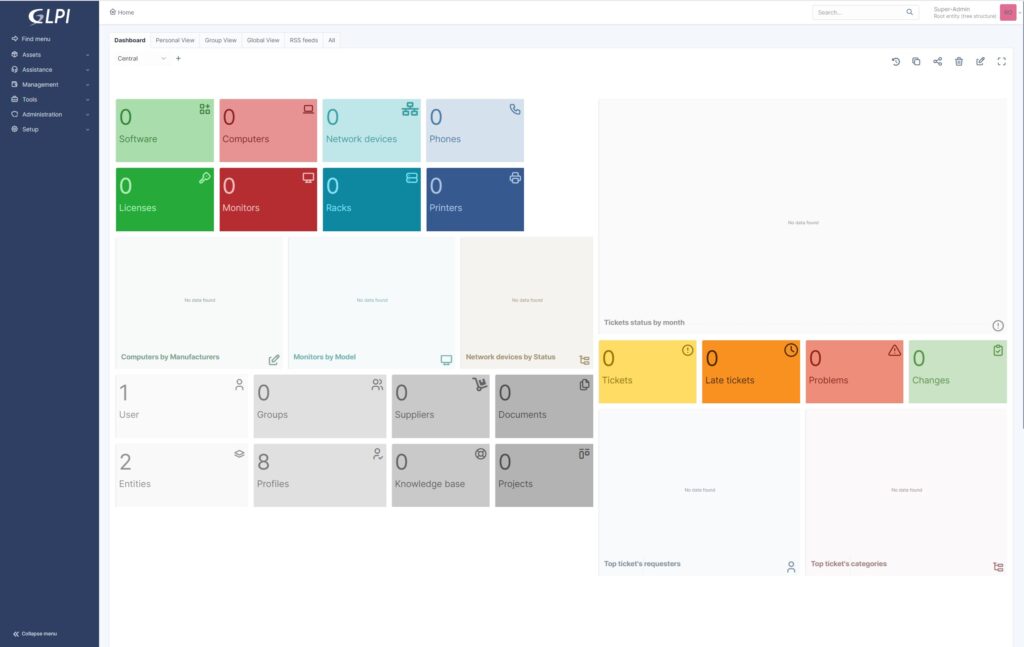
Before our remote inventory in the GLPI console, the situation was as follows with no items:
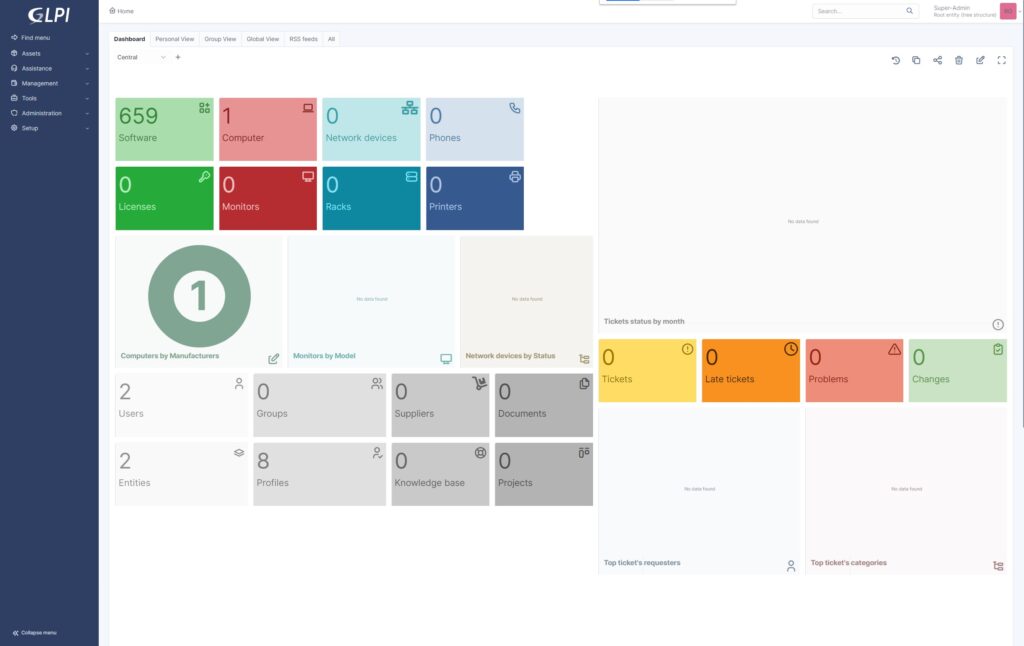
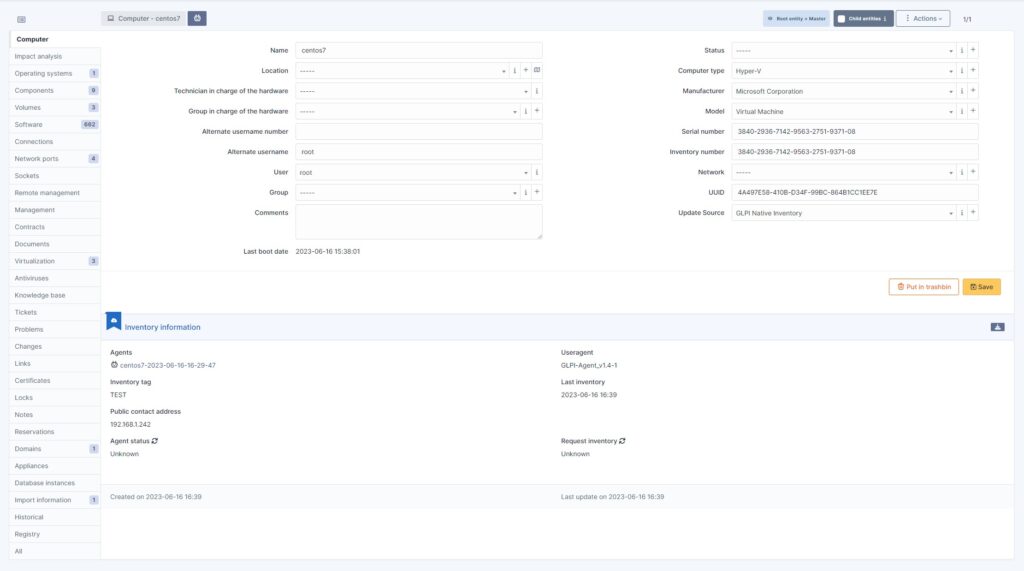
And now we have the following result:
So that’s it for Linux hosts. Part 2 will describe how to configure and add remote Windows Hosts with the SSL certificates used by the WinRM HTTPS protocol.
These Solutions are Engineered by Humans
Did you find this article interesting? Are you an “under the hood” kind of person? We’re really big on automation and we’re always looking for people in a similar vein to fill roles like this one as well as other roles here at Würth Phoenix.
Andrea Mariani
Author
Latest posts by Andrea Mariani
29. 06. 2026
AI, NetEye, Unified Monitoring
How to Build an LLM-Assisted Automation
21. 03. 2026
AI
Reflections on Running LLMs Locally: Why It’s Worth Running Them on Your Own Infrastructure
11. 09. 2025
NetEye, PHP, Unified Monitoring
Using Keycloak to Secure Web Pages and Virtual Directories
20. 06. 2025
NetEye, Unified Monitoring
NEP Telegram Notification