21. 05. 2026
APM, Kubernetes

It’s been a while since my last blog post about our OpenShift journey since as a devops team, we’ve been focusing on other activities for a while.
Today I’d like to talk a bit about how to use OpenShift for CI purposes. As described in our productive use case, we implemented several pipelines to build and publish our user guide. But we also implemented several other pipelines for internal use such as training lab provisioning, NetEye testing PoC, etc…
Operator
So let’s start! OpenShift itself provides an official operator to create your own pipelines and, surprisingly, it’s called “Red Hat OpenShift Pipelines”. Actually it’s based on an open-source project also available on Kubernetes and called Tekton. OpenShift Pipelines is the officially supported version of Tekton. This is not unusual on OpenShift: sometimes you can even find both the community version (e.g. ArgoCD) operator and the official version (e.g. OpenShift GitOps), which are actually the same software suite but with different versions and support levels.
Pipeline
Once you’ve installed the OpenShift Pipelines operator you can start with pipelines. A pipeline is made of several parts:
- metadata: used mainly to define the pipeline’s name and namespace
- workspaces: this is required only if you want to share data among tasks (more about this later), but in general you do want to pass information between different tasks
- params: this is is like a function signature, it includes the parameter name, type, and optionally a description and a default value. Those values will also be prompted in the GUI when you start a pipelines we interface from, and must be supplied in the API call. Similar to Jenkins params, they can be accessed as
$(params.<param_name>) - tasks: this is a list of actual actions to perform (like Jenkins stages) which will be performed by the pipeline. Tasks can be executed sequentially or in parallel.
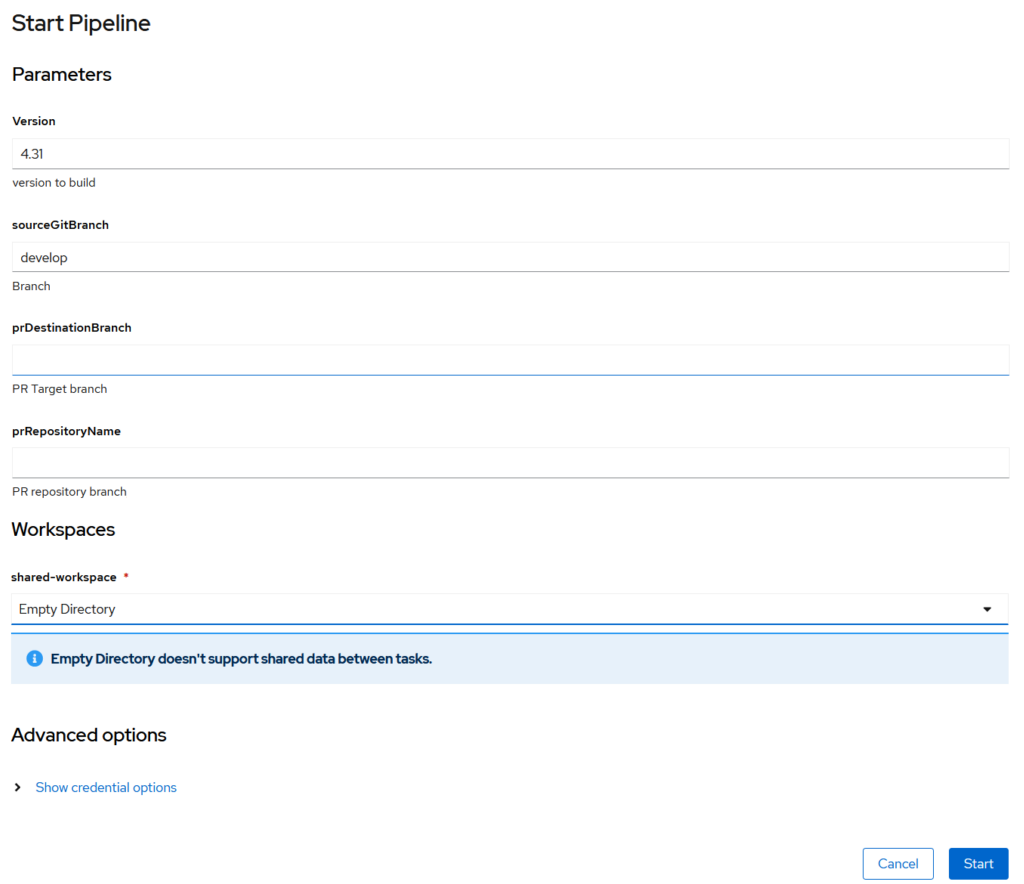
In this screenshot you can see the GUI with the parameters specified inside the params section:
In the following snippet you can see an example:
apiVersion: tekton.dev/v1beta1
kind: Pipeline

metadata:
  name: my-pipeline
  namespace: openshift-pipelines

spec:
  workspaces:
    - name: shared-workspace
  params:
    - name: version
      type: string
      default: "4.31"
      description: "Version to build"
    - name: sourceGitBranch
      type: string
      default: 'main'
      description: "Branch"
    - name: prDestinationBranch
      type: string
      default: ""
      description: "PR Target branch"
    - name: prRepositoryName
      type: string
      default: ""
      description: "PR repository branch"

  tasks:
    ...
Looking more in depth at the single task you can see several components similar to pipelines like workspace and params. In this case we will define a workspace called “output” which will be used to store results.
In addition, you can note the runAfter which states the order in which tasks will be executed: if not defined, the tasks will be executed in parallel. Finally you’ll notice a taskRef: in the pipeline you’ll have only the invocation of the task, while its definition will be in another object. This is great for re-usability.
If a task fails, subsequent steps will be skipped.
tasks:
    - name: prepare-ug-build
      taskRef:
        name: prepare-ug-build
      workspaces:
        - name: output
          workspace: shared-workspace
      params:
        - name: pipelineName
          value: "my-pipeline"
        - name: sourceGitBranch
          value: $(params.sourceGitBranch)
        - name: prRepositoryName
          value: $(params.prRepositoryName)
    - name: fetch-source-repository
      taskRef:
        name: git-clone-modules-ssh-unprivileged
      workspaces:
        - name: output
          workspace: shared-workspace
      params:
        - name: workingDir
          value: "my-pipeline-$(tasks.prepare-ug-build.results.buildNumber)"
        - name: WPGitUrl
          value: "bitbucket.org:siwuerthphoenix"
        - name: sourceGitRepo
          value: "neteye-userguide-core"
        - name: sourceGitBranch
          value: "$(tasks.prepare-ug-build.results.nuc_branch)"
        - name: submodulesGitBranch
          value: "$(tasks.prepare-ug-build.results.submodules_branch)"
        - name: pipelineName
          value: "my-pipeline"
        - name: prDestBranch
          value: $(params.prDestinationBranch)
        - name: prRepositoryName
          value: $(params.prRepositoryName)
      runAfter:
        - prepare-ug-build
Very similar to the tasks section is the finally section. Finally includes a list of tasks which are guaranteed to be executed once all the tasks in the tasks section have been executed (successfully or not). Therefore this section is really useful for performing mandatory tasks like cleanup, or sending fail notifications.
  finally:
    - name: workspace-cleanup-app
      taskRef:
        name: workspace-cleanup
      workspaces:
        - name: output
          workspace: shared-workspace
      params:
        - name: workingDir
          value: "my-pipeline-$(tasks.prepare-ug-build.results.buildNumber)"
Tasks
In the snippet below you can see how a Task is written, again you can notice metadata, params and workspaces sections. A common mistake when start working with Tekton is to mess up with parameter names: those defined inside the task must be the same as defined in task invocation inside pipeline, while values passed to the task invocation are pipeline params.
This is reasonable, but this double key-value mapping (if you’re coming from programming languages you usually use ordered params instead) may be misleading at the beginning and may be the cause of many slowdowns because of typos or refactoring. After a while we decided just to use the same parameter name both in pipelines and in tasks, but this is not mandatory at all, it’s just a way to avoid confusion and simplify copy-and-paste, since you have to define the same params in multiple places.
apiVersion: tekton.dev/v1beta1
kind: Task
metadata:
  name: prepare-ug-build
  namespace: openshift-pipelines
spec:
  params:
  - name: pipelineName
    type: string
  - name: sourceGitBranch
    type: string
  - name: prRepositoryName
    type: string
  results:
    - description: The build number
      name: buildNumber
    - description: NetEye version from branch
      name: version
    - description: NetEye userguide core branch
      name: nuc_branch
    - description: Submodules branch to use for the checkout
      name: submodules_branch
  workspaces:
    - name: output
  steps:
  - name: prepare-ug-build
    image: quay.io/rhdevelopers/origin-cli-yq-jq
    workingDir: $(workspaces.output.path)
    script: |
      #!/usr/bin/env sh
      set -ex
      # Generate a build name
      BUILD_NAME=$(echo $HOSTNAME | cut -f4 -d "-")
      buildNumber=$(date +"%Y%m%d.")"${BUILD_NAME}"
      printf $buildNumber | tee /tekton/results/buildNumber
      ...
Finally you have the steps section: in this section you can have one or more steps which will be executed sequentially. Please note that each step is characterized by a Docker image to be used to run the step, a working directory and a script which will be executed inside the pod. In the script section you can add an inline script to perform intended actions. Remember that you are executing those actions inside a container and therefore you must assume that everything is stateless unless you store the results.
Since the container starts and ends with the stage it belongs to, everything is ephemeral. Therefore, if you want to pass artifacts from one step to the next one (even to another task), you have to write them in the /tekton/results directory. You can achieve this by writing results in a file e.g. /tekton/results/buildNumber and you can read them in the pipeline for example with $(tasks.prepare-ug-build.results.buildNumber). Note that you have to use the task name.
The actual device used as the workspace must be specified either from the GUI
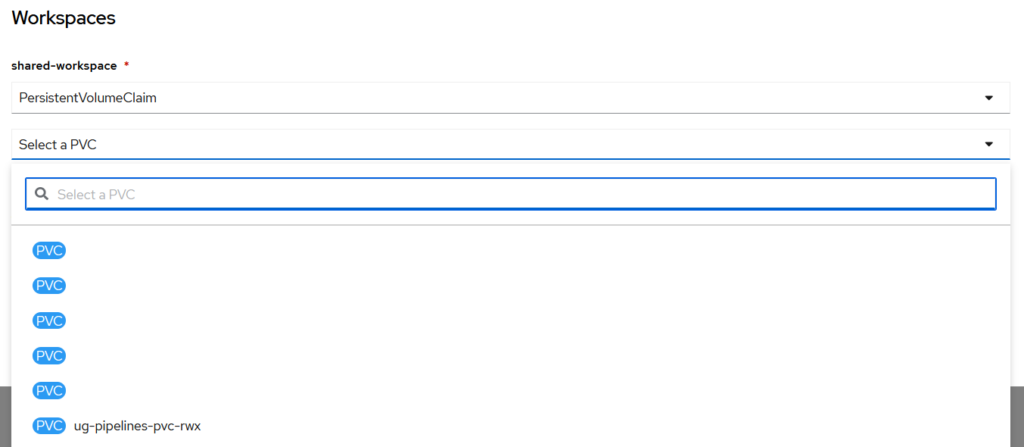
or from a TriggerTemplate (we will talk about Triggers in a dedicated blog post).
A comparison with Jenkins
Currently we run our CI on Jenkins infrastructure, but we are dismissing it to switch to Openshift Pipelines. We don’t have a lot of experience with Tekton at the moment but for the moment we’ve noticed this: Tekton seems much more versatile when you want to parallelize using containers. The fact that each step is a new instance forces you to think in a different way respect to Jenkins in which we basically start a container at the beginning of the pipeline and kill it at the end, executing all stages inside the same container. This can be also a security advantage since we can have different permissions and tools for each task.
One problem we found is the workspace cleanup: often we have to pass stuff between container, but since there is no workspace (in particular for the artifacts we have to pass from one step to the next one) we must be really careful with the cleanup. We tried to use a VolumeClaimTemplate, but we didn’t succeed and we have to investigate this further.
Another limitation we found with respect to Jenkins is that several features that are built-in in Jenkins are not in Tekton. For example there are cases in which you’ll want to serialize builds, i.e. run a single PipelineRun for each Pipeline. On Jenkins this means just flag an option inside the job configuration, but in Tekton this isn’t possible at all: we implemented our own scheduler to poll OpenShift, retrieve PipelineRuns and queue them. Another example is the lack of a straightforward way to retrieve an equivalent of the Jenkins build number, which can be found in the task snippet in this blog post.
In conclusion, both tools have pros and cons and this is only a very high-level introduction just to give an overview about how Openshift Pipelines works. An interesting resource to help you speed up Tekton development could be Tekton Hub, but we haven’t investigated it yet.
These Solutions are Engineered by Humans
Did you find this article interesting? Are you an “under the hood” kind of person? We’re really big on automation and we’re always looking for people in a similar vein to fill roles like this one as well as other roles here at Würth Phoenix.

Alessandro Valentini
DevOps Engineer at Würth IT Italy
Platform Engineer at Würth IT Italy
Author
Latest posts by Alessandro Valentini
30. 06. 2026
Automation, DevOps, Kubernetes, Uncategorized
K8s Secrets: Why We Migrated from SealedSecrets to ExternalSecrets
05. 08. 2025
DevOps, Kubernetes
Use S3 Storage with OpenShift Data Foundation
04. 03. 2025
Automation, DevOps, Service Management
Group-aware Reboot with Ansible
nice explanation