30. 06. 2026
APM, DevOps, Kubernetes

03. 10. 2023
Davide Sbetti
Log-SIEM, Machine Learning, NetEye
Semantic Search in Elasticsearch – Testing Our NetEye Guide: Can We Improve the Search Experience? (Part 1)
Once upon a time (in fact it was just a month ago, but it sounds more dramatic this way) I had the opportunity to attend a webinar about Vector Search, Generative AI, and modern NLP by the Elastic Team. One of the topics that was touched on during the webinar was ELSER , Elastic’s new out-of-domain sparse encoder, recently released with Elastic Stack 8.8, currently in technical preview.
Are you curious to know whether I took some inspiration and knowledge from that?
Long story short (and spoiler alert, yes): It was inspiring enough that I decided to devote some of the time that we can use in innovation activities to test ELSER and see if semantic search can improve the search experience in our NetEye User Guide.
Would like to join me on this adventure? Yes? Great! Let’s start with ELSER.
Out-of-domain Sparse Encoders in Just a Few Paragraphs
Yes, you got it right, this is the little theory part we need before diving into the code. And yes again, the words out-of-domain sparse encoders in the title do actually have a meaning and were not taken randomly out of a dictionary. Let’s go through them!
Warning: if you are already in the field of information retrieval and are already familiar with concepts like embeddings and transformers, you’ll find the following explanations a bit oversimplified. But the intention is only to give a bit of context to the work carried on below.
Encoding information
In the field of information retrieval (a long name that for us, in this blog post, means search) often the text that we would like to search isn’t kept as is, but is transformed or encoded in some way. For example, we could count the number of occurrences a certain word has in each document, divide it by the number of words in the document, and build a vector out of it to represent the documents (a simplified term frequency). More sophisticated concepts are clearly available to researchers in the field, but the general idea is that we would like to transform the input text to a certain structure that takes into account not only the words of the original text but also, for example, their relevance (how much information they provide), while possibly taking the context into account.
Sparse vs. dense vectors
Okay, when talking about models to encode information, as you can imagine in the end we’re going to get down to numbers (and vectors of numbers).
Speaking of vectors, sparse vectors are those that don’t contain many concrete values, so we’ll find many zeros in them. This is opposed to dense vectors, where almost every dimension (cell) of the vector contains information.
How does this influence the way we see encoding models? Well, models that output dense vectors usually require some additional training on specific data, since for example, we would like each vector to say a lot about a single specific word. To achieve this, the model really needs to know a lot about the text we are passing to it, which means that some specialized training is required on some example texts in the domain we’re working on (i.e., domain-specific text). Here I’m oversimplifying things a bit, but the core idea is that generally models using dense vectors are quite specific to a particular domain.
A comparison between the two? Let’s just roughly say that models using dense representations tend to be really good on the data coming from the same domain on which they were trained, but they also tend to be outperformed on texts from other domains, where sparse models will perform better.
So, where does ELSER position itself?
Well, as noted in the blog post that outlined its main characteristics, ELSER is a sparse model based on the SPLADEv2 architecture, which learns a sparse representation of a document (or query) in the form of a bag of words and weights (so basically a map between some words and the weight they have for that document). During this process, it also performs word expansion (so also taking into consideration similar words in terms of syntax or context), to better capture the context of each document. So, in the final bag of words, you won’t find all the words in your documents (the irrelevant ones are removed), and you will probably find additional words, which aren’t in the document but which describe the context. The same transformation is then also applied to the query, so you can then establish a match between the document representations and the query representation (using the vector dot product).
Okay, if you survived this far with the “boring” part, I’m happy to tell you it’s now time to write some code.
How Does This Apply to the NetEye Guide?
When we heard about ELSER and the good results it was able to achieve on general datasets which it wasn’t trained on, we immediately thought about applying it to our NetEye Guide, to see how it could improve the search experience.
Because yes, let’s be frank, we can definitely improve its search experience.
So the main idea for this test is to:
- Crawl a version of the NetEye Guide
- Load it in Elasticsearch on NetEye, applying ELSER during ingestion
- See how the queries perform and integrate them in a local instance of the NetEye User Guide, to see the results rendered concretely on the search page
Crawling
The crawling procedure for this test can be fairly easy: connect to our NetEye Guide website and get all the pages specific to a certain version.
To make it easier to return usable results when searching, we can divide each page according to the sections and subsections in which it’s subdivided (the titles, basically).

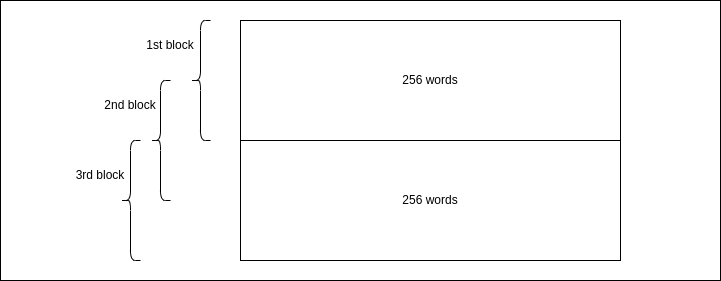
Easy, right? Except for a certain limitation of ELSER in that currently it can process a maximum of 256 tokens (a.k.a. words) at a time. But wait, some pages in our NetEye Guide have more than 256 words!
How can we handle that then? Well, sliding windows!
Yes, because we can divide each section longer than 256 words first in a block of 256, we can then move 128 words ahead and create a second block of words, and so on until we reach the end of the section. Each window/block will then be a document in Elasticsearch.
Why move by blocks of 128 words and not 256 directly? Because we would like our blocks to be overlapping since the second block will start with a sentence that probably needs the context of the first block to be understood correctly. And the whole idea is to have the possibility to match the context of the user’s queries!
So, let’s start by building our crawler, using Python. Argument parsing goes always first!
if __name__ == '__main__':
    parser = argparse.ArgumentParser(
    prog='Neteye Guide Crawler',
    description='Crawls the NetEye Guide specified version
    and uploads it to Elasticsearch')
    parser.add_argument('neteye_version',
    help='The NetEye version of the UG we would like to crawl')

    args = parser.parse_args()

    neteye_guide_crawler = NeteEyeGuideCrawler(
      args.neteye_version
    )

    neteye_guide_crawler.run()
Okay, so the real logic is inside a class named NeteEyeGuideCrawler, let’s write it together, asking Beautiful Soup for help when needed! We initialize the class by setting the NetEye version passed as an argument and the final index name in Elasticsearch, so here: neteye-guide-<version>
from bs4 import BeautifulSoup
import requests
import neteye_guide
import logging
import elastic_client
from datetime import datetime
import argparse

class NeteEyeGuideCrawler:

    MAX_TOKENS = 256
    SCROLL = int(MAX_TOKENS / 2)

    def __init__(self, neteye_version):
        logging.basicConfig(level=logging.DEBUG)

        self.neteye_version = neteye_version
        self.base_url = f"https://neteye.guide/{neteye_version}"
        self.es_index_name = f"neteye-guide-{neteye_version}"

        # we will see what this is in a second
        self.es_client = elastic_client.ElasticClient()

        # it is always good to know when we did the crawling
        now = datetime.now()
        self.crawling_time = int(round(now.timestamp()))
We then build the run method, which retrieves the list of all pages in the User Guide and then crawls them one at a time, uploading the results to Elasticsearch.
def run(self):
    # retrieve all pages for the specified neteye version
    all_neteye_guide_pages = self.retrieve_all_pages_to_crawl()

    # loop over them and crawl + upload
    for page in all_neteye_guide_pages:
        self.crawl_page(page)
        self.es_client.run_actions(self.es_index_name)
How can we retrieve all pages in our guide? Well, we can use the menu for that, taking all the links reported there!
def retrieve_all_pages_to_crawl(self):
        homepage = f"{self.base_url}/index.html"

        # Get the page
        req = requests.get(homepage)

        # Soup it!
        soup = BeautifulSoup(req.text, "html.parser")

        # Retrieve the menu
        menu = soup.find(id="menu")

        if menu is None:
            return []

        all_pages_obj = menu.findAll("a", href=True)
        # extract the URLs of the all the retrieved pages
        all_pages = [page["href"] for page in all_pages_obj]

        logging.info(f"Found {len(all_pages)} pages for NetEye
        version {self.neteye_version}")

        return all_pages
Okay, so now that we have all the pages we can crawl each page! The idea is, as mentioned above, to divide it into sections, applying the sliding window approach to each section. Due to how Beautiful Soup returns the text inside a certain element, we process the sections from bottom to top, removing each section after having processed it to avoid duplicating the text.
def crawl_page(self, page):

    # Build URL
    page_url = f"{self.base_url}/{page}"

    logging.info(f"Crawling page {page_url}")

    # Get the page
    req = requests.get(page_url)

    # Soup it!
    soup = BeautifulSoup(req.text, "html.parser")

    # Extract the text of the div with id
    #'document' (so the content of the page)
    page_document_section = soup.find(role="main")

    # If we do not find the div there is nothing to crawl here
    if page_document_section is None:
       return

    # find all sections
    sections = page_document_section.find_all("section")

    # reverse them so we can delete them
    # after reading to avoid duplicating text
    sections.reverse()

    for section in sections:

       section_raw_text = section.get_text(
         separator=" ",
         strip=True
       )

       # Remove new lines, multiple spaces at the beginning,
       # end or inside the text
       section_words = (
        section_raw_text.replace("\n", " ")
        .replace("\t", " ")
        .encode('ascii', 'ignore')
        .split()
       )

       # Extract the title of the section,
       # useful to report the result
       section_title = (
        section.find(["h1", "h2", "h3", "h4", "h5"])
        .get_text(separator=" ", strip=True)
        .encode('ascii', 'ignore')
       )

       # Create documents for this page
       page_section = page
       section_id = section.get("id")
       if section_id is not None:
          page_section = f"{page_section}#{section_id}"

       self.create_documents(
        page_section,
        section_title.decode("utf-8"),
        section_words
       )

       # remove the section after processing
       section.decompose()
We now have the content of each section, divided up into single words. So it’s time to slide through them and create the Elasticsearch documents out of our section!
 def create_documents(self, page, title, words):
     start = 0
     end = len(words)
     window_end = 0
     generation = 0

     while window_end < end:
         # Slice the list to get words in current window
         window_end = start + self.MAX_TOKENS

         document_words = words[start:window_end]

         # decode according to the coding we would like
         # to enforce
         document_words = [
          word.decode("utf-8") for word in document_words
         ]

         # Join them to make the actual document
         document = " ".join(document_words)

         # Create document object
         es_document = neteye_guide.NetEyeGuideDocument(
           page,
           title,
           generation,
           document,
           self.crawling_time
         )

         self.es_client.add_document(es_document)

         start += self.SCROLL
         generation += 1
What is the generation variable mentioned above? Well, in case we have multiple documents for the same section, we increase an integer counter. Why? Because then we can use it when generating the ID of the document in Elasticsearch.
Q: Hey Davide, are you saying that we need a specific ID for each document? Can’t we just leave that to Elasticsearch?
A: Yes we could, but what if we wanted to update just a single page in the User Guide? Then we could just generate the new documents, overwriting those already present in the Elasticsearch index and thus potentially remove anything left over (say, if we reduced the size of the section) by merely deleting the documents with an older crawling time.
But this is the future. For now, we could have left this to Elasticsearch’s default ID generation, but we do want to be ready for the future, don’t we? That’s basically what NetEyeGuideDocument (below) does, it just generates the correct ID for the document, and prepares the object we would like to store.
import hashlib

class NetEyeGuideDocument:

    def __init__(self, page, title, generation, text, crawling_time):
        self.page = page
        self.title = title
        self.generation = generation
        self.text = text
        doc_id_string = f"{self.page}__{self.generation}"
        doc_id_hash = hashlib.sha256(bytes(
         doc_id_string, encoding='utf-8'
        ))
        self.document_id = doc_id_hash.hexdigest()
        self.crawling_time = crawling_time

    def to_document(self):
        return {
            "page": self.page,
            "text": self.text,
            "title": self.title,
            "crawling_time": self.crawling_time
        }

    def get_id(self):
        return self.document_id

    def get_text(self):
        return self.text
Okay, one last piece is missing. The upload to Elasticsearch. For this, we can build a little client which exploits the capabilities of Elasticsearch’s official Python client to load the documents into the target index.
from elasticsearch import Elasticsearch
import ssl

class ElasticClient:

   # yes, I redacted the paths. You don't want to know
   # where the certificates were, right?
    cert_file_path = "<path_to_certificate_for_authentication>"
    key_file_path = "<path_to_matching_key>"

    def __init__(self):
        context = ssl.create_default_context()
        context.load_cert_chain(
          self.cert_file_path,
          self.key_file_path
        )
        self.client = Elasticsearch(
          'https://elasticsearch.neteyelocal:9200',
          ssl_context=context,
          request_timeout=300
        )
        self.actions = []

    def reset_actions(self):
        self.actions = []

    def add_document(self, document):
        self.actions.append(
         {"index": { "_id": document.document_id}}
        )
        self.actions.append(document.to_document())

    def run_actions(self, index):
        if len(self.actions) > 0:
            result =  self.client.bulk(
              operations=self.actions,
              index=index,
              pipeline="elser-v1-neteye-guide"
            )
            print(result)
            self.reset_actions()
And with this, we can load the documents into Elasticsearch. The only peculiarity worth mentioning is that, as you can see from the code above, each document needs two objects in the payload we send to Elasticsearch: the action and the document itself.
The Elasticsearch side of the job
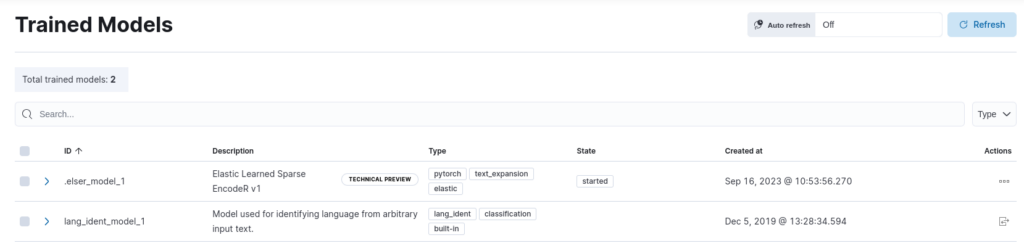
Okay, where is ELSER then? Well, we have to download it. Ah, and apply it. The nice thing is that we can do most of the work directly from Kibana. As noted in the official procedure, we can do it as follows:
- Open Kibana from NetEye, using the Log Analytics menu
- Enter the Analytics > Machine Learning page from the left menu
- Open the Trained Models view
- Click on the download button near the
.elser_model_1model
After that, we’re ready to deploy the model, by simply clicking on the Start deployment button!
Now that the model is deployed, we need to be able to apply it to the documents coming to our NetEye Guide index. How? Using an ingest pipeline, of course!
Yes! Applying ELSER is as easy as creating and applying a simple ingest pipeline. Let’s start with the pipeline definition. Here you can find the one I used, which simply applies ELSER to the field named text, i.e. the one that will contain the text of the section. The target field is the field where the result of the pipeline will be stored. We can load it using the Dev Tools in Kibana as follows:
PUT _ingest/pipeline/elser-v1-neteye-guide
{
  "processors": [
    {
      "inference": {
        "model_id": ".elser_model_1",
        "target_field": "ml",
        "field_map": {
          "text": "text_field"
        },
        "inference_config": {
          "text_expansion": {
            "results_field": "tokens"
          }
        }
      }
    }
  ]
}
Last but not least, the index template! Because as the official documentation states, we need to ensure that the target field used by the pipeline is actually mapped to a specific type, like rank_features, to be sure it is interpreted correctly by the query. We can thus use the following index template (still loading it from Dev Tools) to map all our fields to the desired types:
PUT _index_template/neteye-guide
{
  "index_patterns": [
    "neteye-guide-*"
  ],
  "template": {
    "mappings": {
      "properties": {
        "ml.tokens": {
          "type": "rank_features"
        },
        "page": {
          "type": "keyword"
        },
        "text": {
          "type": "keyword"
        },
        "title": {
          "type": "keyword"
        },
        "crawling_time": {
          "type": "integer"
        }
      }
    }
  },
  "composed_of": [
    "neteye-autoexpand-replicas"
  ],
  "priority": 500,
  "_meta": {
    "managed_by": "NetEye",
    "managed": true
  }
}
The Results
Okay, we’re all set. Time to test our work. Let’s run the crawler using the following command (please ensure the required dependencies are installed first):
python3 crawler.py 4.32
And now let’s grab some coffee: it will take some time to crawl everything, load the documents, and process the text through the ELSER model. So, coffee time!

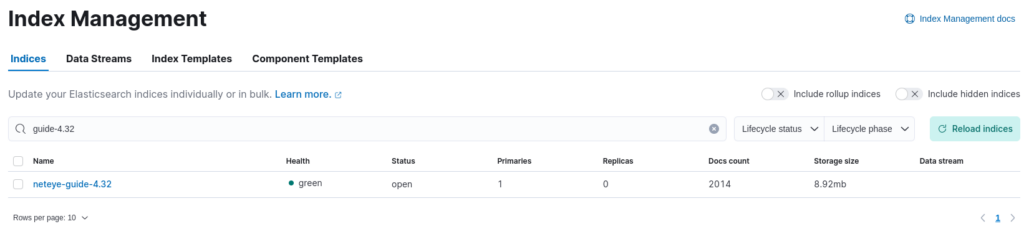
Perfect. Now after the coffee our crawler has successfully finished, so let’s see what we have in Elasticsearch.
If we look at the available indices inside the Index Management page, we can now see the newly created index for the version we crawled. The results of our crawling were about 2.000 documents, which occupy roughly 10 MB.
Now if we open the Dev Tools, we can first of all inspect what one of the documents looks like by executing the following query:
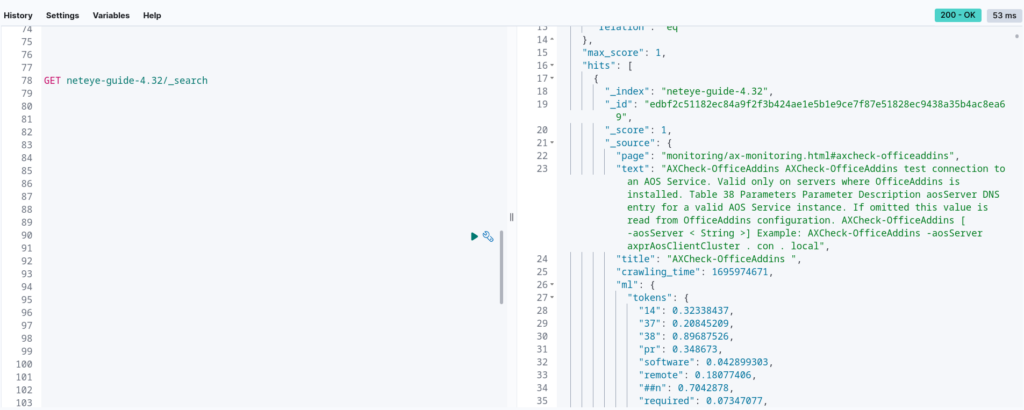
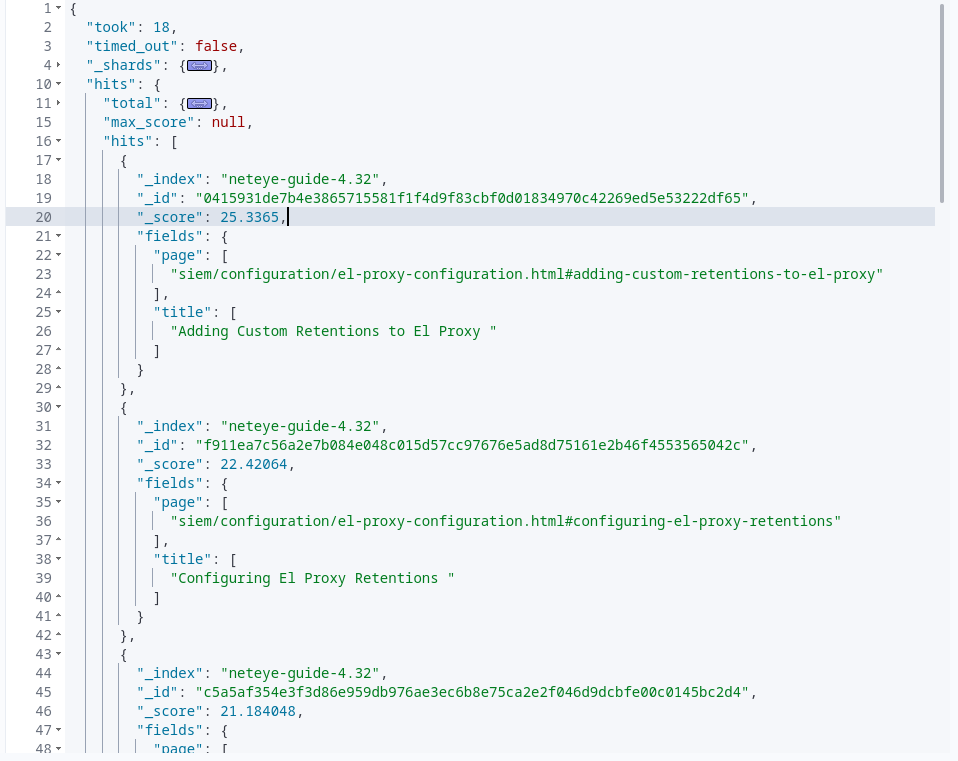
As you can see, besides having the fields we added to the document when indexing it (title, text and page), there is the ml.tokens field, which contains the bag of words that we described above.
How can we query these documents? Like we always do, using the search endpoint! For example, let’s suppose we would like to search for “how to add a custom retention to El Proxy”, what we could do is simply run the following query, to apply the model also to our text expansion query:
POST neteye-guide-4.32/_search
{
  "size": 10,
  "sort": [
    {
      "_score": {
        "order": "desc"
      }
    }
  ],
  "query":{
    "text_expansion":{
      "ml.tokens":{
        "model_id":".elser_model_1",
        "model_text":"how to add a custom retention to El Proxy"
      }
    }
   },
   "collapse": {
    "field": "page"
  },
  "fields": [
    "page",
    "text",
    "title"
  ],
  "_source": false
}
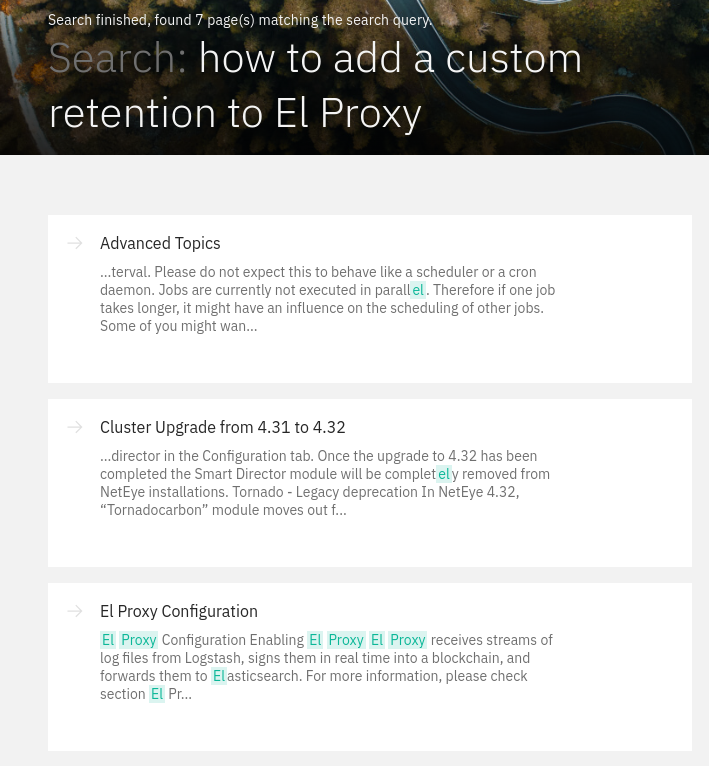
The result of the query can be seen below, where I’ve kept only the relevant fields to make it more legible:
And as we can see we got two interesting results, which seem better, at least based on the title, than the first three results we get when searching through Sphinx’s default search, which we currently use in the NetEye Guide:
Conclusions
In this blog post, we looked at ELSER, Elastic’s new out-of-domain sparse encoder, based on the SPLADE architecture, and we applied it, using an Ingest Pipeline, to a version of our User Guide, crawling it directly from the web, ensuring we were able to divide the text into sections and documents of the correct length.
We then inspected the results from the Dev Tools in Kibana and did a first query on the crawled documents.
What’s left? Well, how about trying to embed this in the Sphinx search and obtain results that we can actually display as the output of the search on our NetEye Guide.
So, if you weren’t bored by this blog post, then hold on just a couple of days and we’ll see together how we can transform these results into the results of our searches on the NetEye Guide.
These Solutions are Engineered by Humans
Did you find this article interesting? Does it match your skill set? Programming is at the heart of how we develop customized solutions. In fact, we’re currently hiring for roles just like this and others here at Würth Phoenix.
Davide Sbetti
Hi! I'm Davide and I'm a Software Developer with the R&D Team in the "IT System & Service Management Solutions" group here at Würth IT Italy. IT has been a passion for me ever since I was a child, and so the direction of my studies was...never in any doubt! Lately, my interests have focused in particular on data science techniques and the training of machine learning models.
Author
Latest posts by Davide Sbetti
30. 06. 2026
AI, Kubernetes
Load-balancing Requests to LLMs in Kubernetes: A KV-cache Approach with llm-d!
30. 03. 2026
APM, Log Management, Log-SIEM, NetEye
Sending OTel Data to Elasticsearch: Tenant Segregation through OAuth