
25. 09. 2018
Valentina Da Rold
NetEye, Unified Monitoring
How to Integrate an External jQuery Plugin in Icinga Web 2
As already mentioned in my other blog posts, NetEye 4 is based on Icinga Web 2, a powerful PHP framework.
During the development of some of our custom NetEye modules for Icinga Web 2, we needed to include some new, custom jQuery plugins to create a neat new effect in the GUI. For example, with the 4.2 release we introduced a multiselect component, switching from the basic HTML version to our new, easier to use and better looking one.
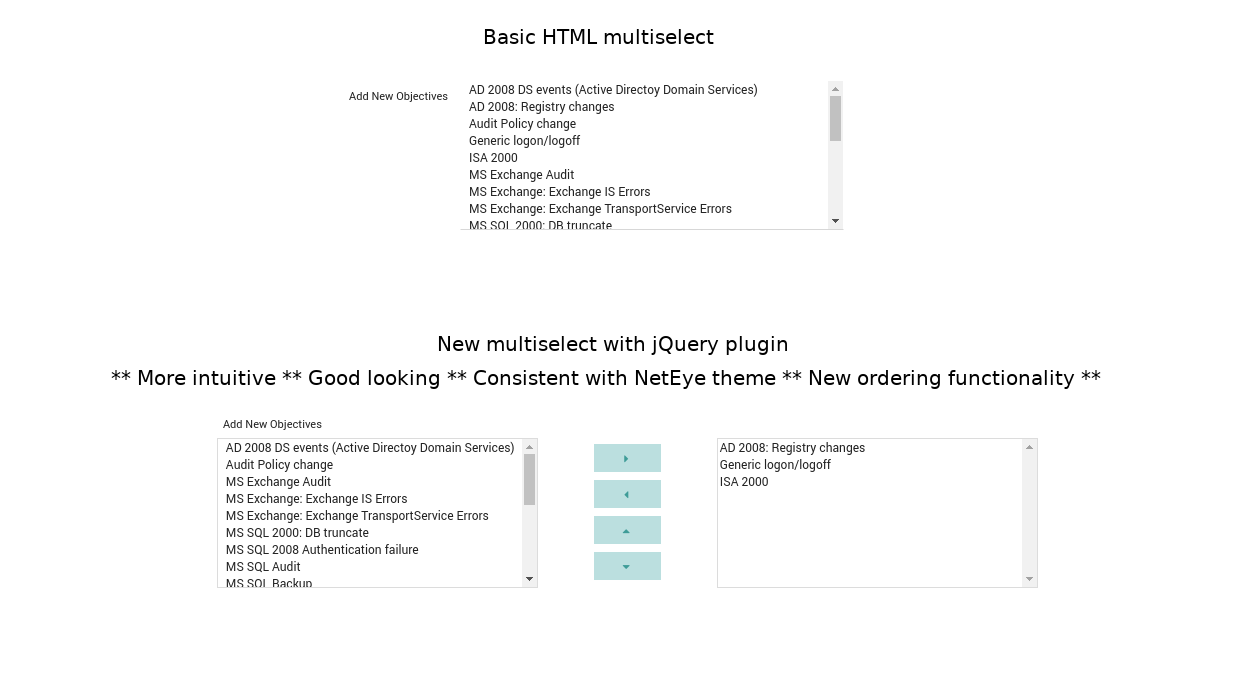
Our custom multiselect box is based on a jQuery plugin called Multiselect (you can download it from https://crlcu.github.io/multiselect/). We then added some custom jQuery code and a customized theme to better integrate this component with our NetEye 4 look-and-feel.
Our goal was to reuse the structure and style for each multiselect across the entire NetEye web interface. In other words, we also wanted to overwrite some Icinga Web 2 multiselects outside our custom modules. The jQuery libraries are automatically loaded in each section of Icinga Web 2, so the key point here was including a global CSS customization that would apply the desired style everywhere.
A short guide that describes how to reproduce this style follows.
- For ordering purposes I suggest you create a
vendordirectory inside your module’spublic/jsfolder - Save the jQuery plugin library inside this folder
- Open the
configuration.phpfile of your module and insert this line:$this->provideJsFile('vendor/multiselect.js'); - Create your custom jQuery class that allows you to apply the plugin on every multiselect in your product:
function attachMultiselect() { jQuery('div.control-group select[multiple="multiple"]').each(function (i, select) { var controlGroup = jQuery(select).parent(); var row = controlGroup.parent(); // Check if the element has already been processed (it should have class .row) if (!row.hasClass('row')) { jQuery(select).hide(); // Hide the default select in order to show the better looking one // get some information by the defaul zend-form element var selectOrigId = jQuery(select).attr('id'); var selectOrigSortable = jQuery(select).data('sortable'); // sortable is the attribute we choose for adding the sort buttons in the plugin var newSelectFromId = selectOrigId + '_from'; var newSelectToId = selectOrigId + '_to'; var sortableBtns = ''; if(selectOrigSortable == '1'){ sortableBtns = '<button type="button" id="' + newSelectFromId + '_move_up" class="btn btn-block"><i class="icon-up-dir"></i></button>' + '<button type="button" id="' + newSelectFromId + '_move_down" class="btn btn-block"><i class="icon-down-dir"></i></button>'; } // Create the new HTML structure for the element var fromSelect = '<select id="' + newSelectFromId + '" class="form-control" size="8" multiple="multiple">' + notSelectedOptions + '</select>'; var customHtml = '<div class="col-xs-2">' + '<button type="button" id="' + newSelectFromId + '_rightSelected" class="btn btn-block"><i class="icon-right-dir"></i></button>' + '<button type="button" id="' + newSelectFromId + '_leftSelected" class="btn btn-block"><i class="icon-left-dir"></i></button>' + sortableBtns + '</div>' + '<div class="without-label col-xs-5">' + '<select id="' + newSelectToId + '" data-orig-select-id="' + selectOrigId + '" class="form-control" size="8" multiple="multiple">' + selectedOptions + '</select>' + '</div>'; jQuery(select).addClass('form-control'); controlGroup.wrap('<div class=\'row\'></div>'); controlGroup.addClass('col-xs-5'); controlGroup.append(fromSelect); controlGroup.after(customHtml); updateValue(jQuery('#' + newSelectToId)); // trigger the value update on button click jQuery('#' + newSelectFromId).multiselect({ right: '#' + newSelectToId, sort: false, afterMoveToRight: function () { updateValue(jQuery('#' + newSelectToId)); triggerChange(select); }, afterMoveToLeft: function () { updateValue(jQuery('#' + newSelectToId)); triggerChange(select); }, afterMoveUp: function () { updateValue(jQuery('#' + newSelectToId)); triggerChange(select); }, afterMoveDown: function () { updateValue(jQuery('#' + newSelectToId)); triggerChange(select); } }); } }); } - Include your custom jQuery function in the
configuration.phpfile:$this->provideJsFile('custom-multiselect.js'); - Create your custom style for the plugin:
#layout .row { margin-right: -15px; margin-left: -15px; .col-xs-5 { float: left; text-align: center; width: 41.66666667%; &.without-label { margin-top: 30px; } .control-label-group { padding-left: 2em; text-align: left; } select[multiple] { height: 150px !important; border: 1px solid #DDDDDD; width: 90%; } } .col-xs-2 { float: left; margin-top: 30px; text-align: center; width: 16.66666667%; .btn-block { background-color: #bfe0e0; border: 2px solid #fff; color: #4a9e9a; cursor: pointer; display: block; width: 50%; padding: 6px 12px; margin: 0 auto; margin-top: 4px; line-height: normal; text-align: center; } } } - In order to include your new multiselect style everywhere in your system, you should now include the stylesheet in the
configuration.phpby using the function:$this->provideGlobalCssFile('multiselect.less');
In this way your theme will be used as the default for all modules and even for Icinga Web 2 itself.


Valentina Da Rold
Hi, I'm Valentina and I'm a Frontend Developer at Wuerth IT Italy. I started out my career applying my Cryptography skills to coding, but really quickly fell in love with the web. I have been making websites and applications since 2012 and I still can't get enough of it. Along the way I found a passion for front-end development, and I use this passion to create interfaces that solve problems. When I'm not creating beautiful solutions, I enjoy cooking or doing sport, while listening to beautiful music.
Author
Latest posts by Valentina Da Rold
30. 03. 2026
Atlassian, Automation
Automating Confluence Page Status at Scale: A Practical Workaround
11. 12. 2025
Atlassian, Development
Boosting Atlassian Integrations with the atlassian-python-api Library
29. 09. 2025
Atlassian, Development
Syncing Entra ID Groups and Members to Jira CMDB via Atlassian SCIM API: Key Lessons Learned
04. 06. 2025
Atlassian, Automation, Development
Automating Asset Delivery Tracking in the Jira Customer Portal: A Developer’s Guide
26. 03. 2025
Atlassian, Automation, Development
Unlocking Atlassian Automation: Lookup Objects vs. Branch on AQL