30. 04. 2026
Documentation

23. 08. 2023
Charles Callaway
Documentation
Tutorial Video Editing Technical Tips, Part 1: Making an Inset Porthole Video
Rather than the type of advice in my series on how to create a tutorial video, today let’s talk about the specifics on how to create a “porthole video”, which is an inset video overlay used during a screencast that doesn’t have the standard square shape (if it were square, we wouldn’t need any special techniques).
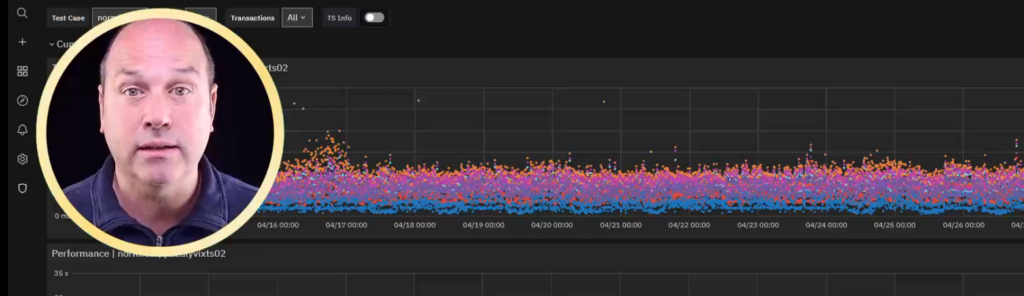
It’s called a porthole in reference to the round window found on ships, but in reality it could be an oval, pentagon, or any other non-square shape. It consists of the video you want to overlay, a window frame (yellow in the above example) in the shape you want, and a green screen layer that ensures the inset video doesn’t extend outside the frame.
Let’s look at why you would want to create one, and how to do it.
So, Why?
Well, let’s just say there’s a plague of boring tutorial videos out there. And generally speaking, what are the most boring parts? When there are long screencasts with a voice narration, but no visible person onscreen.
If your videos consist principally of you and your materials, you’ll want to make sure you’re onscreen as much as possible, especially when you need to show something at full screen size, like a screencast. But that just kicks the “why” question down the road.
Let’s try again, then. There are two main concepts at play here: engagement and credibility. First, a viewer has to be pretty focused and invested in the result to watch a 5 minute screencast in the middle of your video.
But you also want the average viewers in your target audience to watch, not just the most devoted ones. So it needs to be interesting to keep viewers from moving on right away. An easy technical “out” is to break up the screencast into lots of pieces, with a full screen video of you in between each piece.
The other point is that your viewers need a source of trustworthiness. Like, what are they supposed to believe in more, a piece of software, or a person they see in front of them?
If we were making cat videos it would be the other way around, but you can fake anything in a software demo. But here the focus is on you as the trustworthy narrator, and you need to think of yourself as being a more important source of viewer retention than the software itself you’re presenting.
Acting like a real person instead of a robot is also helpful in making viewers think they can rely on what they see. So do what real people do, and gesture, point at, and look at things in the screencast as you talk about them.
And, How?
Let’s start with what you’ll need in general technical terms. Remember from above that we’re interested in non-rectangular shapes. If you’re happy with a rectangular overlay, you can skip to the end, just use your video editor to overlay the video of you talking on top of the screencast, and use a frame around the overlay that’s a different color to enhance the idea that they’re separate.
For other shapes, we need to make the outside “corners” of the overlay video invisible, so that whatever shape we choose, the frame and the video conform to that shape. We’ll need an (affordable) video editor that can do green screen effects, while for images we can just use the PNG format.
Our image editor will also need to be able to create “hollow” shapes for the frames, or else allow you to compose a suitably shaped frame from multiple shapes (e.g., four lines to make a trapezoid).
Given our budget focus in this series, we can meet these requirements with PowerPoint (which you likely already have) for the shapes, and the free version of ActivePresenter for the green screening and overlay (other free versions of video editors are also likely to include green screening).
The general procedure is that we will (1) create our shaped frame in PowerPoint, (2) make the inset porthole video using the video of you, the shape, and a green screen shape, and (3) overlay that intermediate video on top of our full-size screencast.
Detailed Steps
Let’s start with the shaped frame. The most simple framing shape is a circle that’s transparent inside and outside, and where the width is adjustable. Basically a 2 dimensional doughnut. You can select this shape in PowerPoint at Insert > Shape > Circle: Hollow.
Next, size it the full size of a slide in Full HD (1920×1080) and style the graphical parameters appropriately. You’ll want the large size so that anti-aliasing due to the green screen won’t leave a thin green circle around the outside edge of your frame.
Then use the full array of PowerPoint effects to style your frame (A), including color, color gradients, and spot effects, as long as they stay within the clean borders of the frame. Export the frame as a PNG file by right clicking on the doughnut and selecting “Save as Picture”. This will ensure the inside and outside will be transparent, up to the boundaries of the containing rectangle.
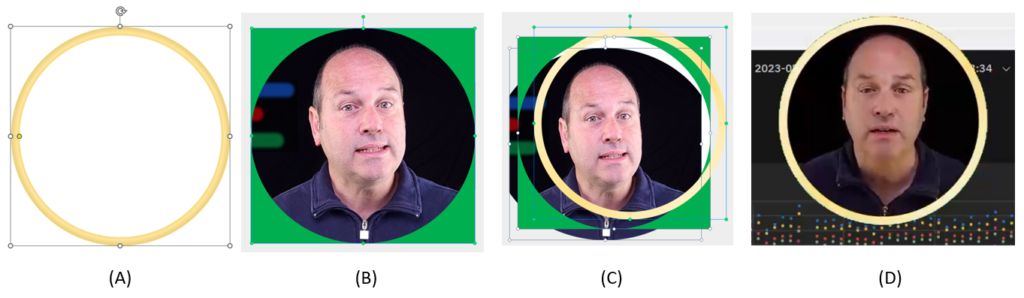
Now we’re ready to create our intermediate porthole overlay video. In your video editor, add the full size video of you at the lowest depth level, then put an inverted-circle-shape green screen (B) over that (e.g. via an inverted spotlight effect in ActivePresenter), and finally the frame on top of that. (C) shows the exploded version of the end result. Now it’s time to export! The porthole video will retain the green corners when it’s saved.
We’ll then be ready to import the new overlay video on top of our screencast. The only thing you need to do is insert the video, resize and reposition it, and set the green screen filter to the color you chose. The final result (D) shows what it will be like with your screencast once green screen removal is activated. Look mom, no corners!
Bells and Whistles
Don’t forget to treat your porthole video just like any other graphic or video you would insert. Make it fade in or out when it starts, or slide it in from off the edge, but don’t make it jump around from one place to another.
If you’ve organized a lengthy screencast as a series of scenes/slides, make sure the porthole video doesn’t jump or fade due to scene/slide transitions: it’s better to slide it out and then slide it back in, maybe from a different location. And make sure the position you use doesn’t cover up something important on the screencast. If necessary, you can always slide it out of the way a few seconds ahead of time.
If you need to make a lot of porthole videos, you can speed up your pipeline by keeping both graphic and video templates handy, so that you only have to replace the placeholder video with your new one. I would also recommend creating a subdirectory in your project directory just for containing porthole videos, and numbering them according to the slides in which they appear.
Finally, give yourself some time to make a full draft of the screencast with overlay. You might find that you can adjust your script, look left/right/up/down, or point to what you’re talking about as you talk about it. It’s an extra level of professionalism that will increase your audience engagement even further.
Charles Callaway
Author
Latest posts by Charles Callaway
30. 06. 2026
Documentation
Teleprompter Tips, Part 2
30. 04. 2026
Documentation
Teleprompter Tips, Part 1
25. 02. 2026
Documentation
Making Your Own Video Tutorials, Part 20: Recording a Good Task-based Screencast
30. 10. 2025
Documentation
Tutorial Video Editing Technical Tips, Part 2: No Country for Boring Men (or Women)