30. 04. 2026
Documentation

Since one apparently just can’t have enough parts of a multi-part blog post, why not one more?
Let’s depart slightly from the usual themes, because I want to talk about something that’s applicable to videos that are slightly more marketing oriented than your typical tutorial videos. Of course you could always make full-blown marketing videos if you want to, but I’m a technical guy, so I’ll stick with what I know.
I’m talking about animation. You know, the style with fancy computer-generated graphics moving around onscreen, without any live video at all.
With animation, some elements of the video, like creating a story, are just as important as ever. Other things I’ve written about earlier aren’t relevant though, like lighting, video camera placement, sound proofing, etc.
So in line with the previous styles we’ve looked at, which are (1) a pure slide-style and (2) putting yourself in the video in some way, let’s look at (3) the animation approach.
What exactly do I mean by ‘animation’?
It turns out that’s not an easy question. Take a look at what Google returns when you search on “animation styles”:
- The 20 Animation Styles You Need to Know About
- What are the 5 types of animation?
- What are the 12 types of animation?
- What are the 4 different animation style categories?
- 31 Types of Animation Styles With Examples
- The 8 Different Types Of Animation Styles
Sounds like everyone is on the same page, right? So let me explain what I mean with some examples. I’m talking about that animated infographic style that basically looks like you could do it yourself with PowerPoint if you knew how PowerPoint animation works.
It’s obviously neither hand-drawn nor 3D animation. Instead it’s all lines, circles, squares, text boxes, etc. Even the animated people are made from geometric shapes. You see it a lot on YouTube ranging all the way from purely technical videos to purely marketing videos. For technical subjects it’s become especially popular lately as a way to showcase major software version updates.
Why animation?
So why not stick with the typical video styles I’ve talked about already? Well, every approach has both advantages and disadvantages.
One of the primary differences between technical and marketing viewpoints is that marketing needs to generate user interest almost from nothing, while a video on a technical subject is usually explicitly sought out by someone. For instance, they’ve already bought a product, and now they’re invested in learning how to use it.
So there’s a significant deficit on the marketing side that needs to be made up, and as quickly as possible. If you, as a technical person, were to try to make a marketing video starring yourself, how many people do you think would click away in the first 5 seconds?
And given our assumption of making low budget videos, you’re not going to be able to hire an engaging person to be your star attraction. This is what animation brings to the table. It’s much easier using animation to get your audience engaged from the very beginning.
But it’s not just a great technique for pure marketing. Even if you want to include a lot of technical information, animation is great at letting you simplify and abstract away everything irrelevant so that your audience can quickly understand the main point.
On the other hand, for pure technical information, it will probably come across as distracting or even silly. And animation doesn’t mesh well with other technical methods like screencasting, or mixed with imagery such as real life pictures or videos.
How to Get Started
And by that of course I mean without spending a lot of money. Here again we depend on two types of software tools: ones you already have, and ones that cost nothing or next to nothing.
If you already have PowerPoint installed, then believe it or not you can make some decent animations with that. The minimum useful version is PP2016. Later versions (2019, 2021, 360) bring additional features like Morph and Zoom.
I personally prefer ActivePresenter 9 which is quite similar to PowerPoint except that it has a true timeline view which, for me at least, makes it much easier to edit videos precisely.
There are also a huge number of online web apps for animation, like Animaker, Powtoon and PixTeller which usually offer monthly subscriptions and have libraries of multi-element templates, rather than just a series of basic shapes like those in PowerPoint.
Your First Basic Animation
So suppose you’ve decided to stick with PowerPoint since it’s already installed on your computer. Let’s take a look at a minimal “Hello World” animation to see what’s involved.
Animation in PowerPoint is always based on shapes, so let’s start with a blank canvas. Add a simple circle, and then switch to the Animations tab:
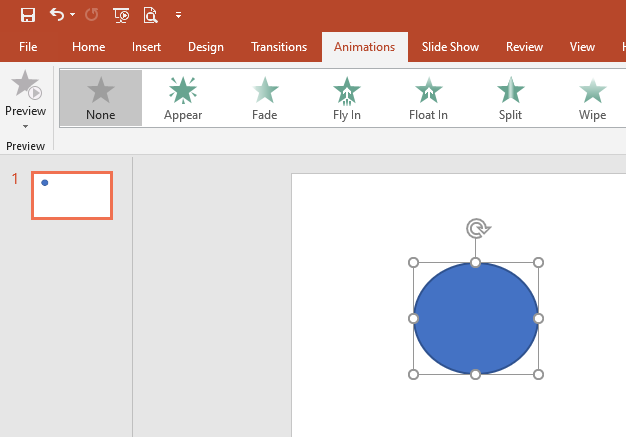
You’ll see the option ribbon full of green shapes that can be expanded to show yellow and red ones as well. Green corresponds to entrance animations, yellow to in-place animations, and red to exit animations.
To the right of the ribbon is the “Effect Options” box for choosing parameters specific to a particular animation.
By using the ribbon, you will overwrite any pre-existing animation. So if you click on “Wheel”, you’ll see a preview of that entrance animation on your shape, and then a small number “1” will appear in a green box to the top left of your circle.
If you then click on an exit animation, it will preview and assign that as well, but the “1” changes to red because you have now overwritten the “Wheel” entrance with a “Fly Out” exit animation:
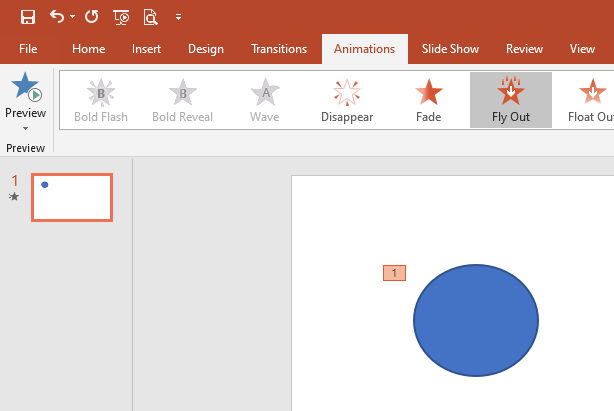
To do both you need to first select the entrance animation, then click on “Add Animation” just to the right of “Effect Options”, and select the second animation from the dropbox. This will add a box labelled “2”.
Now let’s animate it. Click on “Animation Pane” again just to the right of “Add Animation”. This will show the animation sequence (PowerPoint’s version of a timeline) on the right side of the window:
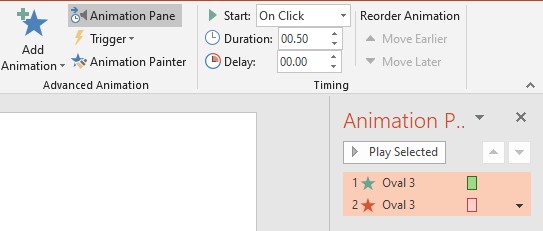
Here you can run the animation by clicking on “Play All”. But you can also more finely tune the animation parameters from this panel. For instance, you can reverse the order by dragging one line above the other.
Or you can add another object like a square, create an entrance animation for it, and put that step in between the two circle animations.
You can make really complex animations, where non-animated objects are just “always on”, and where each slide has its own separate animation stack. But at some point the PowerPoint interface begins to hold you back. When exactly does that happen? Well, some people make really, really complex animations with hundreds of lines. I get bogged down after 40 to 50.
Conclusion
So your homework is to make a more complex animation. I’m not worried about your ability to do it. There are literally thousands of YouTube tutorials showing you the nuts and bolts. For now just try to make something complex to get a feel for how much work you need to do to get X seconds of good animation.
Next time we’ll look at an example of someone else’s good animation, then try to build a few seconds of something similar to it. I’ll show you some tips and tricks as we go along, plus some thoughts about the process as a whole.
Charles Callaway
Author
Latest posts by Charles Callaway
30. 06. 2026
Documentation
Teleprompter Tips, Part 2
30. 04. 2026
Documentation
Teleprompter Tips, Part 1
25. 02. 2026
Documentation
Making Your Own Video Tutorials, Part 20: Recording a Good Task-based Screencast
30. 10. 2025
Documentation
Tutorial Video Editing Technical Tips, Part 2: No Country for Boring Men (or Women)