30. 04. 2026
Documentation

03. 07. 2023
Charles Callaway
Documentation
Making Your Own Video Tutorials, Part 14: Dark Backgrounds
I’m not one to follow a lot of the latest YouTube trends. Maybe it’s an age thing, though it could also just be a stubborn streak. But after you make enough videos, you start to recognize a good thing when you see it.
And one thing that struck me recently were a number of great videos that had very dark, if not black backgrounds, with maybe a splash of colored lighting in the distance.
That’s not all there is, of course. These videos tend to use a special kind of lighting to create enormous contrast between the person we’re watching and everything else.
So in summary, it’s a setup that we’re already quite familiar with: someone sitting at a desk in a room, talking and gesturing according to a script. So what’s the big deal then?
An Example
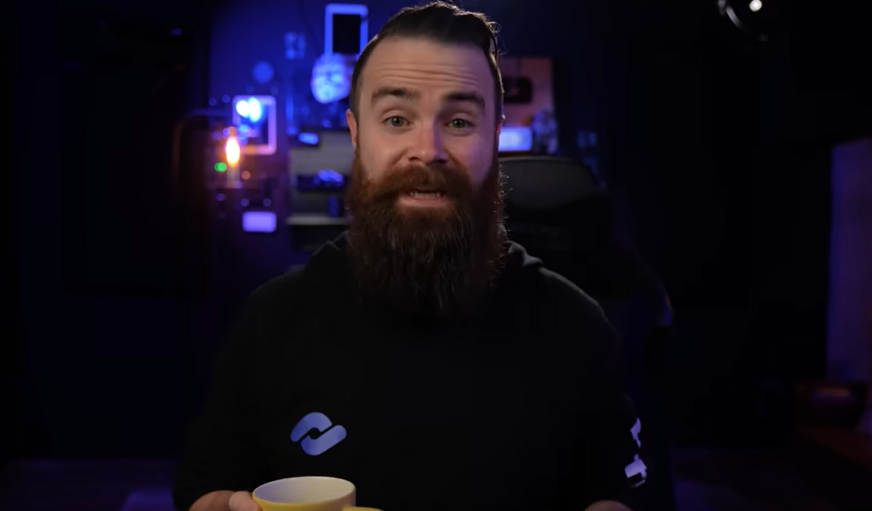
If you’re not familiar with this technique, here’s a great example from one of my inspirations as a video maker (if not always for the actual content):
https://www.youtube.com/@NetworkChuck
There are a lot of variations on this technique, especially in terms of how dark the environment is. But in general, the darker the background is, the more important the foreground lighting becomes.
If you look closely at the screen grab above, you can see the lighting highlights on his left shoulder and the left side of his hair. Can you guess where the backlight has been placed to separate the subject from the background?
You’ll also see the right side of Chuck’s face is brighter than his left side, but the left side isn’t completely in shadow. What does that mean? That there’s a key light 90 degrees to his right, and a fill light 90 degrees to his left.
Maybe we should really quickly review our standard lighting terminology…
A Lighting Primer
First, a quick review of standard lighting terminology:
- Key light The brightest lamp shining on the foreground subject(s), illuminating what you really want to see, like faces.
- Fill light A light that fills in the shadows on foreground subjects that are created by the key light. A very low or absent fill light gives high contrast, cinematic effects.
- Back light A lamp for separating the foreground subject from the background, typically by creating a “halo” effect. If the back light is above the scene, the hair and shoulders will be lit.
- Hard vs. soft light Point light sources will make shadows with very sharp, hard edges, while soft, or diffuse, light makes shadows with long gradients.
- Diffuser An object, usually a thin fabric, that converts hard light into soft light by scattering it.
- Omnidirectional lighting and incidental light Omnidirectional is what you have in your home, with lamps that shine in every direction. Incidental light is light that falls on something in your scene that isn’t its main target.
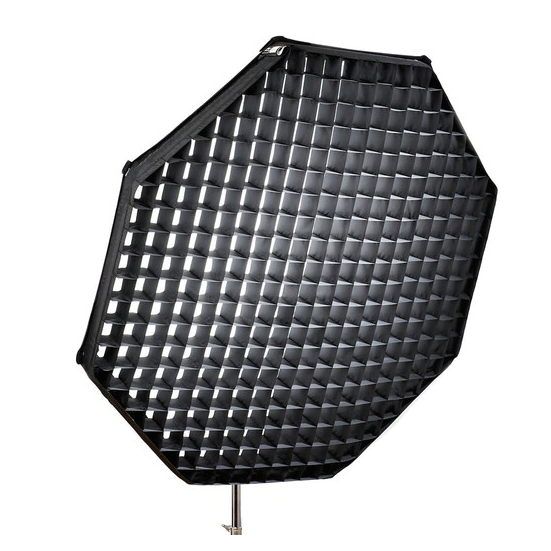
- Directional lighting An object, often a 3D grid, which absorbs light that isn’t travelling perpendicular to the direction of a particular lamp. Frequently what’s used is a grid added to an octagonal soft box:
So with all those lights shining everywhere, why isn’t the background at least a dark gray?
There are three parts of the answer:
- Camera settings: If you don’t mind losing a bit of resolution, you can lower your ISO and shutter speed to make everything darker. If you compensate by increasing the foreground lights, the background will stay dark but you can still see your foreground subjects.
- Make the scene darker: Start off with an already dark background and add some lighting highlights like LEDs or neons. You can also drape a dark bedsheet if you want everything really, really black. The darker the scene is, the less you have to darken your camera settings.
- Carefully manage your direct lighting. Use combinations of diffusers and directional lighting, placing them so that none of the incident light falls on the background. This often means shining lights at 90 degree angles like in the NetworkChuck example above. However you can use shallower angles if you put more distance between the foreground and background.
Tradeoffs
We know that everything in life is a tradeoff. Let’s see what we gain and lose by shooting for dark backgrounds:
Advantages:
- Fewer distractions in the environment. Did you accidentally leave some tools on the desk? Who cares, you can’t see them in the video.
- Easier to scout locations. Are there posters on the walls you can’t remove? Furniture in the way? Shooting in a warehouse? It doesn’t matter.
- Create fake camera angles. Maybe in the past you needed a room that was nice to look at on 3 sides instead of just 1, so you could turn in different directions while talking. Now, a single direction becomes as many camera angles as you want! Just add some distinctive real or virtual lighting for each angle you want.
- Easier to shoot over long periods of time. Shadows don’t move due to the sun. People can rearrange tables or furniture, and nobody will notice what they can’t see.
- Fewer wardrobe worries. Wear a dark sweatshirt or hoody and you’re done.
- A cool new look. Yeah, a black background really does look cool.
Disadvantages:
- You’ll need to up your lighting game. By moving to higher ISO and faster shutter speeds, you’ll be moving out of the automatic settings that modern cameras (including smartphone cameras) are designed to help you with.
- You’ll need to be more careful at brushing your hair and things like that. After all, a small part of you is now almost the only thing visible in your video.
- You’ll need a bigger room so you can move your background farther away. It will also need to have no external windows or any other sources of incidental light, so the spaces you’ve typically used may not be suitable any more.
Finally, it’s important to note that the visual focus moves completely to the person in the foreground. Sooooo…. how good is that person at delivering their lines? And how good are they with gestures and posture? Everything that goes into good public speaking or acting becomes more important than a traditional business-style video tutorial.
So are you ready to try it out? I’ll give you my top secret, eyes-only recipe (don’t worry, you won’t go to jail if you share it) for my Samsung smartphone “Pro Video” settings: ISO 80, shutter speed 1/350, multifocus, 4300K white balance.
And remember, with great power comes great responsibility.
Charles Callaway
Author
Latest posts by Charles Callaway
30. 04. 2026
Documentation
Teleprompter Tips, Part 1
25. 02. 2026
Documentation
Making Your Own Video Tutorials, Part 20: Recording a Good Task-based Screencast
30. 10. 2025
Documentation
Tutorial Video Editing Technical Tips, Part 2: No Country for Boring Men (or Women)