
28. 12. 2023
Davide Sbetti
Log-SIEM, Machine Learning
Semantic Search in Elasticsearch – Testing Our NetEye Guide: Adding the LLM ingredient
You weren’t expecting a part three of this series, right? Well honestly, me neither.
But after working together with you on the POC where we firstly crawled the NetEye Guide and applied ELSER to the resulting documents, and then we exploited its semantic search capabilities in the NetEye Guide search, we asked ourselves, what if we also try to add an LLM to the mix?
Ah yes, you are asking exactly how we would like to integrate it, right? Well, the idea is to use it to summarize the search results obtained out of the query, thus generating a one-shot answer.
Okay, which LLM?
Clearly, the first important decision is which model we would like to try to integrate in our revisited NetEye Guide search POC and… where it will run!
Honestly, the probably most efficient and effective solution (in terms of the end result) would have been to exploit OpenAI GPT models, and so also removing the second important question, since we would not have to think about how and where to run such a model.
Unfortunately for you, for this POC we decided to go in the opposite direction and try to run a local instance of the LLAMA2 7B model. Why? Well, mainly for the following two reasons:
- We thought it could also have been fun to experiment running such a large model locally, on a quite standard consumer laptop. Would it be possible, and with which trade-offs?
- LLAMA2 models are publicly distributed and it’s possible to download the pre-trained weights by just requesting access through a simple form. And we love open-source and open science, so one point in favor!

Step 1: Accessing the model (LLAMA2 7B)
As mentioned above, accessing LLAMA2 models is quite easy. As described in the official page on Hugging Face, it’s just necessary to fill in this form to obtain via email the signed URL necessary for downloading the model.
At this point, we can just clone the official repository from GitHub and run the download script, which can be found in the root directory of the project, as follows: ./download.sh.
When prompted, we can insert the signed URL that we received in the confirmation email and select the model we would like to download. In our case, for performance reasons, we decided to try the smallest one, namely the 7B (where “smallest” is in terms of the number of parameters of the model).
After confirming our selection, the download starts… Time to get a coffee then!
Step 2: Understand we actually have to do something to run it locally
Okay, once the download ends, we can see that in the folder that we cloned from GitHub there is now a subfolder containing the model we just downloaded, namely llama-2-7b.
The subfolder doesn’t contain one single file, it actually contains the following items:
checklist.chk: the list of checkpoints the model has, useful not only for loading it but also to apply fine-tuning to itconsolidated.00.pth: which can be seen as the model itself, in our case. It contains all the weights of the model at the time of the selected checkpointparams.json: a JSON file containing some information on the parameters of the model
One thing we can notice is that the model is not “super light”, since it has a weight of about 13GB.
Now, if we follow the documentation of the official GitHub repo, we can see an example of how we could run an instance of LLAMA2 locally, which seems like a good starting point to understand if we can actually successfully run it.
So, after installing some required dependencies, using the provided requirements.txt file, we can try to run the following suggested command, which will run one of the given examples from the project’s root folder:
torchrun
  --nproc_per_node 1
  --ckpt_dir llama-2-7b/
  --tokenizer_path tokenizer.model
  --max_seq_len 128
  --max_batch_size 1
  example_text_completion.py
The command specifies where to find the checkpoint, which example to run, and the path to the tokenizer, which takes care of transforming the input tokens (in our case words) to tokens understood by the model (basically numbers). Just note that this transformation is not guaranteed to keep words as separated components but can, for example, reduce multiple words to a single token or, conversely, split a word into multiple tokens (exactly what happens in the case of LLAMA2).
And by running the command… we will discover we may have an error. In our case, the following error:
RuntimeError: ProcessGroupNCCL is only supported with GPUs, no GPUs found!
That is because, as you can imagine, the code was mainly designed to be run on GPUs, while the laptop on which this experiment was conducted does not have a dedicated GPU (what is checked by the LLAMA2 build function).
Okay, so we failed the experiment and we can close it here, right?
Step 3: Running the model locally (with a digression on what is quantization)
Mmm, not really. Luckily, there is a project, named Llama.cpp, which can actually help us. The goal of the project is to convert the LLAMA models to a pure C/C++ implementation which can run not only on GPUs, but also entirely on CPUs, if we would like to.
It was originally born with the idea of running the models on a MacBook, but was then extended and now supports a quite wide range of platforms. Moreover, it also supports different quantization types.
What does this mean? Well, the weights of the model are actually numbers, quite precise numbers in fact, which occupy a certain amount of memory (where “certain amount” in the case of LLM can be translated as “a lot”, since there are many weights). The core idea is that we can give up some precision in those weights, obtaining a model that occupies less space and, therefore, is also faster to load and use. The quantization techniques are generally referred to as the number of target bits that we would like each weight to occupy.
Okay, now that we know this, we can try to apply it to the LLAMA2 7B model we just downloaded, with the goal of running it on our laptop and also reducing its size.
In order to achieve this, we can apply the following procedure:
- Clone the project from GitHub
- Copy the original model’s files inside the
modelsfolder in the llama.cpp projectmkdir llama.cpp/models/7B && cp llama/llama-2-7b/* llama.cpp/models/7B/ - Also copy the tokenizer used by LLAMA2 models into the same directory we just created, as follows:
cp llama/tokenizer.model llama.cpp/models/7B/ - Install the necessary requirements with
pip install -r llama.cpp/requirements.txt - Convert the model to the plain C/C++ implementation, with the command
python3 llama.cpp/convert.py llama.cpp/models/7B/
At this point, we will most likely receive the following error:
Exception: Vocab size mismatch (model has -1, but llama.cpp/models/7B/tokenizer.model has 32000)This happens because llama.cpp trusts the information found in the params.json file that we saw before, which actually reports really that the vocabulary size is -1. This value represents probably in the case of Meta a flag to understand they can get the real vocabulary size from the tokenizer itself, while llama.cpp really trusts this value, which, of course, does not really make sense in our case.
To fix this, we can modify the llama.cpp/models/7B/params.json file setting the correct vocab_size, namely 32000.
After that, we can run again the
python3 llama.cpp/convert.py llama.cpp/models/7B/
command to successfully convert the model.
The result is a file llama.cpp/models/7B/ggml-model-f16.gguf which contains the converted model. As we can see, the model still occupies the same amount of space as the original one. Why? Well, we did not quantize it yet, did we?
To quantize the model, it’s actually sufficient to run the following command:
./quantize llama.cpp/models/7B/ggml-model-f16.gguf llama.cpp/models/7B/ggml-model-q4_0.gguf q4_0
Please note that the flag q4_0 in the command above means that we are applying a 4-bit quantization, so we are forcing each weight to occupy 4-bits instead of the usual 32. Yes, a good loss in terms of precision, but, as we will see later, it will be necessary.
We can now see that a new file has appeared, named llama.cpp/models/7B/ggml-model-q4_0.gguf, which now occupies less than 4GB. We’re now ready to test this!
As a first test, we can try to run the model asking it something quite random, just to see if everything runs as expected. For this, we can exploit the features of LangChain, a framework that allows us to easily work with language models, providing for example a simple way to use prompt templates. The second bit of good news, besides LangChain’s really nice features, is that there is a dedicated binding for llama.cpp, so using our model with LangChain is quite easy!
We can install the required dependencies by running pip install langchain==0.0.341 llama-cpp-python.
After that, we can write a small Python script which defines a prompt template, namely a template for the information we would like to provide the model with when querying it. For this first test, using a prompt template means overengineering the whole process a bit, but it’s a first step in the direction of integrating the model in our search, so let’s do it.
In our case, the prompt template can just instruct the model to answer the question as truthfully as possible, while admitting it in case the answer is not known. Which simple query do we use? Well, let’s see if the model knows something about America’s discovery…..
from langchain.chains import LLMChain
from langchain.llms import LlamaCpp
from langchain.prompts import PromptTemplate
from langchain.schema import StrOutputParser

template = """Answer the question as truthfully and concise as
possible using the provided text, and if you do not know the
answer, say "I don't know".

{query}""".strip()


prompt = PromptTemplate(
  template=template,
  input_variables=["query"]
)

# Make sure the model path is correct for your system!
llm = LlamaCpp(
  model_path="/pathto/llama.cpp/models/7B/ggml-model-q4_0.gguf",
  temperature=0.5,
  max_tokens=200,
  top_p=1,
  verbose=True,
  n_ctx=1000,
  streaming=False
)

query = "When has been America discovered?"

chain = LLMChain(
  llm=llm,
  prompt=prompt,
  output_parser=StrOutputParser()
)
response = chain.predict(query=query)

print(f"Response: {response}")
By running the script above, and having a bit of patience (sigh!), we can obtain a result similar to the following one:
Answer: The first known European contact with what is now the
United States occurred in 1492 when Christopher Columbus
landed on an island in the Bahamas and claimed it for Spain.

[Source](https://www.history.com/topics/american-revolution/history-of-the-united-states)
Success! We managed to run the LLAMA2 7B instance locally!
Step 4: Integrating it in the NetEye Guide search
Okay, now we know some basics on how we can run the instance of LLAMA2 7B that we converted and quantized during the previous step, how can we integrate it with our NetEye Guide Search?
Well, the first basic idea that we can follow is to provide the model with the results obtained by the search that we performed using Elastic ELSER model, asking it to answer the query used by the user in the search.
For now, for simplicity and performance issues, we can really trust the results of our search, providing the model with the text of the first result only, since the more text we give it to process, the more time it will take the answer to be ready.
We can now modify the code that we wrote during the first two blog posts of this series. In particular, on top of the code that we wrote to expose the custom endpoint that returns the search results, we can import the necessary libraries:
from langchain.chains import LLMChain
from langchain.llms import LlamaCpp
from langchain.prompts import PromptTemplate
from langchain.schema import StrOutputParser
After that, we can define the prompt template. This time, we don’t have just the query of the user as a variable in our template, but we’ll provide it also with the context from which the answer needs to be extracted, namely our top search result.
template = """Answer the question as truthfully and
concise as possible using the provided text, and if
the answer is not contained within the text below,
say "I don't know.
Do not use markdown, just plain text"

Context:
{context}

{query}""".strip()


prompt = PromptTemplate(
  template=template,
  input_variables=["context", "query"]
)
And yes, the last sentence was added because LLAMA2 has a tendency in using Markdown in its answers, while we would like to render just plain text on our web page.
At this point, we can define a new endpoint which, given a query, performs the search in Elasticsearch and, using the top result, returns a direct answer to the user.
@app.route("/generative_query")
def generative_query():
    query_string = request.args.get('q')

    top_result = run_query(query_string, n_results=1)

    generative_answer = generate_answer(
     query_string,
     top_result[0]['fields']['text'][0]
    )

    return jsonify({'answer''': generative_answer})
In the code above, the run_query function is nearly the same as the one we defined in the previous blog post, with just one extra parameter to specify the number of results that we would like to retrieve.
Furthermore, the generate_answer function resembles what we experimented with above when running the model to get more facts about the discovery of America.
def generate_answer(query, context):
    # Make sure the model path is correct for your system!
    llm = LlamaCpp(
      model_path="/pathto/llama.cpp/models/7B/ggml-model-q4_0.gguf",
      temperature=0.2,
      max_tokens=300,
      top_p=1,
      n_ctx=1000,
      streaming=False
    )

    chain = LLMChain(
      llm=llm,
      prompt=prompt,
      output_parser=StrOutputParser()
   )
    response = chain.run(query=query, context=context)

    return response
Note that, in the code above we set the temperature of the model to 0.2. The temperature is a parameter that controls how “creative” the model can be. Tweaking this value also means controlling, to some degree, the level of randomness in the answers given by the model. In our case, we set it to a quite low value, to limit a bit the freedom in “inventing” some facts in the answer.
At this point, we can modify the code of our search.html file a bit to also call the second endpoint and then visualize the result of the “generative search”. Since this can take some time, we can show a temporary “in progress” message while the model is processing the query.
We can so add the call of the endpoint we just designed right below the one we previously implemented:
const generative_query_url='http://localhost:8081/generative_query?q=' + encodeURIComponent(query);

$.ajax({url: generative_query_url, success: function(result){

        if(result.answer) {
            $("#generative-answer").text(result.answer);
        } else {
            $("#generative-answer").text("Unfortunately the model was not able to generate a direct answer for your query :(");
        }

    }});

function toggleGenerativeAnswer() {
    $("#generative-answer-container").toggle();
}
After that, we can just create a simple box in the HTML structure that will show the answer of the model…
<div class="generative-search">
<div id="generative-answer-container" style="display: none;">
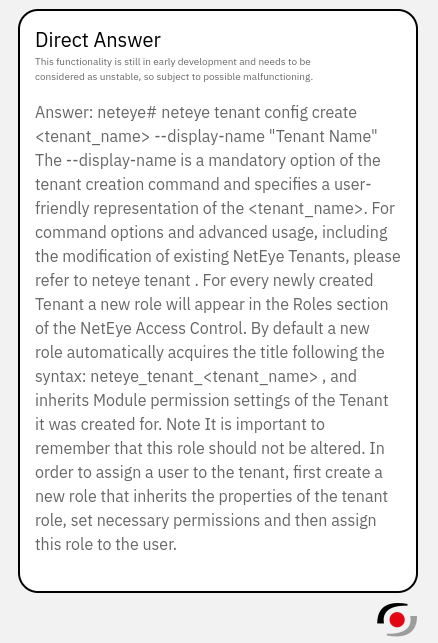
<h3>Direct Answer</h3>
<p class="description">
This functionality is still in early development and should be <br>
considered unstable, and thus subject to possible malfunctions.
</p>
<div id="generative-answer">
<p>
Still crunching the data just for you...
</p>
</div>
</div>
<div id="generative-answer-opener">
<a aria-label="Open Direct Answer box" title="Open Direct Answer box" type="button" onclick="toggleGenerativeAnswer()">
<img src="{{ pathto('_static/img/net-eye.png', 1)|e }}">
</a>
</div>
</div>
…with some CSS giving it a bit of style and color
.generative-search{
    position: fixed;
    bottom: 20px;
    right: 30px;

    .description {
        font-size: 10px;
    }

    #generative-answer-container {
        min-height: 300px;
        border: 2px solid black;
        border-radius: 20px;
        padding: 15px;
        margin-bottom: 10px;
        max-width: 400px;
        background: white;

        & h3 {
            margin-bottom: 0;
        }
    }

    #generative-answer {
        margin-bottom: 20px;
    }

    #generative-answer-opener {
        text-align: right;
    }

}
And now, by running the custom endpoint and a local instance of the NetEye Guide, based on our code we can observe the final result of this experiment!
First of all, we can see how, on the bottom right of our search page, there is now the NetEye logo that allows us to open the search box.
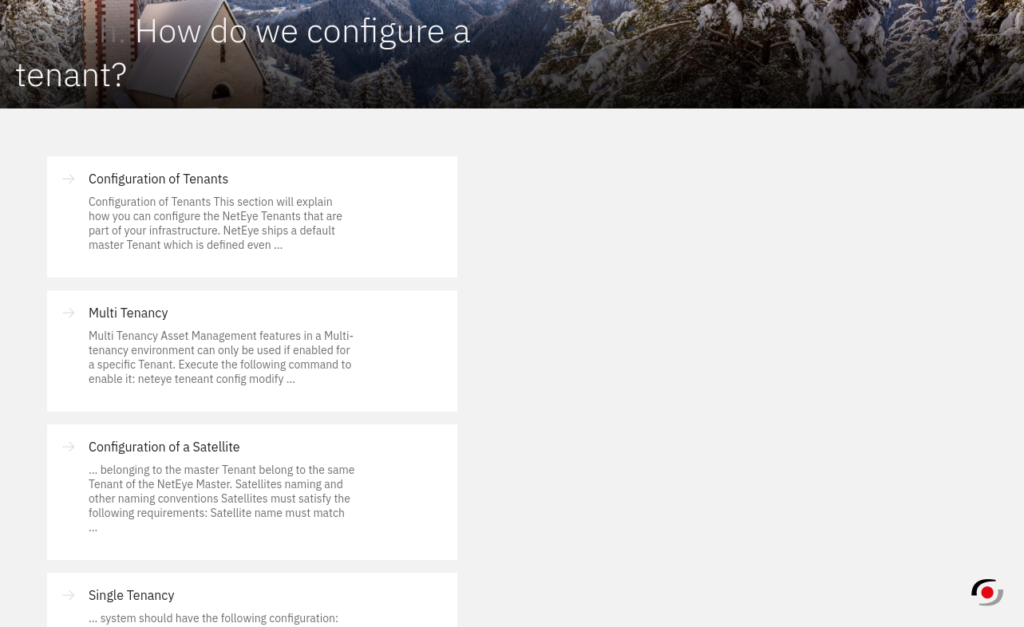
And, if we open the search box while the model is still processing the query, this is what we will see:
As soon as the answer is generated, it will appear inside the search box as well:
The limits of what we just did and a look at the future
Okay, this is the moment in which we try to look back and (hopefully) honestly highlight the limits of what we did.
Firstly, as you also saw when we developed the code, running the model locally requires a certain amount of resources and, at least on the test laptop that we used, having the answer generated takes about 45-50 seconds, so it’s absolutely not lightning speed. This clearly makes the configuration we just tested not suitable for a production environment.
Moreover, so that the model doesn’t run too slowly, we also reduced its size by quantizing it to 4 bits, thus accepting some degradation in the quality of the text generated by the model.
Lastly, and always due to performance issues, we’re considering only the top result from our search. While thanks to an improved search this can still extract some really useful information, it’s quite limiting due to the following two factors:
- The real answer to the query may not be in the first result returned by Elasticsearch
- The first result may also be just a portion of a whole section of the User Guide, which may contain some other useful or contextual information that’s necessary to generate an accurate answer. For this reason, it would be interesting to also try to add the text contained in the whole section, or at least the nearby portions, to improve the overall final answer.
In summary (so to speak), most of the trade-offs and disadvantages of the approach we tried in this POC are related to performance issues. This was clearly predictable, but it was quite interesting for us to test how to run one such LLM locally and the limits of such an approach. Of course, these limits could be overcome by either running the model in a much more powerful environment or… by letting someone else run it, exploiting already available APIs, for example those offered by companies such as OpenAI.
The Conclusions (for real, this time)
In this series of blog posts, we saw how it was possible to apply ELSER, the encoder developed by Elastic, to documents created from some crawled text, in our case the NetEye User Guide.
We observed how its application improved the quality of the search results and we managed to integrate it, through a little POC, into the code base of our NetEye User Guide, thus being able to consult the improved results directly from our web-based interface.
Moreover, we managed to run an instance of the LLAMA2 7B model locally and we saw some of the potential that such an approach could have when it comes to generating direct answers to users’ queries. While doing this, we also discovered the limits of such an approach.
And with that we are really done with this topic, I promise.
Thank you for joining me in this little exploration and see you soon!
These Solutions are Engineered by Humans
Did you find this article interesting? Does it match your skill set? Programming is at the heart of how we develop customized solutions. In fact, we’re currently hiring for roles just like this and others here at Würth Phoenix.


Davide Sbetti
Hi! I'm Davide and I'm a Software Developer with the R&D Team in the "IT System & Service Management Solutions" group here at Würth IT Italy. IT has been a passion for me ever since I was a child, and so the direction of my studies was...never in any doubt! Lately, my interests have focused in particular on data science techniques and the training of machine learning models.
Author
Latest posts by Davide Sbetti
30. 03. 2026
APM, Log Management, Log-SIEM, NetEye
Sending OTel Data to Elasticsearch: Tenant Segregation through OAuth