01. 07. 2026
AI, Atlassian, Service Management

Jira Module for Icinga Web 2
As many of you are aware, at the end of 2019 Icinga released the first version of a Jira module for Icinga Web 2. This module gives Icinga Web 2 the ability to query Atlassian Jira Service Desk for issues related to Hosts or Services and, of course, to open them on the fly. The trick can be done with two Custom Fields on Jira, containing data the Jira Module for Icinga Web 2 uses to track Issues: as long as you have them, you can enjoy the use of this module.
At this moment, the Jira module is not included by default on any NetEye 4 Distribution, but you can easily add it with some simple commands. It should now be obvious what the aim of this blog is: by following this guide, you’ll be able to install the Jira module for Icinga Web 2 on a NetEye 4 Single Node deployment. All you need is a NetEye 4 with the Core subscription and an Internet connection to GitHub.
If you want to go more in depth in this module, or you simply want a broader view, you can browse the Icinga2 Web site or go directly to the GitHub Project’s site.
Prepare Jira for Working with NetEye 4
Integration with the Jira module for Icinga Web 2 is not an “out-of-the-box” experience: you have to prepare Jira Service Desk for it. You can find detailed instructions by following my colleague Gabriele’s blog, which takes care of the Jira Service Desk configuration part. Right after reading that blog, you will have:
- The email address of the User account you prepared for this module
- The API Token that grants access to the user itself without keeping up with password expiration or 2-factor authentication
- (optional) The ID of the default Jira Project where you want to open the new Issues
Install the Jira Module on NetEye 4
To install the Jira Module for Icinga Web 2 you only have to perform two major steps:
- Download and unpack the module
- Configure the Jira Module to access Jira Service Desk
Both these activities must be done directly on the NetEye 4 Server, therefore having SSL access as root is mandatory.
Download and Unpack the Module
As reported by the official documentation, two methods are available: download the module as a compressed file and unpack it, or clone the Git Repository. While cloning the Git Repository seem easier and can grant you access to the latest updates, you should note that Git will leave some hidden files inside your filesystem. So downloading the compressed file might be preferable for Production environments.
Just open an SSH connection to your NetEye 4 Server, log in as root, and run these commands:
ICINGAWEB_MODULEPATH="/usr/share/icingaweb2/modules"
REPO_URL="https://github.com/Icinga/icingaweb2-module-jira"
TARGET_DIR="${ICINGAWEB_MODULEPATH}/jira"
MODULE_VERSION="1.0.1"
URL="${REPO_URL}/archive/v${MODULE_VERSION}.tar.gz"
install -d -m 0755 "${TARGET_DIR}"
wget -q -O - "$URL" | tar xfz - -C "${TARGET_DIR}" --strip-components 1
install -d -m 2770 -o apache -g icingaweb2 /neteye/shared/icingaweb2/conf/modules/jira
With this, you will create the required directories with the right permissions, download the module and unpack it into those directories.
Configure the Module to Access Jira Service Desk
Now that you have the module, you need to enable and configure it before you start opening issues.
Enable the module by running this command:
icingacli module enable jira
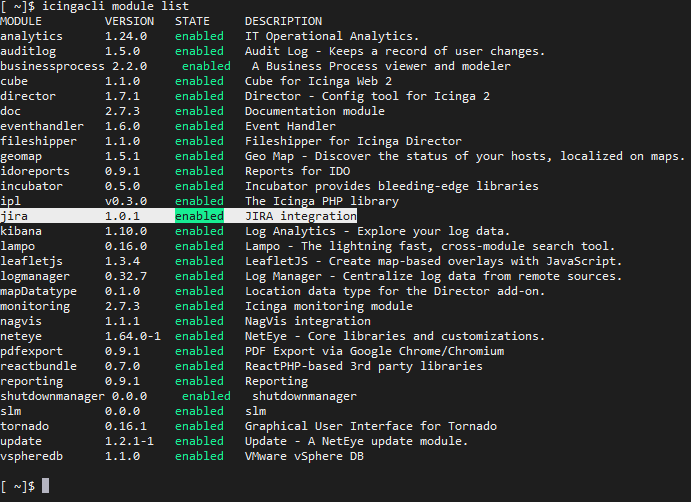
You can check for the correct outcome of the command by ensuring that the JIRA Integration is listed with all the modules reported by the command icingacli module list:
Now you can proceed to create the config file. Its name must be config.ini and it must be placed inside the directory /neteye/shared/icingaweb2/conf/modules/jira. You can use this as a template for customization:
[api]
host = "<Jira Service Desk FQDN>"
; port = 443
; path = "/"
; scheme = "https"
username = "<Jira User Email>"
password = "<Jira User API Token>"

[ui]
; default_project = "<Project ID – Its optional>"
; default_issuetype = "<Issue type – Its optional>"

[icingaweb]
url = <URL to your NetEye>
Here you can find an example of a compiler config file. Do not use this exact file, it’s just an example and they will obviously not work. You’ll need to fill in your own values:
[api]
host = "mysite.atlassian.net"
; port = 443
; path = "/"
; scheme = "https"
username = "jira.integration@mydomain.com"
password = "Pod1y1DeDDcxCEdIbOxq0HxI"

[ui]
; default_project = "SO"
; default_issuetype = "Event"

[icingaweb]
url = "https://myneteye.mydomain.local/neteye"
To activate the current configuration, just restart your NetEye 4 using the classic neteye stop and neteye start commands.
If you want to dig further into the options of the config file, just follow this link.
Try Using the Module
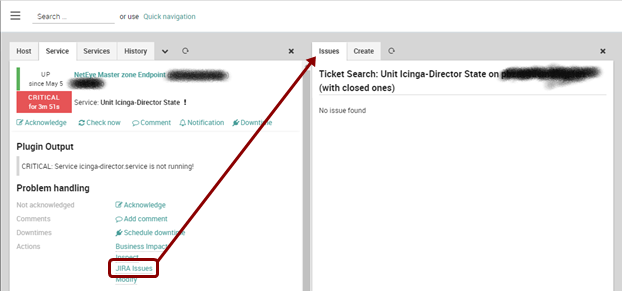
Now you can go look for every Host or Service you have inside the Monitoring module. On each of them, you will find a new JIRA Issues action. Clicking on it will take you to a Panel showing the list of actually opened Issues for the current Host or Service.
And, if you move on to the Create tab, you have a pre-compiled module that will allow you to create a new Issue on the fly. If you don’t like the defaults, you can always customize them. As you can see, inside the description, links to the monitored items are provided so you can always go back to the monitored objects directly from Jira.
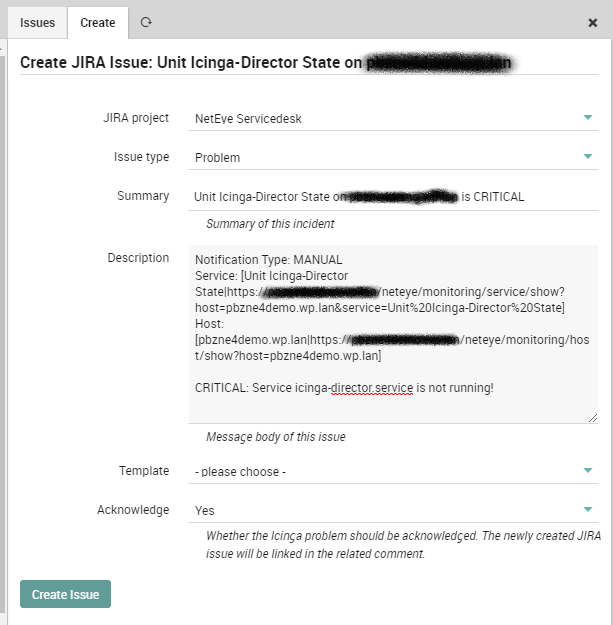
Right after creation, you can view the new Issue on the Issues tab with all the Issues already opened for the current object, or you can view all the opened Issues for all monitored objects on the Jira Menu item.
Author
Latest posts by Rocco Pezzani
22. 05. 2026
NetEye, NetEye Extension Packs
NEP and Upgrading to NetEye 4.48
18. 03. 2025
Icinga Web 2, ITOA, NetEye, UI, Unified Monitoring
A First Step towards Multitenancy in Icinga 2
31. 12. 2024
Business Service Monitoring, ITOA, NetEye, SLM, Unified Monitoring
Display a Service’s Availability with ITOA
30. 11. 2024
Business Service Monitoring, NetEye, Unified Monitoring
The Story of a Strange Business Process